Making Lead White (Flake White) — The Dutch Stack Process for the Most Important Pigment in Oil Painting History
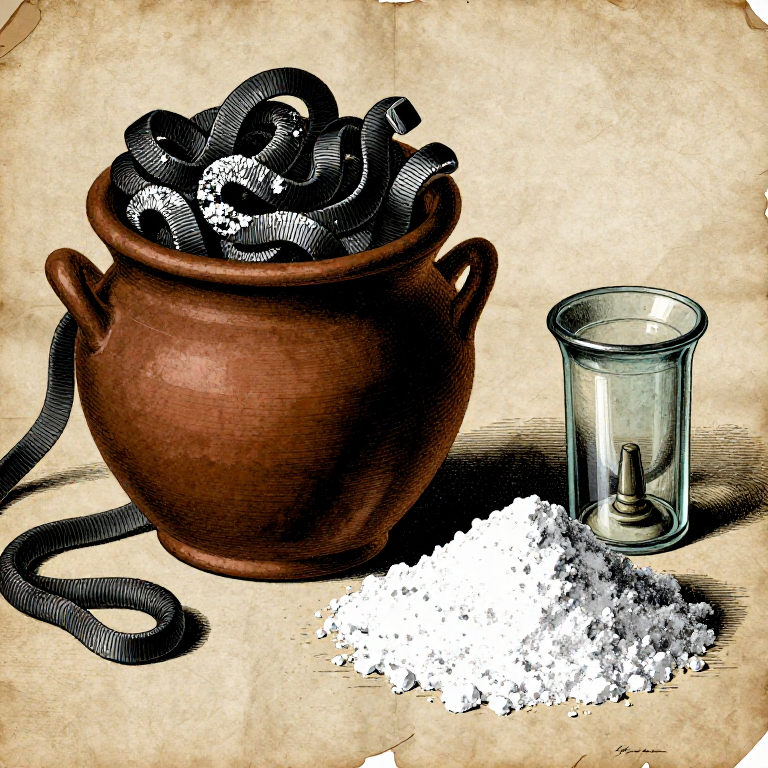
Lead white (basic lead carbonate, 2PbCO₃·Pb(OH)₂) was the only white pigment available to painters from antiquity until zinc white appeared in the late 18th century — and it remained the preferred white for oil painting well into the 20th century. No other white pigment matches its combination of opacity, warmth, buttery handling, and ability to form a tough, flexible paint film. The Greek historian Theophrastus described its manufacture around 300 BC, and the process changed remarkably little in over two thousand years.
The Dutch stack process (stapelproces) was the industrial-scale version developed in the Netherlands by the 17th century. Lead strips are coiled and placed in earthenware pots with vinegar at the bottom. The pots are stacked in beds of composting horse dung, which generates gentle warmth (35-50°C) and carbon dioxide. Acetic acid vapour from the vinegar attacks the lead surface, forming lead acetate, which then reacts with CO₂ and moisture to form basic lead carbonate — the brilliant, dense white pigment.
SAFETY WARNING: Lead is a powerful cumulative neurotoxin. There is NO safe level of lead exposure. Lead white dust must NEVER be inhaled or ingested. All handling must be done with a P100 respirator, chemical splash goggles, and gloves. Never eat, drink, or smoke in the work area. Keep lead white WET during grinding to suppress dust. Wash hands and equipment thoroughly after use. Dispose of all waste water and materials as hazardous waste. Children and pregnant women must not be present during any stage of production. This blueprint is for historical and educational purposes — use extreme caution.
අනතුරුදායක අන්තර්ගතය
මෙම බ්ලූප්රින්ට් එකෙහි අනතුරුදායක ක්රියාපටිපාටි ඇතුළත් වේ. පියවරෙන් පියවර උපදෙස් බැලීමට පුරනය වී ඔබේ ගිණුම් සැකසීම්වල අනතුරුදායක අන්තර්ගතය සක්රිය කරන්න.
සම්බන්ධ බ්ලූප්රින්ට්
මෙම බ්ලූප්රින්ට් දැනුම බෙදා ගනී — ශිල්ප ක්රම, ද්රව්ය හෝ මූලධර්ම

Making Oil Paint from Raw Pigments — Grinding Pigments in Linseed Oil
Charlie විසින්![]()
ART

Making Egg Tempera Paint — The Medieval Panel Painting Medium
Charlie විසින්![]()
ART
Making Encaustic Paint — The Hot Beeswax Medium of Ancient Greek and Egyptian Painters
Charlie විසින්![]()
ART

Making Traditional Gesso — The White Ground That Prepared Every Panel Painting in History
Charlie විසින්![]()
ART

Making Lampblack Pigment — Collecting Carbon Soot from a Burning Flame
Charlie විසින්![]()
ART

Making Ultramarine from Lapis Lazuli — Extracting the Most Precious Pigment in History
Charlie විසින්![]()
ART

Making Verdigris — The Copper Acetate Green of Medieval Painters
Charlie විසින්![]()
ART

Making Cinnabar Red Pigment — Grinding Mercury Sulfide into the Most Vivid Red of the Ancient World
Charlie විසින්![]()
ART

Making Malachite Green Pigment — Grinding the Copper Mineral into Painter's Green
Charlie විසින්![]()
ART

Making Lime Wash — The Oldest and Simplest Wall Paint in the World
Charlie විසින්![]()
ART

Making Casein Paint from Milk and Lime — The Ancient Protein-Based Wall Paint
Charlie විසින්![]()
ART

Painting a Buon Fresco on Wet Lime Plaster — Roman Wall Painting
Charlie විසින්![]()
Masonry

Making Lithopone — The Co-Precipitated White Pigment of the Industrial Age
Charlie විසින්![]()
ART
CC0 පොදු වසම
මෙම බ්ලූප්රින්ට් CC0 යටතේ නිකුත් කර ඇත. ඔබට අවසර නොමැතිව පිටපත් කිරීම, වෙනස් කිරීම, බෙදා හැරීම සහ භාවිතා කිරීම කළ හැක.
බ්ලූප්රින්ට් හරහා නිෂ්පාදන මිලදී ගැනීමෙන් නිර්මාතෘට සහාය වන්න නිර්මාතෘ කොමිසම විකුණුම්කරුවන් විසින් නියම කළ, හෝ මෙම බ්ලූප්රින්ට්හි නව අනුවාදයක් සාදා ආදායම බෙදා ගැනීමට ඔබේ බ්ලූප්රින්ට්හි සම්බන්ධතාවයක් ලෙස ඇතුළත් කරන්න.