SZTUKA
Piękno i dobre samopoczucie
RZEMIOSŁO
KULTURA I HISTORIA
ROZRYWKA
ŚRODOWISKO
JEDZENIE I NAPOJE
INŻYNIERIA ODWROTNA
NAUKI
LEKKOATLETYKA
TECHNOLOGIA
URZĄDZENIA DO NOSZENIA
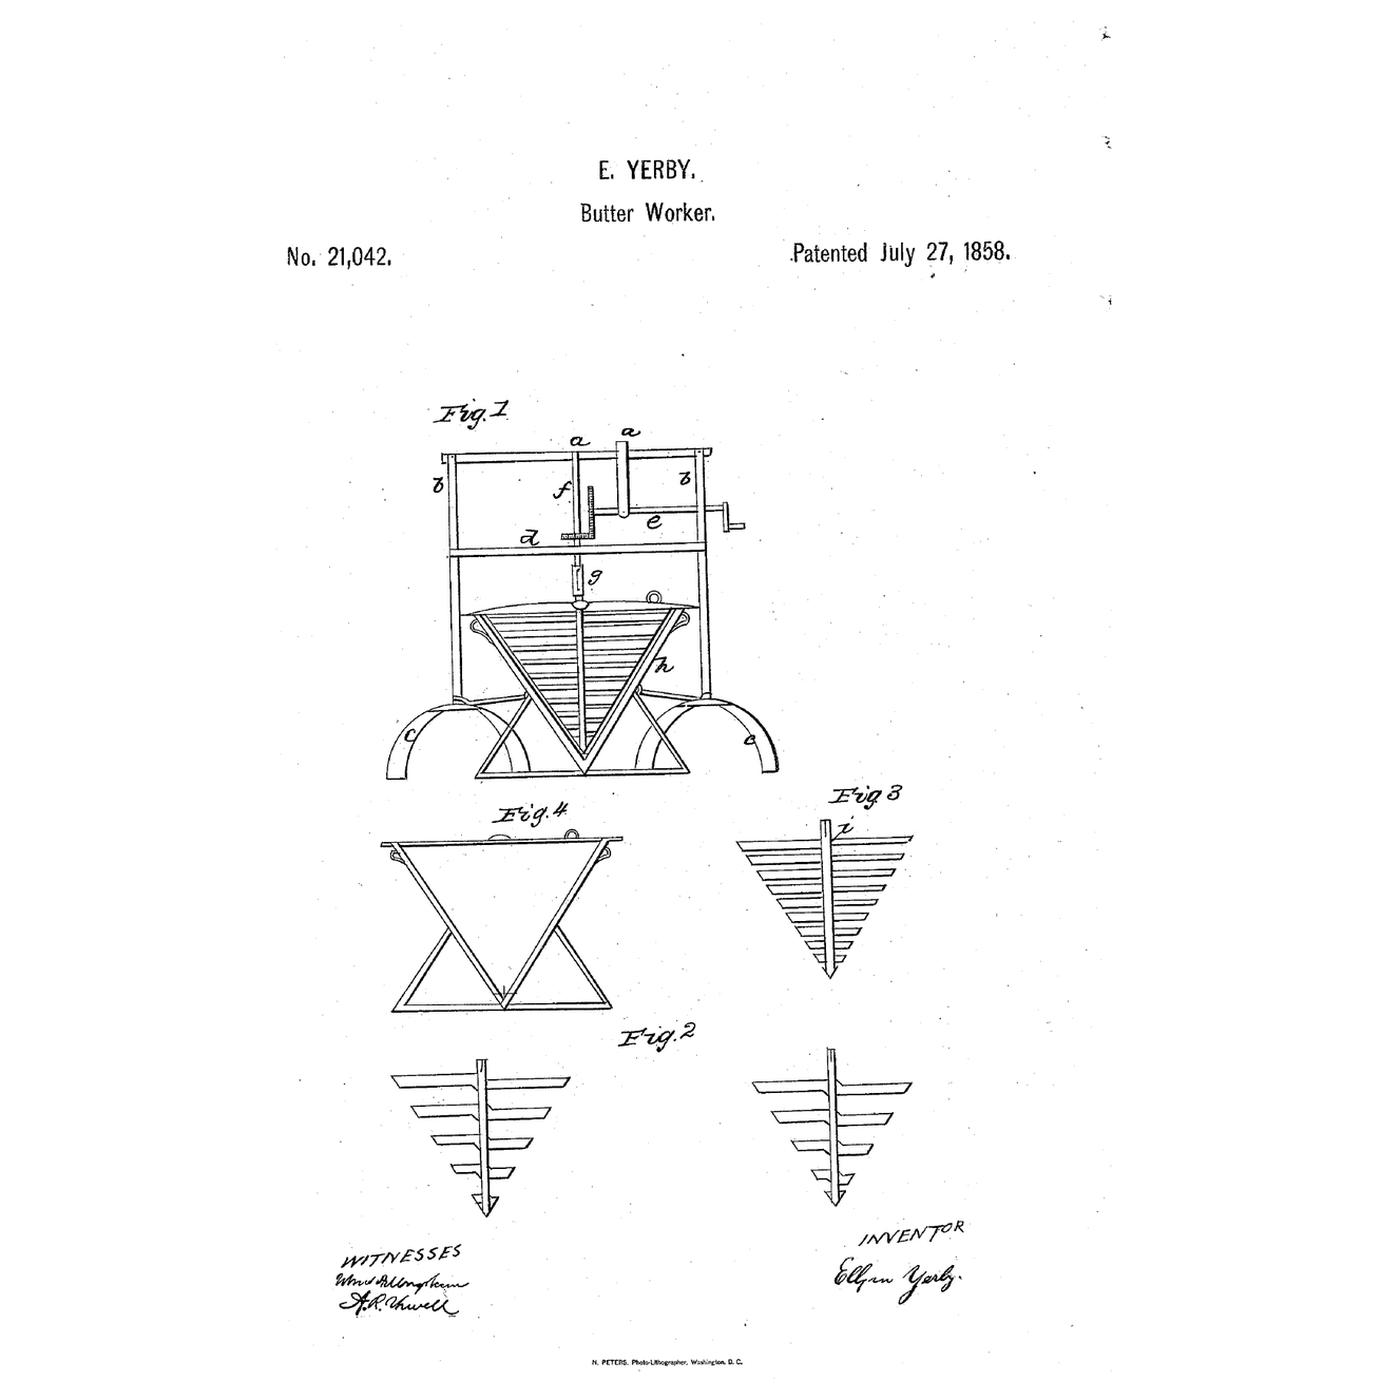


Conical-Pan Batter Machine: A Geared Beater Shaped to Its Cone Beats Batter, or Churns Butter
Ellyson Yerby of Washington, District of Columbia, received US 21,042, dated 27 July 1858, for a "batter machine": a crank and bevel gears in a standing frame turn a conical beater in a conical pan, which turns on a spindle in the pan's point. One beater, of stepped blades, makes cake batter; another, with flat sides, churns butter. The beater's part of the shaft unhooks so the pan comes away.
This rung builds the frame in pine and prints the pan, beaters and gearing at tabletop scale.
Zaawansowany
About 5 hours, plus printing
Instrukcje
1
1
Gearing and the pan
Gearing and the pan
Wczytywanie notatnika Jupyter…
2
2
Geared beaters, before it
Geared beaters, before it
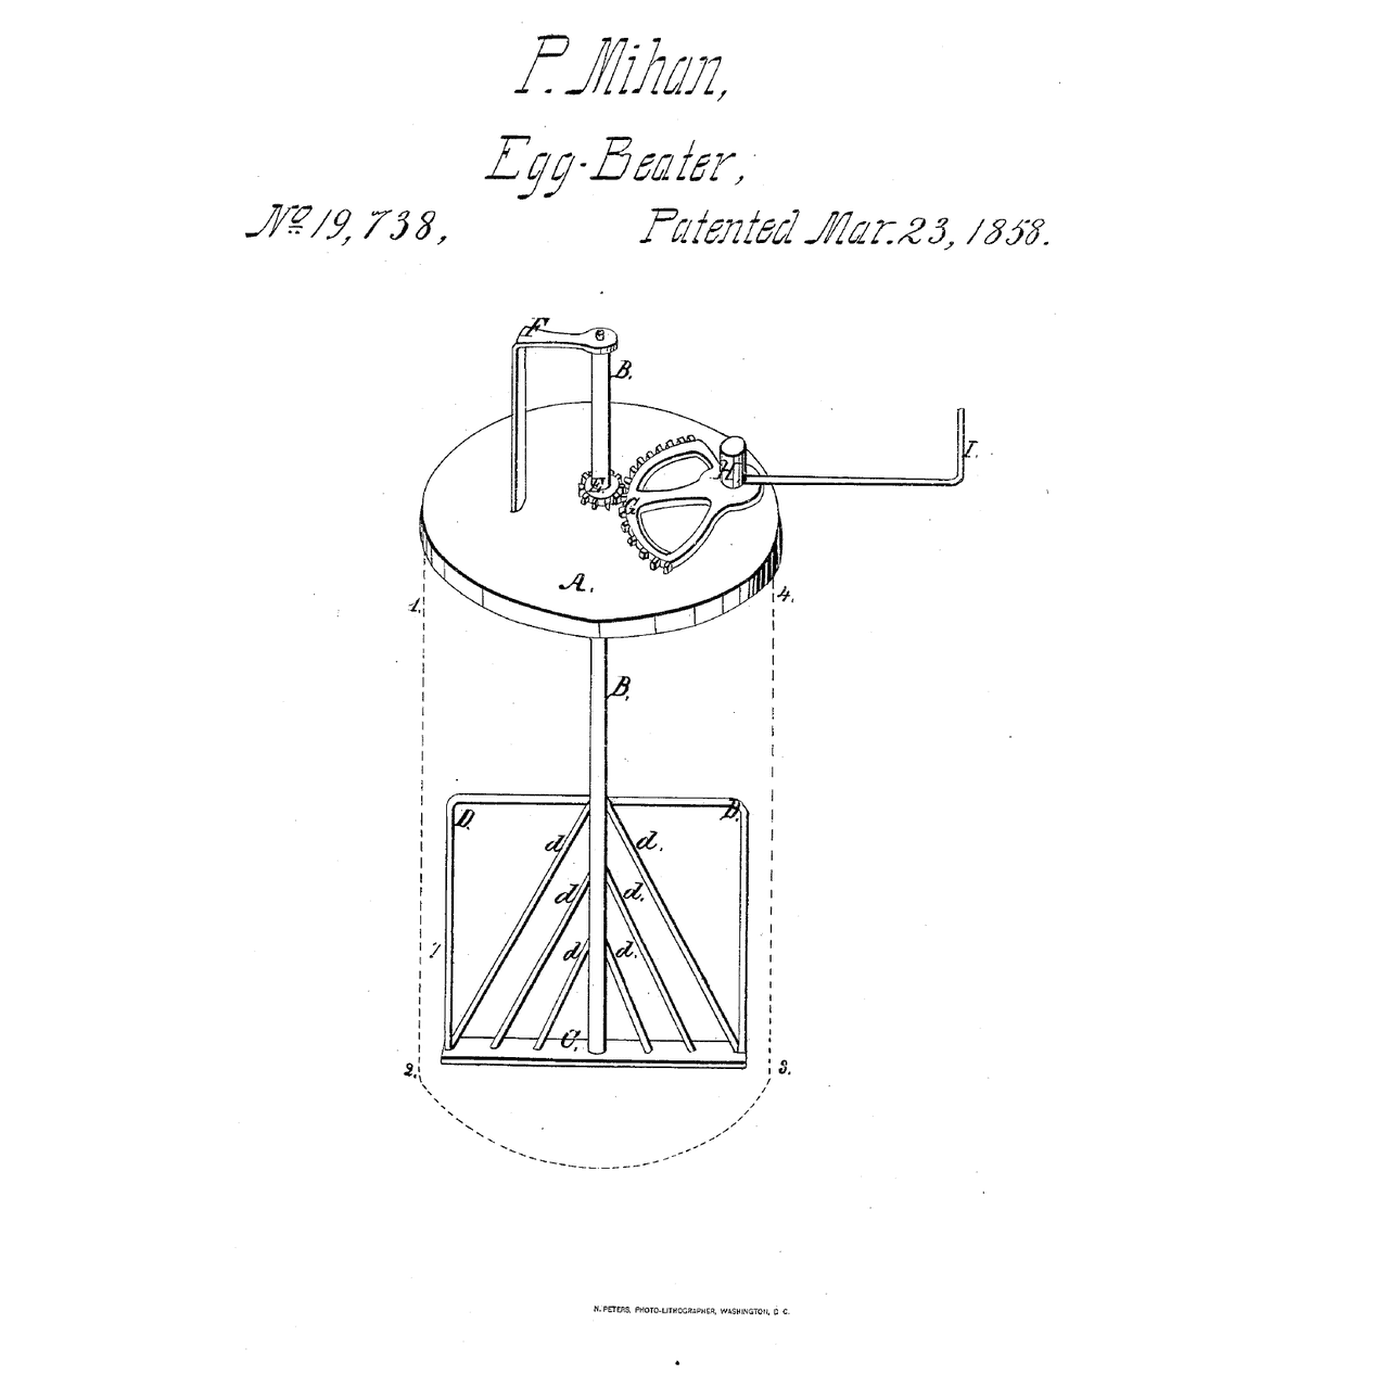
Mihan's beaters stood in an open vessel; Yerby shapes his beater to a conical pan that turns it on a spindle.
3
3
Read US 21,042
Read US 21,042
"The eggs and sugar are first put into the pan and beaten about five minutes, then add your butter, then beat about three minutes then add your flour as required which will insure in twenty minutes a good cake."
4
4
Print the parts
Print the parts
Print the pan (/uploads/blueprints/conical-pan-batter-machine-pan.stl) rim down, the batter beater (/uploads/blueprints/conical-pan-batter-machine-batter-beater.stl) with supports, the butter beater (/uploads/blueprints/conical-pan-batter-machine-butter-beater.stl), the tongue (/uploads/blueprints/conical-pan-batter-machine-tongue.stl), the slide (/uploads/blueprints/conical-pan-batter-machine-slide.stl), the pinion (/uploads/blueprints/conical-pan-batter-machine-pinion.stl), the wheel (/uploads/blueprints/conical-pan-batter-machine-wheel.stl) and the crank (/uploads/blueprints/conical-pan-batter-machine-crank.stl). Print in PETG at 0.2 mm layers, 30 % infill, 4 walls; wash before first use.
Materiały do tego kroku:
 Filament PETG1 sztuka
Potrzebne narzędzia:
 Drukarka 3D z filamentem (FDM)
5
5
The frame
The frame
From 18 mm pine, cut two uprights 40 mm wide and 330 mm long, two feet 200 mm long and 40 mm deep with an arch sawn out underneath, a head 236 mm long and a brace 200 mm long, both 40 mm wide. Glue and screw each upright onto a foot, the head across their tops and the brace between them 210 mm up. Drill a 10.5 mm hole down through the middle of the head and the brace, and one across through the right upright 270 mm up, with a pine block 30 mm thick glued inside it as a longer bearing.
Materiały do tego kroku:
 Deska sosnowa1 sztuka
 Klej do drewna1 sztuka
 Wkręty do drewna1 sztuka
Potrzebne narzędzia:
 Piła ręczna
 Piłka włosowa
 Wiertarko-wkrętarka akumulatorowa
 Papier ścierny
 Zestaw wkrętaków
6
6
Shafts, gears and pan
Shafts, gears and pan
Push a 10 mm dowel 216 mm long down through the head and the brace as the upright shaft, fixing the pinion on it just under the head with an M3 screw drilled through, and fix the tongue's sleeve on its lower end the same way. Push a 10 mm dowel 132 mm long through the right upright as the crank shaft, press the wheel on its inner end to mesh the pinion and fix the crank outside with an M3 screw. Screw an M4 screw up through the pan's point as the spindle, stand the pan between the uprights and hook it to them with two hooks and eyes through its loops.
Materiały do tego kroku:
 Kołki z twardego drewna1 sztuka
 Śruby maszynowe1 sztuka
 Haftka1 sztuka
Potrzebne narzędzia:
Piła ręcznaWiertarko-wkrętarka akumulatorowaZestaw wkrętaków7
7
The build in 3D
The build in 3D
FreeCAD model of this build: the pine frame on arched feet, the crank shaft and wheel, the pinion on the upright shaft, the joint with its tongue and slide, the stepped batter beater on the spindle, and the conical pan on three legs.
8
8
Churn butter
Churn butter
Set the butter beater on the spindle, slip the tongue into its slot, push an M3 screw through as the pin and drop the slide over the joint. Pour in 300 ml of heavy cream at about 15 °C, checked with the thermometer, and turn the crank steadily, timing it with the stopwatch. When the butter comes, lift the slide, take out the pin and unhook the pan. Pour off the buttermilk, wash the butter in cold water until it runs clear, salt and weigh it.
Materiały do tego kroku:
 Śmietanka kremówka300 ml
 Sól morska gruboziarnista1 sztuka
 Woda1 sztuka
Potrzebne narzędzia:
 Termometr z sondą pozostawianą w potrawie
 Stoper
 Cyfrowa waga kuchenna
 Duża misa ze stali nierdzewnej
9
9
Beat batter
Beat batter
Fit the batter beater the same way. In Yerby's order: beat 2 eggs with 100 g sugar about five minutes, add 100 g soft butter and beat about three minutes more, then add 100 g flour and beat until smooth. Scrape the batter out with the spatula. The amounts are ours, sized to the pan.
Materiały do tego kroku:
 Jajo2 sztuk
 Cukier kryształ100 g
 Masło100 g
 Mąka uniwersalna100 g
Potrzebne narzędzia:
Cyfrowa waga kuchenna Łopatka
10
10
Troubleshooting
Troubleshooting
Batter machine troubleshooting.
Flow
Loading...
11
11
History and honest limits
History and honest limits
**Ellyson Yerby** of Washington, District of Columbia, US 21,042, 27 July 1858, for a machine for "All Kinds of Batter and for Churning Butter". He cast lead into the pan's point to steady the spindle; we do not, as lead has no place near food. His detached shaft was joined by a piece of sheet iron through an incision, held by a pin and a metal slide. He wrote that the machine makes the batter for a pound cake in twenty minutes and churns butter in ten. Our frame, sizes, pan legs and printed parts are ours, and our times are not tested against his. FDM prints hold food in their layer lines, so wash well and replace when worn.
Materiały
14- 1 sztukaZastępnik
- 1 sztukaZastępnik
- 1 sztukaZastępnik
- 1 sztukaZastępnik
- 1 sztukaZastępnik
- 1 sztukaZastępnik
- 1 sztukaZastępnik
- 300 mlZastępnik
- 1 sztukaZastępnik
- 1 sztukaZastępnik
- 2 sztukZastępnik
- 100 gZastępnik
- 100 gZastępnik
- 100 gZastępnik
Wymagane narzędzia
11- Zastępnik
- Zastępnik
- Zastępnik
- 1 vendor sell this, none ship to you yetZastępnik
- Zastępnik
- Zastępnik
- Zastępnik
- Zastępnik
- Zastępnik
- Zastępnik
Pliki projektowe
1Powiązane blueprinty
Te blueprinty dzielą się wiedzą — technikami, materiałami lub zasadami



CC0 Domena publiczna
Ten plan jest udostępniany na licencji CC0. Możesz go swobodnie kopiować, modyfikować, rozpowszechniać i wykorzystywać do dowolnych celów, bez konieczności uzyskiwania zgody.
Wesprzyj Makera kupując produkty przez jego plan, za co zarabia Prowizja Makera ustalony przez sprzedawców, lub stwórz nową iterację tego planu i dołącz go jako połączenie w swoim własnym planie, aby dzielić się przychodami.