Współpraca
SZTUKA
Piękno i dobre samopoczucie
RZEMIOSŁO
KULTURA I HISTORIA
ROZRYWKA
ŚRODOWISKO
JEDZENIE I NAPOJE
INŻYNIERIA ODWROTNA
NAUKI
LEKKOATLETYKA
TECHNOLOGIA
URZĄDZENIA DO NOSZENIA
Hinged-Leaf Wing Dasher Churn: Turn One Way to Churn, Reverse and a Leaf Opens to Gather the Butter
Buttercup

Autor

Buttercup

11. listopad 2026IE
6
0
0
0
0

Hinged-Leaf Wing Dasher Churn: Turn One Way to Churn, Reverse and a Leaf Opens to Gather the Butter

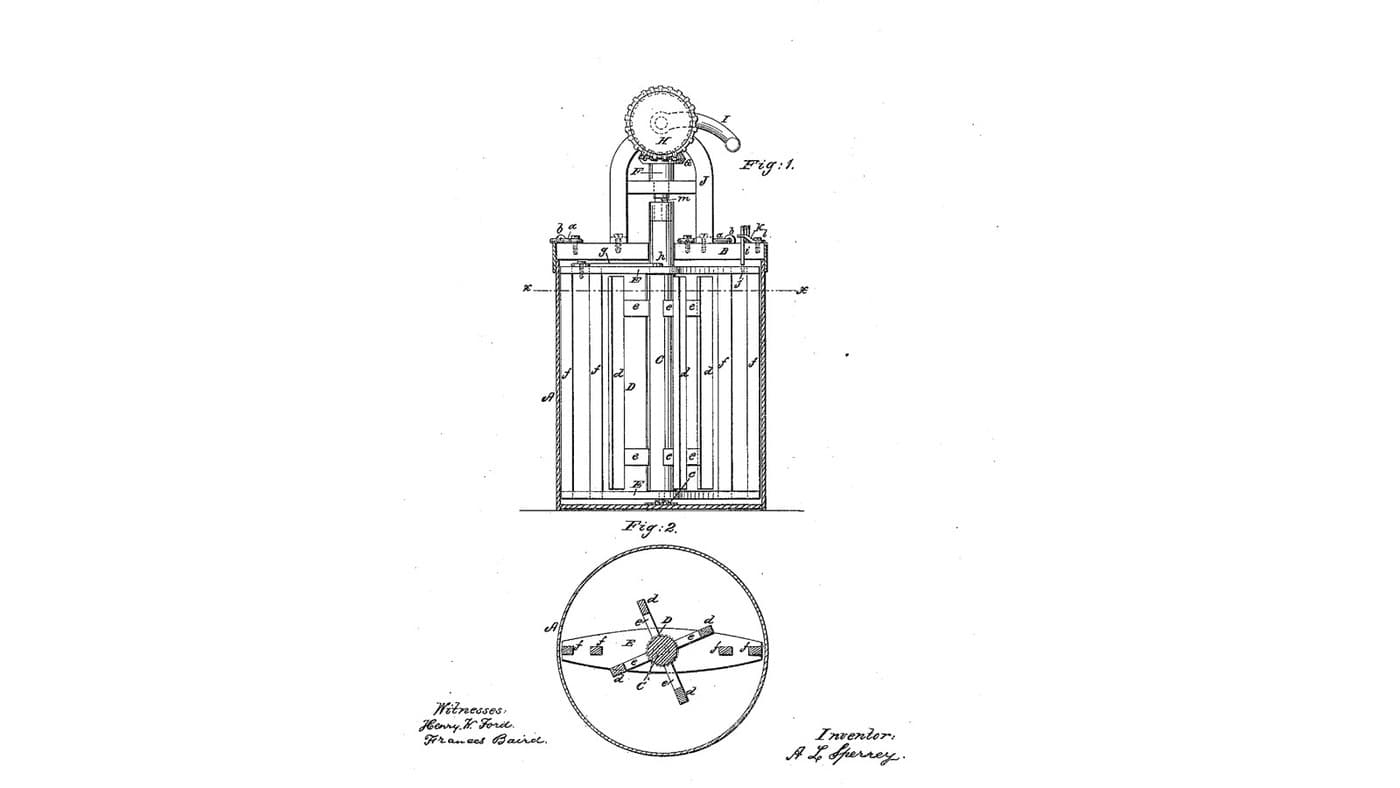
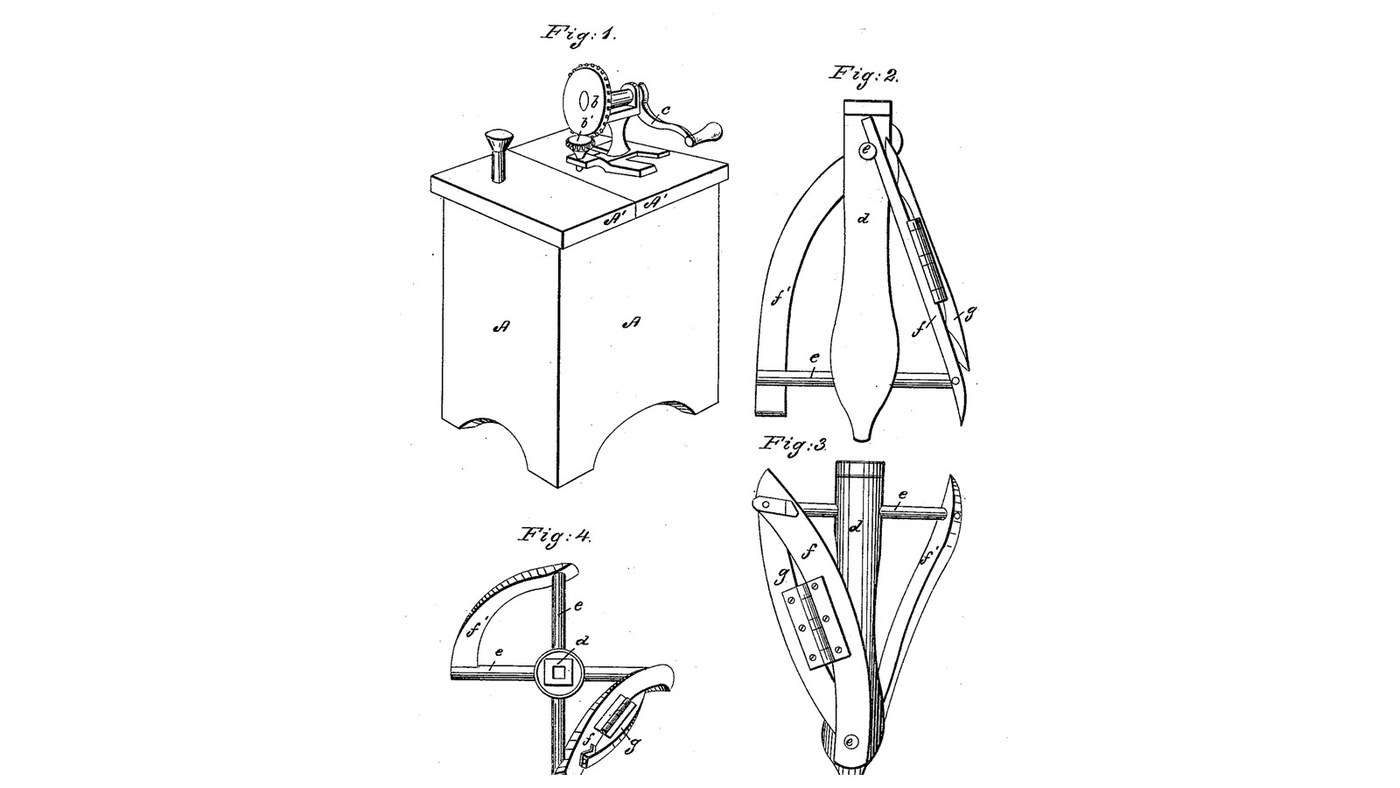
Malachi B. Hassler of Columbia City, Indiana, received US 25,410, dated 13 September 1859, for a churn dasher. A crank and a pair of wheels on the lid turn an upright dasher shaft. Two arms through the shaft carry two curved wings: one bowed outward near the shell, one bowed inward near the shaft. A curved leaf hinged to the inner wing lies folded while churning; turning the dasher the other way opens it, and it gathers the butter near the shell. The patent gives no sizes; every size here is ours.
Średniozaawansowany
About 2 days, plus printing

Instrukcje

1

Crank, wheels and wings

Wczytywanie notatnika Jupyter…
2

Reverse the dash to gather the butter, the same day

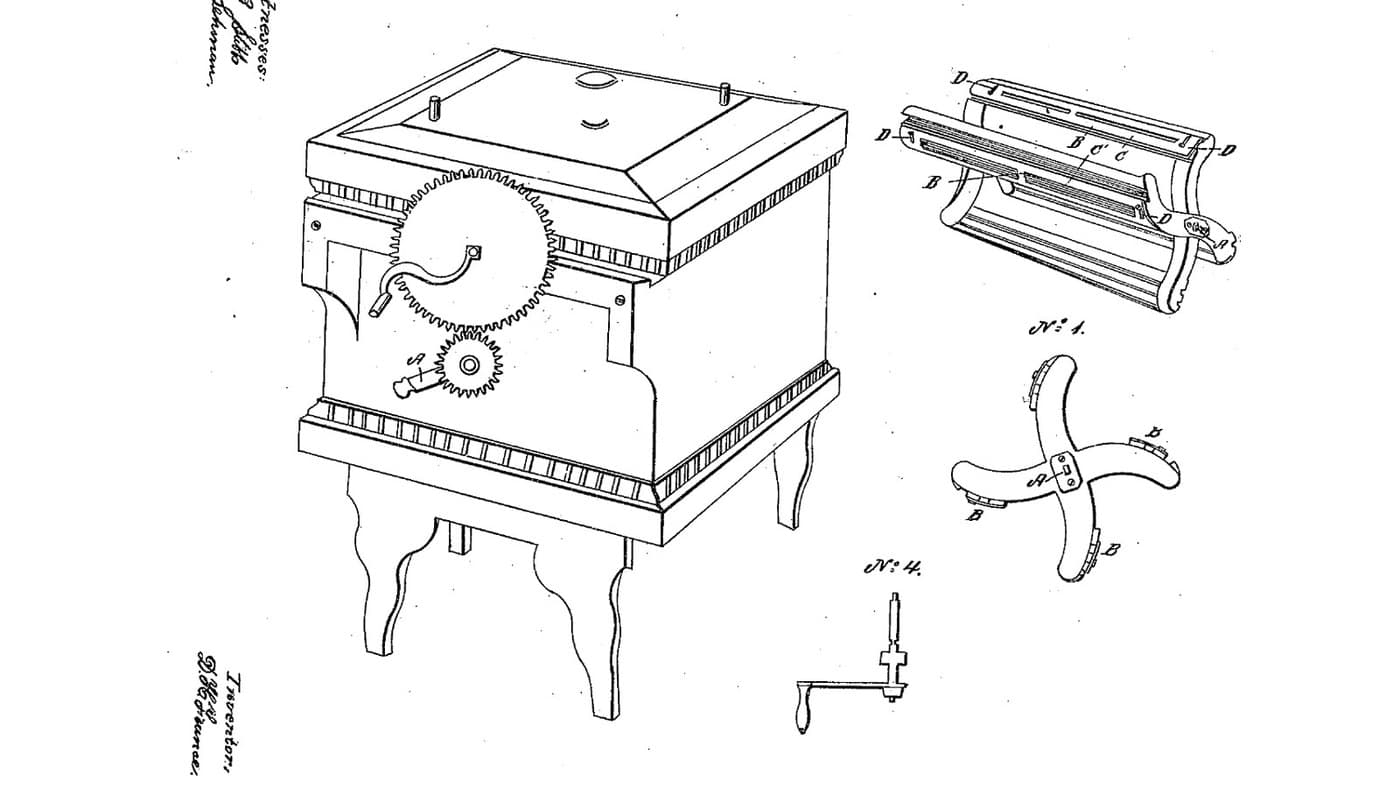
France's strips slide over the gaps when the dash is reversed. Hassler's leaf swings open.
3

Read US 25,410

"hinged to the wing (f) is a folding curved leaf (g), so arranged that it may be folded back upon the wing (f), during the process of churning, and when it may be desired to gather the butter; by reversing the motion of the dasher, the said leaf (g) may be opened as shown clearly in Fig. 3, and serve to gather the butter near the shell of the churn, while the wing (f) serves to secure it next to the shaft (d)"
4

Print the crown wheel b

Crown wheel, 36 teeth on its face, module 2, with a hub bored 12.4 mm and a cross hole for a pin. PETG, 0.2 mm layers, 40 % infill, 4 walls.
Plik projektowySTLCC0 - Free
5

Print the pinion b'

Spur pinion, 12 teeth, module 2, with a hub bored 12.4 mm and a cross hole for a pin. PETG, 0.2 mm layers, 40 % infill, 4 walls.
Plik projektowySTLCC0 - Free
6

Print the outer wing f'

The outer wing: a ribbon 36 x 12 mm turning a quarter round at 112 mm from the shaft as it falls 200 mm, convex outward. Print with tree supports. PETG, 0.2 mm layers, 40 % infill, 4 walls.
Plik projektowySTLCC0 - Free
7

Print the inner wing f

The inner wing: a ribbon 30 x 12 mm bowed in towards the shaft as it falls 200 mm. Print with tree supports. PETG, 0.2 mm layers, 40 % infill, 4 walls.
Plik projektowySTLCC0 - Free
8

Print the leaf g

The leaf: a curved ribbon 26 x 8 mm that lies on the inner wing's middle. Print with tree supports. PETG, 0.2 mm layers, 40 % infill, 4 walls.
Plik projektowySTLCC0 - Free
9

Shell A and lid A'

From 20 mm hardwood make a box 300 x 300 mm and 450 mm deep inside, its four sides carried 100 mm below the bottom and cut with an arch 180 mm wide, so they stand as legs. Glue a hardwood step 60 x 60 x 20 mm in the middle of the floor with a 20 mm hole 15 mm deep. Make the lid 380 x 380 mm in two halves, split 30 mm off centre, bore the larger half 13 mm in the middle, and give the smaller half a knob. Fill the box with water overnight so it swells tight, then empty it.

Materiały do tego kroku:

Deska z drewna liściastegoDeska z drewna liściastego3 sztuk
Klej do drewnaKlej do drewna1 sztuka
Wkręty do drewnaWkręty do drewna30 sztuk
Kołki z twardego drewnaKołki z twardego drewna1 sztuka

Potrzebne narzędzia:
Pilarka stołowaPilarka stołowa
WyrzynarkaWyrzynarka
Wiertarko-wkrętarka akumulatorowaWiertarko-wkrętarka akumulatorowa
Zestaw wiertełZestaw wierteł
Ścisk stolarski listwowyŚcisk stolarski listwowy
Kątownik stolarskiKątownik stolarski
Miara zwijanaMiara zwijana
WodaWoda
10

Gearing on the lid

Screw a hardwood bridge 80 x 56 x 25 mm over the lid's hole and two chairs 44 x 30 mm, 106 mm tall, in a line towards the front. Pass a 12 mm stainless shaft down through the bridge and lid, with the pinion pinned on top and a 16 mm square hardwood pin glued on below the lid. Pass a 12 mm stainless crank shaft through the chairs with the crown wheel pinned on, meshing with the pinion, and a hardwood crank c with a handle on its end.

Materiały do tego kroku:

Pręt ze stali nierdzewnejPręt ze stali nierdzewnej1 sztuka
Deska z drewna liściastegoDeska z drewna liściastego1 sztuka
Kołki z twardego drewnaKołki z twardego drewna1 sztuka
Klej do drewnaKlej do drewna1 sztuka
Wkręty do drewnaWkręty do drewna8 sztuk
Filament PETGFilament PETG1 sztuka

Potrzebne narzędzia:

Drukarka 3D z filamentem (FDM)Drukarka 3D z filamentem (FDM)
Piła do metaluPiła do metalu
Pilniki (pilnik ręczny)Pilniki (pilnik ręczny)
Wiertarko-wkrętarka akumulatorowaWiertarko-wkrętarka akumulatorowa
Zestaw wiertełZestaw wierteł
Zestaw wkrętakówZestaw wkrętaków
11

Dasher shaft d and arms e e

Turn a hardwood shaft 40 mm square and 435 mm long down to 18 mm across for its last 55 mm, tapering into the square over the 60 mm above. Cut a square socket 16.6 mm across and 35 mm deep in its top. Chisel a 20 mm mortise through it across where it will stand 260 mm above the box's floor, and another at right angles at 60 mm, and glue in two hardwood arms 20 mm square, 224 mm long.

Materiały do tego kroku:

Deska z drewna liściastegoDeska z drewna liściastego1 sztuka
Klej do drewnaKlej do drewna1 sztuka

Potrzebne narzędzia:

Tokarka do drewnaTokarka do drewna
Dłuto do gniazdDłuto do gniazd
Pobijak drewnianyPobijak drewniany
Piła ręcznaPiła ręczna
Papier ściernyPapier ścierny
Miara zwijanaMiara zwijana
12

Wings f f' and leaf g

Screw the outer wing from the upper arm's back tip down to the lower arm's left tip, bowed out, and the inner wing from the upper arm's front tip down to the lower arm's right tip, bowed in. Hinge the leaf to the inner wing's edge towards the box's corner with the small butt hinge, so it lies on the wing one way and swings out the other. Stand the dasher's foot in the step, put the lid on so the square pin drops into the socket.

Materiały do tego kroku:

Zawias meblowy czopowyZawias meblowy czopowy1 sztuka
Wkręty do drewnaWkręty do drewna8 sztuk

Potrzebne narzędzia:

Wiertarko-wkrętarka akumulatorowaWiertarko-wkrętarka akumulatorowa
Zestaw wiertełZestaw wierteł
Zestaw wkrętakówZestaw wkrętaków
13

The build in 3D

FreeCAD model of this build, one side and half of another cut away: the shell, the lid with the crown wheel, pinion and crank, and the dasher with its two arms, the two wings and the leaf (shown open). The dasher was turned through 16 angles with the leaf closed and open.
Plik projektowyBLENDCC0 - Free
14

Churn, then gather

Pour about 12 litres of heavy cream at about 15 °C into the box, checked with the thermometer, and put the lid on. Turn the crank the way that keeps the leaf folded on its wing, timing it. When the butter comes, turn the crank the other way so the leaf opens and gathers the butter. Lift the lid off, lift out the butter, drain the buttermilk, wash the butter in cold water until it runs clear, work in a pinch of salt and weigh it.

Materiały do tego kroku:

Śmietanka kremówkaŚmietanka kremówka12 l
Sól morska gruboziarnistaSól morska gruboziarnista1 sztuka
WodaWoda1 sztuka

Potrzebne narzędzia:

Termometr z sondą pozostawianą w potrawieTermometr z sondą pozostawianą w potrawie

StoperStoper
Cyfrowa waga kuchennaCyfrowa waga kuchenna
Duża misa ze stali nierdzewnejDuża misa ze stali nierdzewnej
15

Troubleshooting

Hinged-leaf churn troubleshooting.

Flow

Loading...
16

History and honest limits

**Malachi B. Hassler** of Columbia City, Indiana, US 25,410, 13 September 1859, "Churn". He claimed "the arrangement of the hinged curved leaf (g) in combination with the wings (f, f',)". The patent gives no sizes; every size here is ours. The wings' exact curves are read from his drawings; ours are printed.

Materiały

10

Wymagane narzędzia

21

Pliki projektowe

6

CC0 Domena publiczna

Ten plan jest udostępniany na licencji CC0. Możesz go swobodnie kopiować, modyfikować, rozpowszechniać i wykorzystywać do dowolnych celów, bez konieczności uzyskiwania zgody.

Wesprzyj Makera kupując produkty przez jego plan, za co zarabia Prowizja Makera ustalony przez sprzedawców, lub stwórz nową iterację tego planu i dołącz go jako połączenie w swoim własnym planie, aby dzielić się przychodami.

Dyskusja

(0)

Zaloguj się aby dołączyć do dyskusji

Ładowanie komentarzy...