Współpraca
SZTUKA
Piękno i dobre samopoczucie
RZEMIOSŁO
KULTURA I HISTORIA
ROZRYWKA
ŚRODOWISKO
JEDZENIE I NAPOJE
INŻYNIERIA ODWROTNA
NAUKI
LEKKOATLETYKA
TECHNOLOGIA
URZĄDZENIA DO NOSZENIA
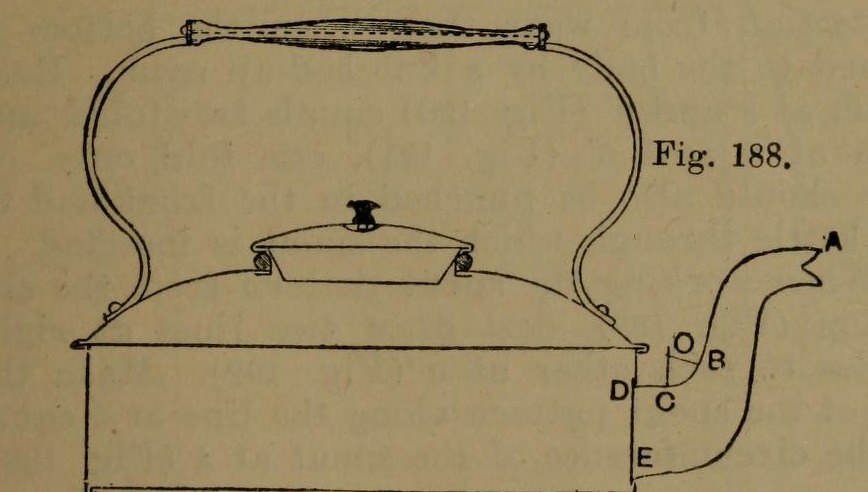


Stovetop Kettle: a Square Copper Kettle (Hasluck, 1907)
A tinsmith's square kettle in sheet copper, 9 x 9 in and 3 5/8 in deep: a box body with folded corner seams, a hollowed top pened on, a brazed and bent spout, a small cover, and a wooden handle on brass uprights.
Hasluck prefers copper; tinplate also works and is a separate route.
Source: Paul N. Hasluck, Tinplate Work (1907), pp. 91-98. Unknown: copper gauge, solder. Picture: Figs. 188-189 of the book.
Zaawansowany
Unknown
Instrukcje
1
1
Cut the patterns
Cut the patterns
For a body 9 x 9 x 3 5/8 in, cut two ends 9 1/2 x 4 in and two sides 9 1/4 x 4 in, notched for box seams at the corners (Figs. 190-191), with allowances to fold at top and bottom. Punch the spout hole in the front. Cut the bottom 9 1/2 in square, notched for a 1/4 in edge. Set out the top as a 10 1/2 in square with curved allowances for hollowing and a 4 in circle for the cover hole (Fig. 193); set out the spout from the elevation (Fig. 192), the cover and its cone-shaped rim (Figs. 194-195).
Materiały do tego kroku:
 Blacha miedziana1 body, bottom, top, spout, cover
Potrzebne narzędzia:
 Cyrkiel traserski
 Rysik traserski
 Nożyce do blachy
2
2
Braze and shape the spout
Braze and shape the spout
Thin the long edges by hammering. Set in the throat with a stretching hammer on a beak iron, bend the spout round until the edges overlap, bind it with wire, lay spelter and borax along the inside of the seam and braze it; then close and braze the under seam. Fill it with lead and bend the neck with a round-faced hammer on the hollowing block; file off spare spelter and smooth it. Run out the lead, throw off a seating round the large end, trim the top with snips and tin the inside.
Materiały do tego kroku:
 Nieznany metal1 spelter
 Cyna1 tinning
Potrzebne narzędzia:
 Młotek do planowania
 Palik
 Drut żelazny
 Boraks w proszku
 Palnik do lutowania twardego
 Ołów
 Cedzak dziurkowany
 Klocek z drewna twardego
 Pilnik do metaluNożyce do blachy
3
3
Fold and seam the body
Fold and seam the body
Fold the top edges square, the front and back outwards and the sides likewise; fold the bottom edges right over inwards to take the bottom (Fig. 188). Hook each side's end over the front's and work the corner seam on a straight-edged tool (Figs. 198-199). Turn up the bottom's 1/4 in edge, push it edge-down into the bottom folds, and solder the bottom and seams.
Materiały do tego kroku:
 Lut cynowo-ołowiowy1 sztuka
Potrzebne narzędzia:
 Pobijak drewnianyPalik
 Lutownica elektryczna
 Topnik
4
4
Hollow the top and make the cover
Hollow the top and make the cover
Hollow the top on the block: sink the four sides a little, hollow the corners with a bullet-faced hammer, flatten each side along the block edge, even the shoulder and smooth it all over. Pare the edges, mark the flange with an edging machine, set it down square with a hatchet stake and mallet, and take up an edge to fit over the body. Cut the cover hole with circular snips and fit a narrow wired rim, worked over inside. Make the cover: solder its cone rim to fit the wired rim, throw off a flange, hollow the cover disc and seam it on, and fix the knob.
Materiały do tego kroku:
Drut żelazny1 rimLut cynowo-ołowiowy1 sztukaNieznany metal1 cover knobPotrzebne narzędzia:
Młotek do planowaniaKlocek z drewna twardegoPalikPobijak drewnianyNożyce do blachyLutownica elektrycznaTopnik5
5
Handle, top and spout
Handle, top and spout
Cut two handle uprights from stout brass or copper band (Fig. 196), drill them for rivets and for the spindle that carries the wooden handle, and bend them to shape. Rivet them to the top and solder over the rivet heads inside. Pene the top down onto the body and solder along each edge. Push the spout through its hole from inside until its large end butts against the front, and solder it strongly from inside.
Materiały do tego kroku:
 Blacha mosiężna1 handle uprights
 Pręt mosiężny1 spindle
 Trzonek1 wood
 Nity miedziane1 number not givenLut cynowo-ołowiowy1 sztuka
Potrzebne narzędzia:
 Wiertarka ręczna
 Młotek nitowniczyPobijak drewnianyLutownica elektrycznaTopnik
Materiały
9- 1 body, bottom, top, spout, coverZastępnik
- 1 cover knobZastępnik
- 1 tinningZastępnik
- 3 sztukZastępnik
- 1 rimZastępnik
- 1 handle uprightsZastępnik
- 1 spindleZastępnik
- 1 woodZastępnik
- 1 number not givenZastępnik
Wymagane narzędzia
17- Zastępnik
- Zastępnik
- Zastępnik
- Zastępnik
- Zastępnik
- Zastępnik
- Zastępnik
- Zastępnik
- Zastępnik
- Zastępnik
- Zastępnik
- Zastępnik
- Zastępnik
- Zastępnik
- Zastępnik
- Zastępnik
- Zastępnik
Materiały z połączonych planów


Według tego planu powstaje
CC0 Domena publiczna
Ten plan jest udostępniany na licencji CC0. Możesz go swobodnie kopiować, modyfikować, rozpowszechniać i wykorzystywać do dowolnych celów, bez konieczności uzyskiwania zgody.
Wesprzyj Makera kupując produkty przez jego plan, za co zarabia Prowizja Makera ustalony przez sprzedawców, lub stwórz nową iterację tego planu i dołącz go jako połączenie w swoim własnym planie, aby dzielić się przychodami.