التعاون
فنون
الجمال والعناية
حِرَف
الثقافة والتاريخ
ترفيه
البيئة
الطعام والمشروبات
الهندسة العكسية
العلوم
رياضة
التقنية
الأجهزة القابلة للارتداء
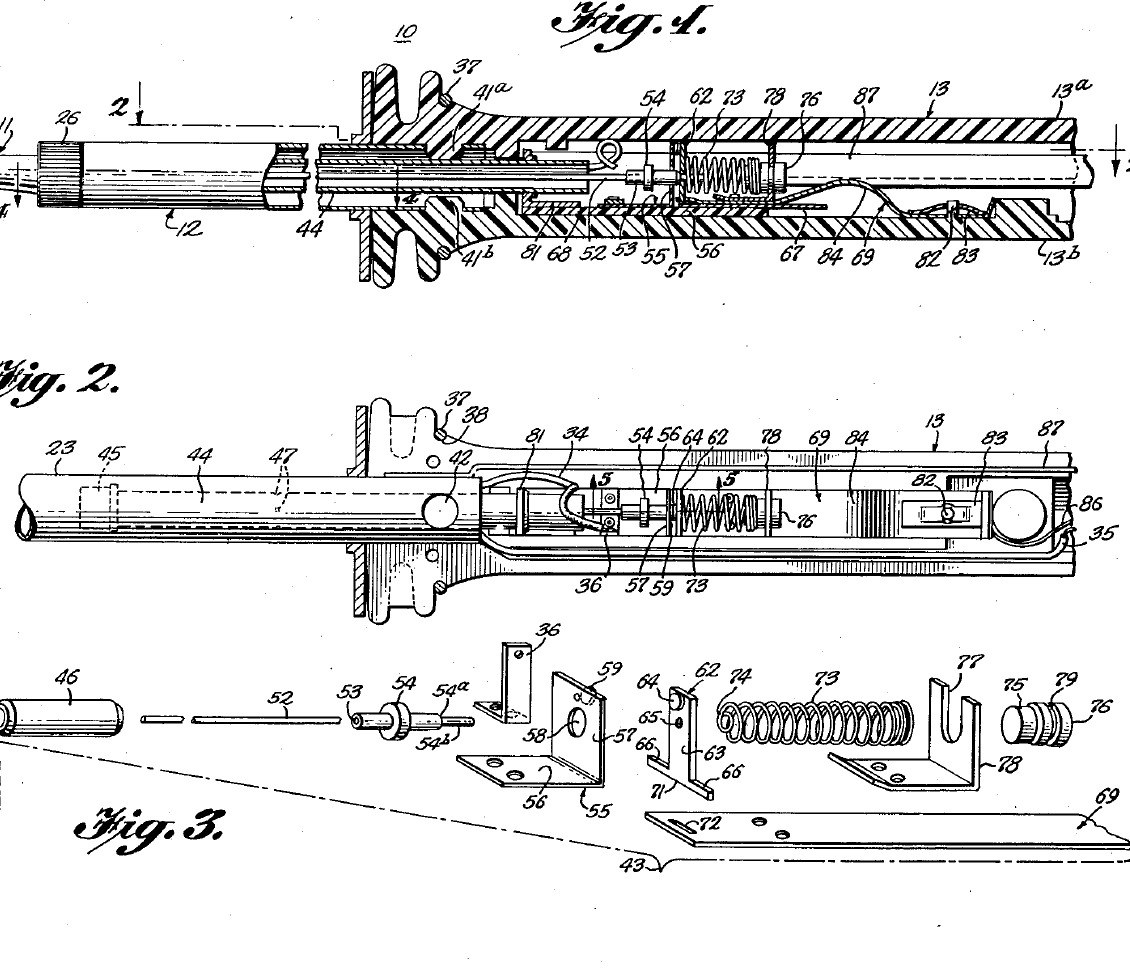


Soldering Iron: Temperature Controlled by a Curie-Point Tip and a Magnet Switch (Weller, US 3,188,448, 1965)
A soldering iron that holds its own tip temperature. At the back of the copper tip sits a slug of nickel-iron alloy that stops being magnetic above a set temperature (its Curie point). A small Alnico magnet behind it is pulled forward while the slug is cool, closing a switch that feeds the heater; once the tip is hot the slug lets go, a steel bushing pulls the magnet back and the switch opens. Swap tips to choose 600, 700 or 800 °F.
Result: a 55-watt temperature-controlled iron idling near 700 °F instead of running ever hotter.
Source: C. E. Weller, US 3,188,448 (1965). Unknown: the plating baths, the heater wire and insulation, most sizes. Picture: the patent drawing.
متقدم
Unknown
التعليمات
1
1
Make the tip and control slug
Make the tip and control slug
Turn the tip from tellurium copper: a cylindrical body, a taper and a chisel end (any shape suits the work). Plate it first with iron, which keeps the copper out of the molten solder, then with nickel, which shuts out the air. Bore its rear end and fit tightly into it the shank of a slug of thermomagnetic nickel-iron alloy, such as 48 % nickel, 3 % molybdenum and the rest iron, or about 43 % nickel and the rest iron. The alloy sets the control point: make tips for 600, 700 and 800 °F. Not given: the plating baths, sizes.
المواد لهذه الخطوة:
 قضيب نحاس بالتيلوريوم1 tip
 سبيكة نيكل-حديد حرارية مغناطيسية1 control slug
الأدوات المطلوبة:
 مخرطة معادن
 طقم طلاء كهربائي
 أبعاد غير معروفة
2
2
Wind the heater barrel
Wind the heater barrel
Make the barrel of two stainless steel tubes: an inner spool the tip slides into snugly, and an outer cover tube joined to it at the front, with a thread and screw cap to hold the tip. In the space between them wind the heater from one length of resistance wire: an inner layer, then an outer layer wound the opposite way so their fields cancel, with insulating sheet inside, between and outside the layers. Silver-solder heat-resistant leads to its ends. Ours: nichrome wire. Not given: the insulating sheet, the turns.
المواد لهذه الخطوة:
 أنبوب من فولاذ مقاوم للصدأ2 spool and cover tube
 سلك نيكروم1 heater
 مادة عازلة غير معروفة1 three sheet layers
 معدن غير معروف1 leads
 سبيكة لحام فضية1 as needed
الأدوات المطلوبة:
 موقد بروبانمخرطة معادن
3
3
Build the magnet switch
Build the magnet switch
In a stainless steel sleeve about 2.4 in long, close the front with a non-magnetic thermal bushing. Behind it slides a cylindrical Alnico V magnet, then a non-magnetic spacer about 0.032 in thick, then a cold-drawn steel bushing about 0.50 in long held by dents in the sleeve; the magnet's stroke is about 0.015 in. A push rod runs from the magnet through the bushing to an insulator. On a melamine plate, hinge a moving contact between a thin conducting strip and a holding strip, facing a flexible contact; a spring of fourteen coils of 0.010 in music wire, 0.210 in across, presses the moving contact toward the flexible one. Rivet the spring bracket to the holding strip. Not given: the contact metals.
المواد لهذه الخطوة:
أنبوب من فولاذ مقاوم للصدأ1 sleeve مغناطيس ألنيكو1 قطعة
 قضيب فولاذ طري1 magnetic bushing, push rodمعدن غير معروف1 thermal bushing, spacer, contacts, strips, brackets
 مادة غير معروفة1 insulator
 لوح ميلامين1 base plate
 سلك فولاذ زنبركي1 0.010 in music wire spring
الأدوات المطلوبة:
مخرطة معادن طقم برشمة
 زرادية مستديرة الفك
4
4
Assemble the handle and use
Assemble the handle and use
Mould the handle in two plastic halves with a socket at the front whose bosses lock the cover tube. Lay in the switch unit, held only by the bowed tail of its holding strip on an anchor pin with a speed nut, so it floats and its thermal bushing presses on the tip's slug. Wire the heater, the switch and a ground lead from the cover tube to the cord. Rivet the halves near the butt and fit a split ring near the front. In use, below the control point the slug pulls the magnet forward and the spring closes the contacts; above it the steel bushing pulls the magnet back and the push rod opens them. At idle the heater runs only about 30 to 40 % of the time. Not given: the plastic.
المواد لهذه الخطوة:
مادة غير معروفة1 handle halvesمعدن غير معروف1 rivet, split ring, speed nut سلك مرن بقابس1 قطعة
الأدوات المطلوبة:
 آلة القولبة بالحقنطقم برشمة
المواد
13- عنصر نائب
- 1 control slugعنصر نائب
- 1 sleeveعنصر نائب
- 1 heaterعنصر نائب
- 1 three sheet layersعنصر نائب
- 1 rivet, split ring, speed nutعنصر نائب
- 1 as neededعنصر نائب
- 1 قطعةعنصر نائب
- 1 magnetic bushing, push rodعنصر نائب
- 1 handle halvesعنصر نائب
- 1 base plateعنصر نائب
- 1 0.010 in music wire springعنصر نائب
- 1 قطعةعنصر نائب
الأدوات المطلوبة
7- عنصر نائب
- عنصر نائب
- عنصر نائب
- عنصر نائب
- عنصر نائب
- عنصر نائب
- عنصر نائب
مواد المخططات المرتبطة

هذا المخطط يصنع

CC0 ملكية عامة
هذا المخطط مُصدر بموجب CC0. يحق لك نسخه وتعديله وتوزيعه واستخدامه لأي غرض، دون طلب إذن.
ادعم الصانع بشراء منتجات عبر مخططه حيث يكسب عمولة الصانع يحددها البائعون، أو أنشئ نسخة جديدة من هذا المخطط وضمّنه كرابط في مخططك لمشاركة الإيرادات.