İşbirliği
SANAT
GÜZELLİK & SAĞLIK
ZANAAT
KÜLTÜR & TARİH
EĞLENCE
ÇEVRE
YİYECEK & İÇECEK
TERS MÜHENDİSLİK
BİLİMLER
SPOR
TEKNOLOJİ
GİYİLEBİLİR ÜRÜNLER
Friction Plunger Churn: Cream Pumped Through Openings You Close a Little More as It Thickens
Buttercup

Oluşturan

Buttercup

10. Kasım 2026IE
6
0
0
0
0

Friction Plunger Churn: Cream Pumped Through Openings You Close a Little More as It Thickens

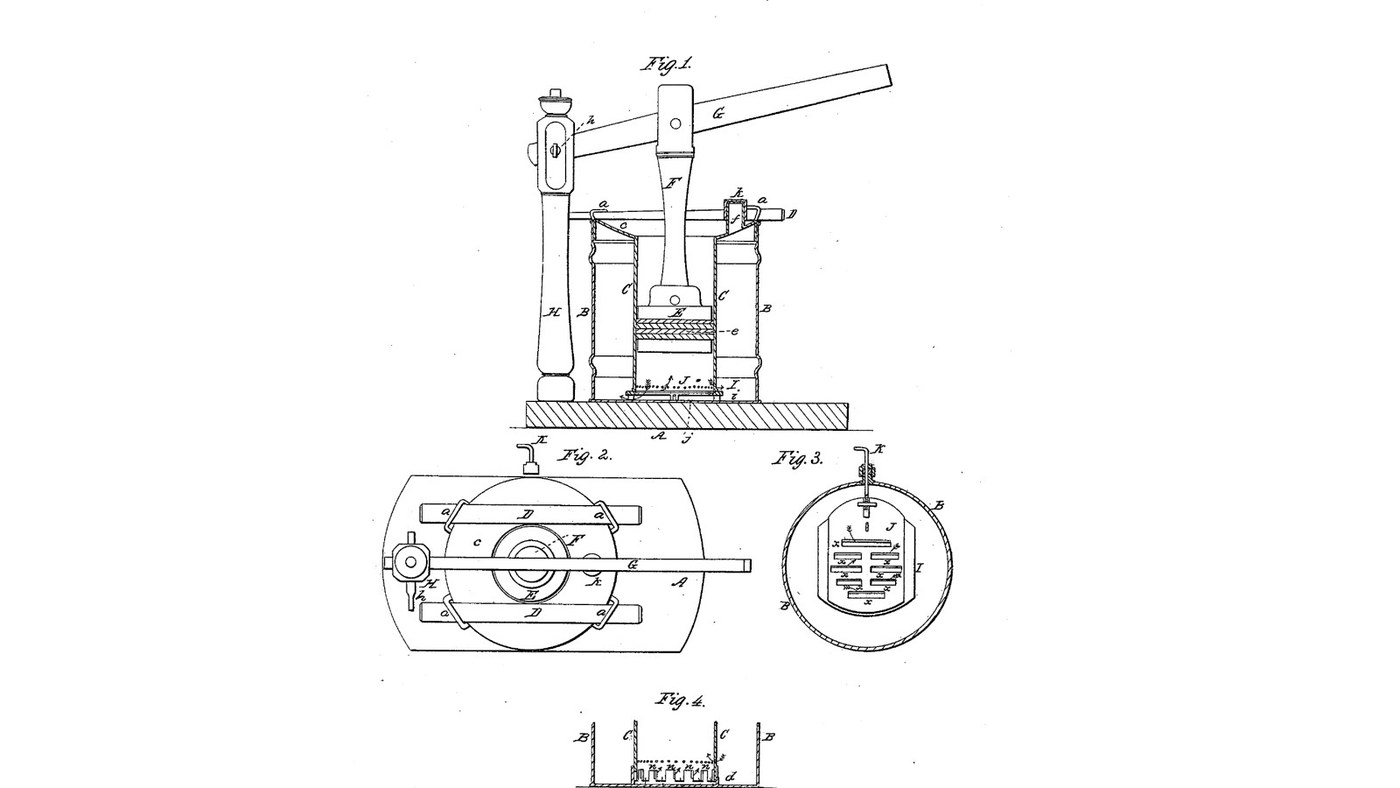
John J. Lehaye of Reading, Pennsylvania, received US 25,162, dated 16 August 1859, for a churn that works by friction. A hollow cylinder stands inside the cream vessel on two slotted plates. A packed plunger, worked by a long lever, draws the cream from the vessel into the cylinder through the slots and drives it back. A screw rod through a stuffing box in the vessel's side slides the upper plate, so the openings can be narrowed as the churning goes on. Lehaye gives no sizes; every size here is ours.
Orta
About 2 days, plus printing

Talimatlar

1

How hard the cream is rubbed through the openings

Jupyter defteri yükleniyor…
2

A piston that draws through a grate, the week before

Parker's beater pumped eggs through fixed openings. Lehaye's openings close a little more as the cream thickens.
3

Read US 25,162

"By causing the cream to pass and repass through contracted openings, and with considerable force, the friction of the cream against the edges of the openings has the effect of rapidly separating the butter from the whey at the same time the constant change in the course of the cream agitates the latter as effectually as the ordinary dashers."
4

Print the plate I

The 200 mm lower plate on four 20 mm legs i, with six 8 x 50 mm openings 18 mm apart and two guide flanges for plate J. Print it legs up. PETG, 0.2 mm layers, 30 % infill, 4 walls.
Tasarım DosyasıSTLCC0 - Free
5

Print the plate J

The 116 x 64 mm sliding plate with six openings matching plate I's and a boss at one end for rod K's nut. PETG, 0.2 mm layers, 30 % infill, 4 walls.
Tasarım DosyasıSTLCC0 - Free
6

Print the cylinder rings

One 86.5 mm ring of the cylinder C, 160 mm across with a 3 mm wall and a spigot on top. Print three. PETG, 0.2 mm layers, 30 % infill, 4 walls.
Tasarım DosyasıSTLCC0 - Free
7

Print the bottom cylinder ring

The bottom ring, with an 18 mm notch in its lower edge for rod K. PETG, 0.2 mm layers, 30 % infill, 4 walls.
Tasarım DosyasıSTLCC0 - Free
8

Print the plunger's upper plate

A 152 mm plate with a hub bored 6.4 mm across for rod F's pin. PETG, 0.2 mm layers, 30 % infill, 4 walls.
Tasarım DosyasıSTLCC0 - Free
9

Print the plunger's lower plate

The plain 152 mm plate with a 6.4 mm hole in the middle. PETG, 0.2 mm layers, 30 % infill, 4 walls.
Tasarım DosyasıSTLCC0 - Free
10

Print the stuffing box's inner half

The flanged boss that sits inside the bucket, with an O-ring groove in its face and two 4.4 mm screw holes. PETG, 0.2 mm layers, 30 % infill, 4 walls.
Tasarım DosyasıSTLCC0 - Free
11

Print the stuffing box's outer half

The flanged boss outside the bucket, with a groove in its bore for a 6 mm O-ring round rod K. PETG, 0.2 mm layers, 30 % infill, 4 walls.
Tasarım DosyasıSTLCC0 - Free
12

Print the vent tube

The 20 mm tube through the flange that lets the gases out. PETG, 0.2 mm layers, 30 % infill, 4 walls.
Tasarım DosyasıSTLCC0 - Free
13

Print the vent's cover k

The push-on cover for the vent tube. PETG, 0.2 mm layers, 30 % infill, 4 walls.
Tasarım DosyasıSTLCC0 - Free
14

Base A and column H

Cut an 18 mm plywood base 750 x 400 mm. Stand a hardwood column 70 x 70 mm, 643 mm tall, on it 290 mm from where the bucket's middle will be, glued and screwed from under the base. Saw a slot 24 mm wide and 100 mm deep in its top and bore it 12.4 mm across 40 mm below the top for the pin h.

Bu adım için malzemeler:

Kontrplak levhaKontrplak levha1 adet
Sert Ağaç TahtasıSert Ağaç Tahtası1 adet
Ahşap TutkalıAhşap Tutkalı1 adet
Ahşap vidalarAhşap vidalar6 adet

Gerekli aletler:

Dekupaj TestereDekupaj Testere
El TesteresiEl Testeresi
Marangoz keskileriMarangoz keskileri
Kablosuz MatkapKablosuz Matkap
Yassı matkap ucu takımıYassı matkap ucu takımı
Matkap Ucu TakımıMatkap Ucu Takımı
Marangoz gönyesiMarangoz gönyesi
Şerit MetreŞerit Metre
15

Bucket B and the stuffing box

Screw the bucket's floor to the base. Drill a 20.4 mm hole in its side 30 mm above the floor, facing away from the column, and two 4.4 mm holes 19 mm either side of it. Lay a 30 x 2 mm O-ring in the inner half's groove, fit the halves inside and outside the wall and draw them together with two stainless M4 screws and lock nuts. Fill the bucket with water to check the box does not leak, then empty it.

Bu adım için malzemeler:

20 Litrelik Kova20 Litrelik Kova1 adet
Ahşap vidalarAhşap vidalar4 adet
O-ring contaO-ring conta2 adet
Makine vidalarıMakine vidaları2 adet
Naylon Fiberli Emniyet SomunuNaylon Fiberli Emniyet Somunu2 adet
PETG filamentPETG filament1 adet

Gerekli aletler:

FDM 3B yazıcıFDM 3B yazıcı
Kablosuz MatkapKablosuz Matkap
Yassı matkap ucu takımıYassı matkap ucu takımı
Matkap Ucu TakımıMatkap Ucu Takımı
Tornavida takımıTornavida takımı
Kurbağacık anahtarKurbağacık anahtar
SuSu
16

Plates I and J, and rod K

Press an M6 nut into plate J's boss. Lay J on plate I between its flanges and stand I on its legs in the middle of the bucket's floor. Cut 170 mm of M6 stainless threaded rod, bend 40 mm of one end to an L for a handle, push the straight end in through the stuffing box with a 6 mm O-ring in its bore and screw it into J's nut. Turn K both ways: J slides until its openings line up with I's, and closes them after 8 mm.

Bu adım için malzemeler:

Altıgen SomunAltıgen Somun1 adet
Dişli milDişli mil1 adet
O-ring contaO-ring conta1 adet

Gerekli aletler:

Demir TesteresiDemir Testeresi
Tezgah MengenesiTezgah Mengenesi
Kurbağacık anahtarKurbağacık anahtar
17

Cylinder C, flange c, staples and wedges

Stack the four rings on plate I, the notched one at the bottom over rod K. Cut the flange from 12 mm plywood, a ring 304 mm across with a 154 mm hole, and bore a 16 mm hole 125 mm from its middle for the vent. Set it on the bucket's rim over the cylinder's top. Fit four stainless U-bolts through the bucket wall just under the rim, two each side, and drive two tapered hardwood wedges, 340 x 30 mm and 16 mm at their thick end, through them over the flange so it presses the cylinder down on the plates. Push the vent tube into its hole and its cover on top.

Bu adım için malzemeler:

Kontrplak levhaKontrplak levha1 adet
U cıvatasıU cıvatası4 adet
Sert Ağaç TahtasıSert Ağaç Tahtası1 adet
PETG filamentPETG filament1 adet

Gerekli aletler:

Dekupaj TestereDekupaj Testere
Yassı matkap ucu takımıYassı matkap ucu takımı
Kablosuz MatkapKablosuz Matkap
Matkap Ucu TakımıMatkap Ucu Takımı
El TesteresiEl Testeresi
Kurbağacık anahtarKurbağacık anahtar
18

Plunger E, rod F and arm G

Cut two 153.9 mm discs of 3 mm food-grade silicone sheet and bolt them between the plunger plates through the middle, hub up; the silicone's edge is the packing e and should slide in the cylinder with a light drag. Saw a slot in each end of a 22 mm hardwood dowel 470 mm long between pin centres and pin its lower end to the plunger's hub with a 6 mm stainless bolt. Make the arm G from hardwood 40 x 22 mm, 930 mm long, bore it 12.4 mm 30 mm from one end for the pin h and 6.4 mm 290 mm from that for rod F, then bolt it into the column's slot with a 12 mm bolt and pin rod F to it.

Bu adım için malzemeler:

Silikon kauçuk levhaSilikon kauçuk levha1 adet
Altıköşe cıvata takımıAltıköşe cıvata takımı4 adet
Naylon Fiberli Emniyet SomunuNaylon Fiberli Emniyet Somunu4 adet
Düz PulDüz Pul4 adet
Sert ağaç kavelalarSert ağaç kavelalar1 adet
Sert Ağaç TahtasıSert Ağaç Tahtası1 adet

Gerekli aletler:

MakasMakas
El TesteresiEl Testeresi
Kablosuz MatkapKablosuz Matkap
Matkap Ucu TakımıMatkap Ucu Takımı
Kurbağacık anahtarKurbağacık anahtar
Şerit MetreŞerit Metre
19

The build in 3D

FreeCAD model of this build, cut open: the bucket on its base, the slotted plates I and J with rod K through the stuffing box, the cylinder of four rings under the flange, the wedges and staples, the vent, and the plunger on rod F worked by the arm G from the column H. Checked over the lever's whole travel and with plate J slid fully.
Tasarım DosyasıBLENDCC0 - Free
20

Churn

With plate J slid so all the openings are open, pour about 10 litres of heavy cream at about 15 °C into the bucket, checked with the thermometer. Work the arm about once a second, timing it. As the cream thickens, give rod K a turn now and then to close the openings a little. Lift the vent's cover now and then to let the gas out. When the butter comes, knock the wedges out, lift out the flange, the cylinder and the plunger, pour off the buttermilk, wash the butter in cold water until it runs clear, work in a pinch of salt and weigh it.

Bu adım için malzemeler:

Yağlı kremaYağlı krema10 l
İri Deniz Tuzuİri Deniz Tuzu1 adet
SuSu1 adet

Gerekli aletler:

Takılı kalan problu termometreTakılı kalan problu termometre
KronometreKronometre
Dijital Mutfak TerazisiDijital Mutfak Terazisi
Büyük paslanmaz çelik karıştırma kâsesiBüyük paslanmaz çelik karıştırma kâsesi
21

Troubleshooting

Friction plunger churn troubleshooting.

Flow

Loading...
22

History and honest limits

**John J. Lehaye** of Reading, Pennsylvania, assignor to himself and John Tucker of Philadelphia, US 25,162, 16 August 1859, "Churn". He claimed the vessel B, cylinder C and plunger E in combination with means for enlarging or contracting the openings between the cylinder and the vessel. He gives no sizes, so every size here is ours; the U-bolts are his staples a, the O-ring box his stuffing box, and silicone his packing. His Fig. 4 alternative, projections on the cylinder's foot and on a ring in the vessel's bottom, turned to open or close the gaps, is not built. He also offered the machine as an egg beater and for mixing curds.

Malzemeler

19

Gerekli Aletler

19

Tasarım dosyaları

11

CC0 Kamu Malı

Bu plan CC0 lisansıyla yayınlanmıştır. İzin almadan kopyalayabilir, değiştirebilir, dağıtabilir ve herhangi bir amaçla kullanabilirsiniz.

Planı üzerinden ürün satın alarak Maker'ı destekleyin, böylece Maker Komisyonu Satıcılar tarafından belirlenen komisyonu kazanırlar veya bu Planın yeni bir versiyonunu oluşturun ve gelir paylaşımı için kendi Planınıza bağlantı olarak ekleyin.

Tartışma

(0)

Giriş yapın tartışmaya katılmak için

Yorumlar yükleniyor...