Співпраця
МИСТЕЦТВО
КРАСА ТА ЗДОРОВ'Я
РЕМЕСЛО
КУЛЬТУРА ТА ІСТОРІЯ
РОЗВАГИ
СЕРЕДОВИЩЕ
ЇЖА ТА НАПІЇ
ЗБОРНА ІНЖЕНЕРІЯ
НАУК
СПОРТ
ТЕХНОЛОГІЯ
НОСИМО
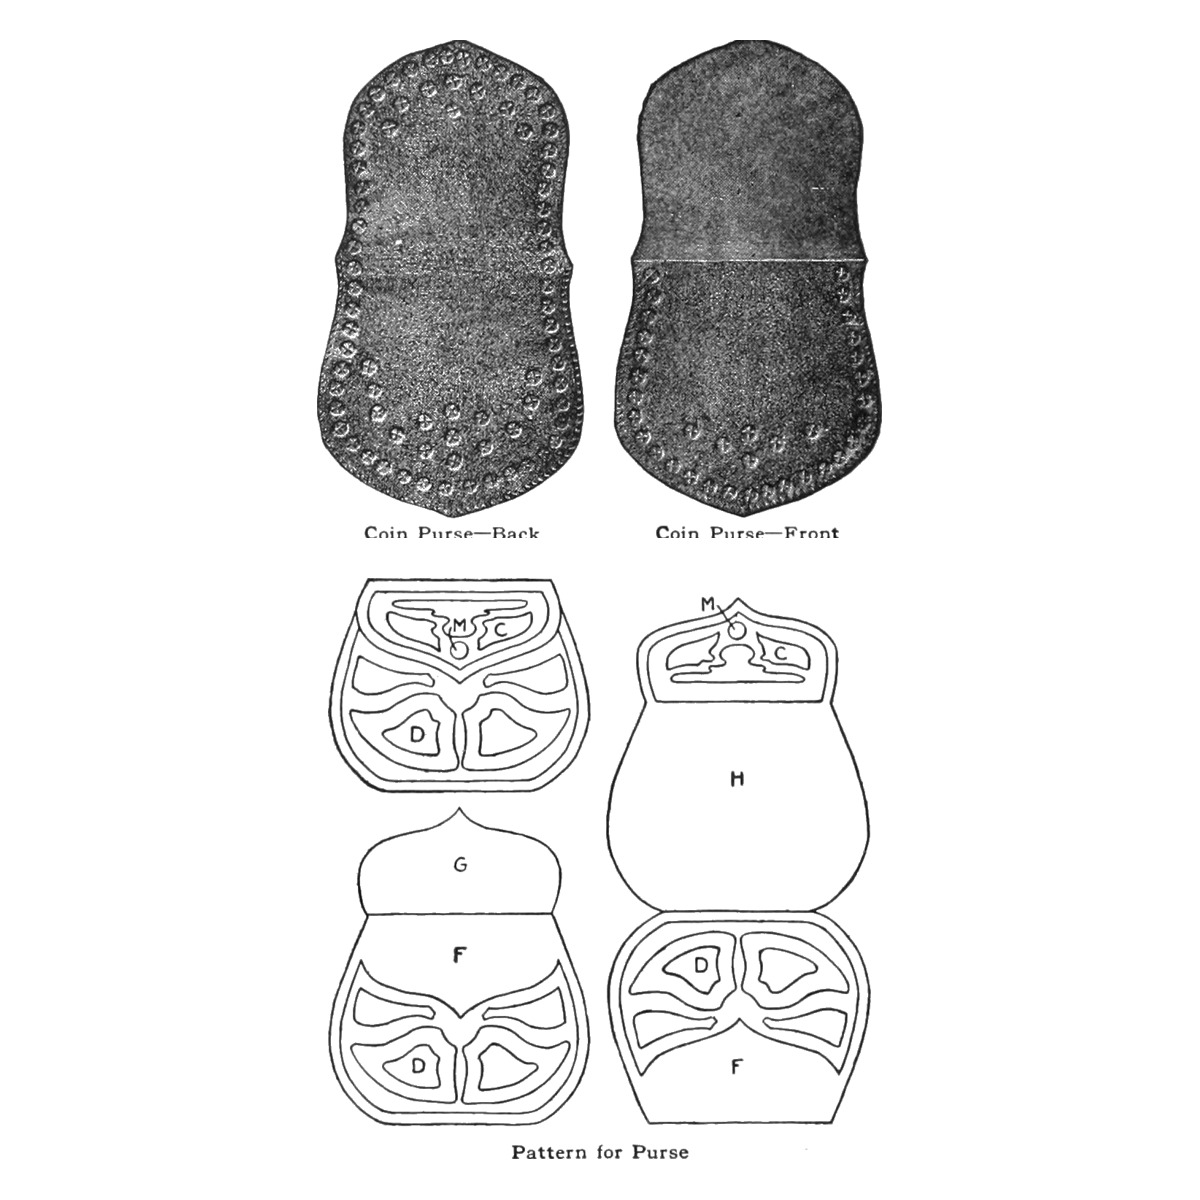


Tooled Calfskin Coin Purse: Lined, Flap Over Front, Design Split Between Flap and Front (Boy Mechanic, 1915)
The first piece in Mary C. Scovel's leather course (The Boy Mechanic, Book 2, 1915): a coin purse of Russian calfskin from a 4 by 8 in piece, its design traced, lined and tooled or stamped, split so half sits on the flap and half on the front below it, then lined with silk and stitched.
Початківець
About 3 hours
Інструкції
1
1
Her sizes in centimetres
Her sizes in centimetres
Завантаження блокнота Jupyter…
2
2
Read The Boy Mechanic, Book 2
Read The Boy Mechanic, Book 2
Her outfit: "two special tools costing 50 cents each, one with a narrow edge for lining patterns, and one with broad ends for tooling; and a piece of tin, plate glass, or very smooth hard wood, which should not be smaller than 9 by 12 in. A soft sponge, a triangle, a rule, tracing paper and a hard pencil are also needed." Russian calfskin is best for tooling and stamping.
3
3
Make the paper pattern
Make the paper pattern
The purse has three parts: front, back and flap. Fold paper to the proportions you want, with the design for the front D on the same side of the paper as the flap C; the space F under the flap has no design. Fold F behind H, then C behind H and F, and turn the pattern over to see the purse. Cut a piece of leather 4 by 8 in, which leaves 1/4 in outside the pattern for pinning.
Матеріали для цього кроку:
 Опойок1 штука
Необхідні інструменти ({count})
 Калька
 Олівець
 Ножиці
 Лінійка
4
4
Damp the leather and transfer the design
Damp the leather and transfer the design
Draw the whole design for the purse on tracing paper. Wet the leather on the wrong (unfinished) side with a soft sponge: pat it to moisten, not soak, it; too wet and the tool sticks and leaves an uneven background. Pin the design firmly on the leather, tack the leather down on its outer margin to the glass or board, and go over every line with a hard pencil, with firm, even pressure. Lift the paper and go over the lines with the narrow lining tool, with a strong, firm stroke. A line design can stop here.
Матеріали для цього кроку:
Опойок1 штукаНеобхідні інструменти ({count})
 ГубкаКалькаОлівець
 Канцелярські кнопки (коробка 50 штук)
 Скляний лист
 Модельєр для шкіри
5
5
Tool or stamp the background
Tool or stamp the background
Leave at least 1/8 in between the edge of the pattern and the design. To tool, press the background down with the broad end in even, long strokes; if it will not go down, the leather is too dry, so take it off and damp the back again. Keep the edges sharp between pressed and raised parts. To stamp instead, strike a small carpenter's nail set lightly with a wooden mallet in rows of circles; too hard a blow cuts the leather.
Необхідні інструменти ({count})
Модельєр для шкіри Добійник для цвяхів
 Дерев'яний молоток (киянка)Губка
6
6
Line and stitch
Line and stitch
Fold the parts together, line with silk to match the leather, and stitch the front and back parts close to the edge. Stitch on a sewing machine with a long stitch, a large needle and silk as heavy as the needle takes; try it on a scrap first, and put tissue paper over the leather if the foot marks it. Without a machine, prick holes with an awl and sew with needle and silk, running or over-and-over; going over-and-over to the end and back gives an X stitch. She has the catch M put on by a shoemaker or trunk store; a snap fastener is used here.
Матеріали для цього кроку:
 Шовкова тканина1 штука
 Шовкова нитка1 штука
 Клейстер із пшеничного борошна1 штука
 Кнопка-застібка1 штука
Необхідні інструменти ({count})
Ножиці Швейна машина
 Шило
 Дві лимарські голки
7
7
Troubleshooting
Troubleshooting
Tooled leather troubleshooting.
Flow
Loading...
8
8
History and honest limits
History and honest limits
From Mary C. Scovel, "Arts-Crafts Leather Work", in **The Boy Mechanic, Book 2**, Popular Mechanics, 1915 (Project Gutenberg 44585; checked on the archive.org scan boymechanicbook200chic2, pp. 432-441), Part I. She gives the piece size but no finished purse size; the shape comes from her pattern. The snap fastener, tools and metric figures are ours.
Матеріали
5- 2 штукЗаповнювач
- 1 штукаЗаповнювач
- 1 штукаЗаповнювач
- Заповнювач
- 1 штукаЗаповнювач
Необхідні інструменти
13- Заповнювач
- 1 vendor sell this, none ship to you yetЗаповнювач
- Заповнювач
- Заповнювач
- Заповнювач
- Заповнювач
- Заповнювач
- Заповнювач
- Заповнювач
- Заповнювач
- Заповнювач
- Заповнювач
- Заповнювач
За цим кресленням виготовляють
Пов'язані креслення
Ці креслення діляться знаннями — техніки, матеріали або принципи
CC0 Суспільне надбання
Це креслення випущено під ліцензією CC0. Ви можете вільно копіювати, змінювати, поширювати та використовувати цю роботу для будь-яких цілей без запиту дозволу.
Підтримайте мейкера, купуючи продукти через його креслення, де він отримує Комісію мейкера встановлену вендорами, або створіть нову ітерацію цього креслення та включіть його як зв'язок у власне креслення для розподілу доходу.