Співпраця
МИСТЕЦТВО
КРАСА ТА ЗДОРОВ'Я
РЕМЕСЛО
КУЛЬТУРА ТА ІСТОРІЯ
РОЗВАГИ
СЕРЕДОВИЩЕ
ЇЖА ТА НАПІЇ
ЗБОРНА ІНЖЕНЕРІЯ
НАУК
СПОРТ
ТЕХНОЛОГІЯ
НОСИМО
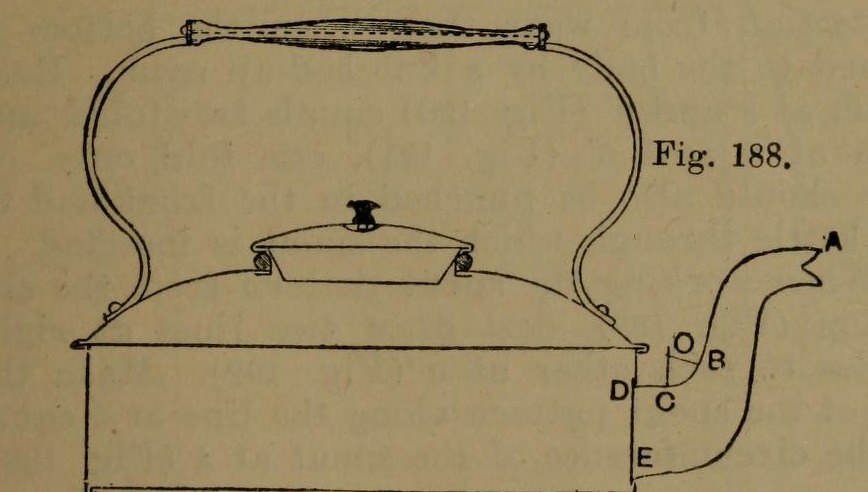


Stovetop Kettle: a Square Copper Kettle (Hasluck, 1907)
A tinsmith's square kettle in sheet copper, 9 x 9 in and 3 5/8 in deep: a box body with folded corner seams, a hollowed top pened on, a brazed and bent spout, a small cover, and a wooden handle on brass uprights.
Hasluck prefers copper; tinplate also works and is a separate route.
Source: Paul N. Hasluck, Tinplate Work (1907), pp. 91-98. Unknown: copper gauge, solder. Picture: Figs. 188-189 of the book.
Просунутий
Unknown
Інструкції
1
1
Cut the patterns
Cut the patterns
For a body 9 x 9 x 3 5/8 in, cut two ends 9 1/2 x 4 in and two sides 9 1/4 x 4 in, notched for box seams at the corners (Figs. 190-191), with allowances to fold at top and bottom. Punch the spout hole in the front. Cut the bottom 9 1/2 in square, notched for a 1/4 in edge. Set out the top as a 10 1/2 in square with curved allowances for hollowing and a 4 in circle for the cover hole (Fig. 193); set out the spout from the elevation (Fig. 192), the cover and its cone-shaped rim (Figs. 194-195).
Матеріали для цього кроку:
 Мідний лист1 body, bottom, top, spout, cover
Необхідні інструменти ({count})
 Розмічальний циркуль
 Рисувалка
 Ножиці по металу
2
2
Braze and shape the spout
Braze and shape the spout
Thin the long edges by hammering. Set in the throat with a stretching hammer on a beak iron, bend the spout round until the edges overlap, bind it with wire, lay spelter and borax along the inside of the seam and braze it; then close and braze the under seam. Fill it with lead and bend the neck with a round-faced hammer on the hollowing block; file off spare spelter and smooth it. Run out the lead, throw off a seating round the large end, trim the top with snips and tin the inside.
Матеріали для цього кроку:
 Невідомий метал1 spelter
 Олово1 tinning
Необхідні інструменти ({count})
 Рихтувальний молоток
 Кілок
 Залізний дріт
 Порошок бури
 Пальник для паяння твердим припоєм
 Свинець
 Дірчаста шумівка
 Брусок твердої деревини
 Напилок по металуНожиці по металу
3
3
Fold and seam the body
Fold and seam the body
Fold the top edges square, the front and back outwards and the sides likewise; fold the bottom edges right over inwards to take the bottom (Fig. 188). Hook each side's end over the front's and work the corner seam on a straight-edged tool (Figs. 198-199). Turn up the bottom's 1/4 in edge, push it edge-down into the bottom folds, and solder the bottom and seams.
Матеріали для цього кроку:
 Олов'яно-свинцевий припій1 штука
Необхідні інструменти ({count})
 Дерев'яний молоток (киянка)Кілок
 Електричний паяльник
 Флюс
4
4
Hollow the top and make the cover
Hollow the top and make the cover
Hollow the top on the block: sink the four sides a little, hollow the corners with a bullet-faced hammer, flatten each side along the block edge, even the shoulder and smooth it all over. Pare the edges, mark the flange with an edging machine, set it down square with a hatchet stake and mallet, and take up an edge to fit over the body. Cut the cover hole with circular snips and fit a narrow wired rim, worked over inside. Make the cover: solder its cone rim to fit the wired rim, throw off a flange, hollow the cover disc and seam it on, and fix the knob.
Матеріали для цього кроку:
Залізний дріт1 rimОлов'яно-свинцевий припій1 штукаНевідомий метал1 cover knobНеобхідні інструменти ({count})
Рихтувальний молотокБрусок твердої деревиниКілокДерев'яний молоток (киянка)Ножиці по металуЕлектричний паяльникФлюс5
5
Handle, top and spout
Handle, top and spout
Cut two handle uprights from stout brass or copper band (Fig. 196), drill them for rivets and for the spindle that carries the wooden handle, and bend them to shape. Rivet them to the top and solder over the rivet heads inside. Pene the top down onto the body and solder along each edge. Push the spout through its hole from inside until its large end butts against the front, and solder it strongly from inside.
Матеріали для цього кроку:
 Латунний лист1 handle uprights
 Латунний пруток1 spindle
 Руків'я1 wood
 Мідні заклепки1 number not givenОлов'яно-свинцевий припій1 штука
Необхідні інструменти ({count})
 Ручний дриль
 Клепальний молотокДерев'яний молоток (киянка)Електричний паяльникФлюс
Матеріали
9- 1 body, bottom, top, spout, coverЗаповнювач
- 1 cover knobЗаповнювач
- 1 tinningЗаповнювач
- Заповнювач
- 1 rimЗаповнювач
- 1 handle uprightsЗаповнювач
- 1 spindleЗаповнювач
- 1 woodЗаповнювач
- 1 number not givenЗаповнювач
Необхідні інструменти
17- Заповнювач
- Заповнювач
- Заповнювач
- Заповнювач
- Заповнювач
- Заповнювач
- Заповнювач
- Заповнювач
- Заповнювач
- Заповнювач
- Заповнювач
- Заповнювач
- Заповнювач
- Заповнювач
- Заповнювач
- Заповнювач
- Заповнювач
Матеріали з пов'язаних креслень


За цим кресленням виготовляють
CC0 Суспільне надбання
Це креслення випущено під ліцензією CC0. Ви можете вільно копіювати, змінювати, поширювати та використовувати цю роботу для будь-яких цілей без запиту дозволу.
Підтримайте мейкера, купуючи продукти через його креслення, де він отримує Комісію мейкера встановлену вендорами, або створіть нову ітерацію цього креслення та включіть його як зв'язок у власне креслення для розподілу доходу.