
Співпраця
МИСТЕЦТВО
КРАСА ТА ЗДОРОВ'Я
РЕМЕСЛО
КУЛЬТУРА ТА ІСТОРІЯ
РОЗВАГИ
СЕРЕДОВИЩЕ
ЇЖА ТА НАПІЇ
ЗБОРНА ІНЖЕНЕРІЯ
НАУК
СПОРТ
ТЕХНОЛОГІЯ
НОСИМО
Sprung-Leg Tubing Cutter: a Bent Rod With a Disk Outside and a Roller Inside, the Handle's Screw Bends One Leg In (Zeiler, 1958)
Forge

Створено

Forge

13. листопад 2026NO
7
0
0
0
0

Sprung-Leg Tubing Cutter: a Bent Rod With a Disk Outside and a Roller Inside, the Handle's Screw Bends One Leg In (Zeiler, 1958)

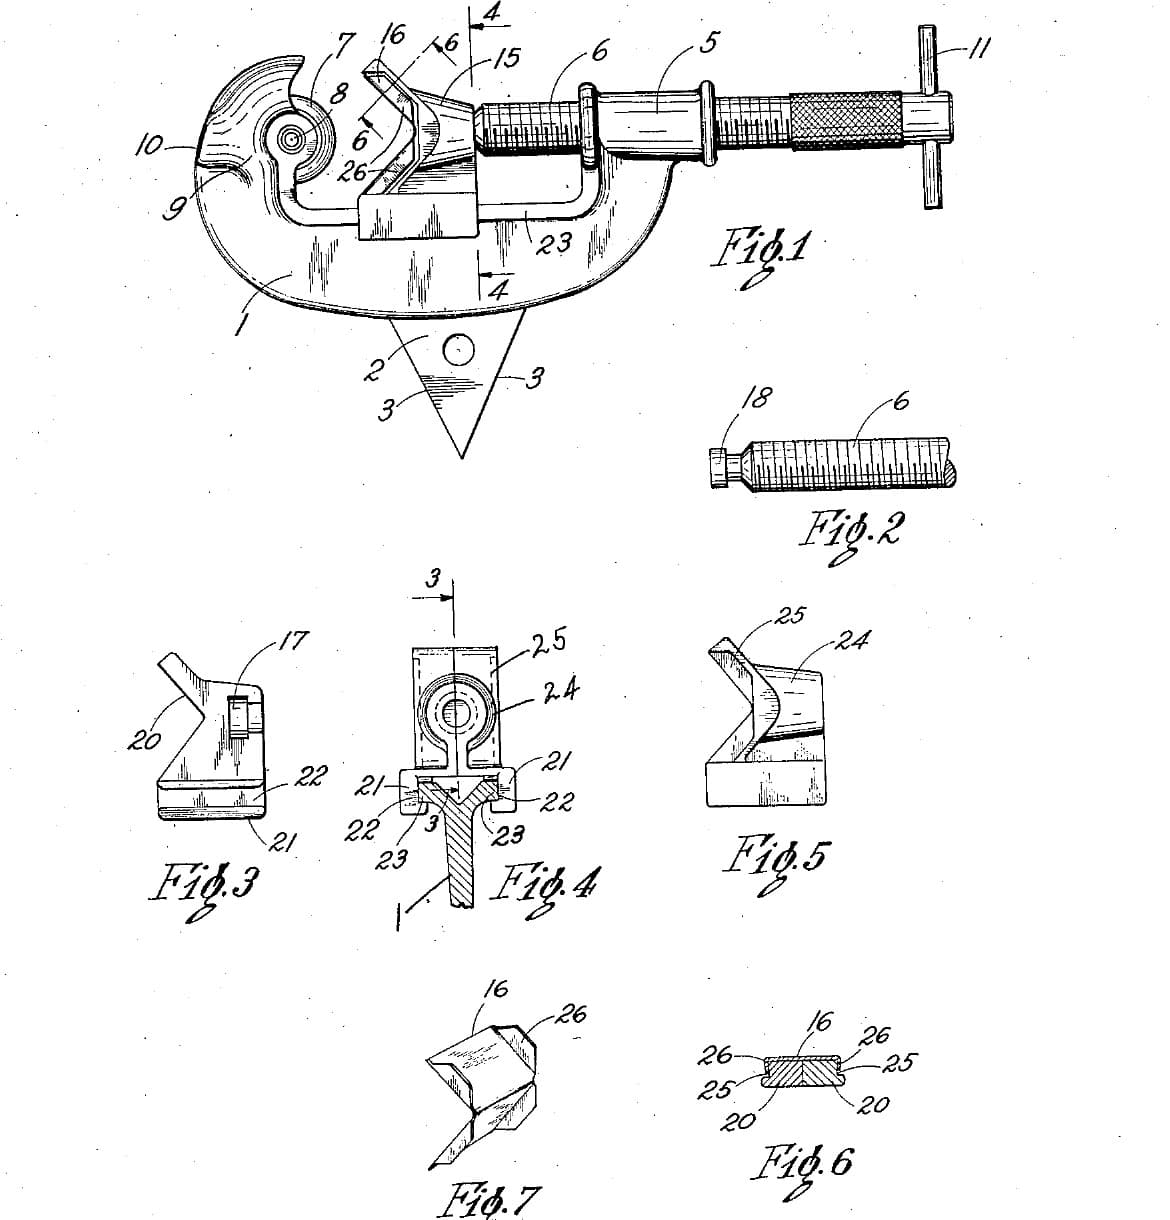
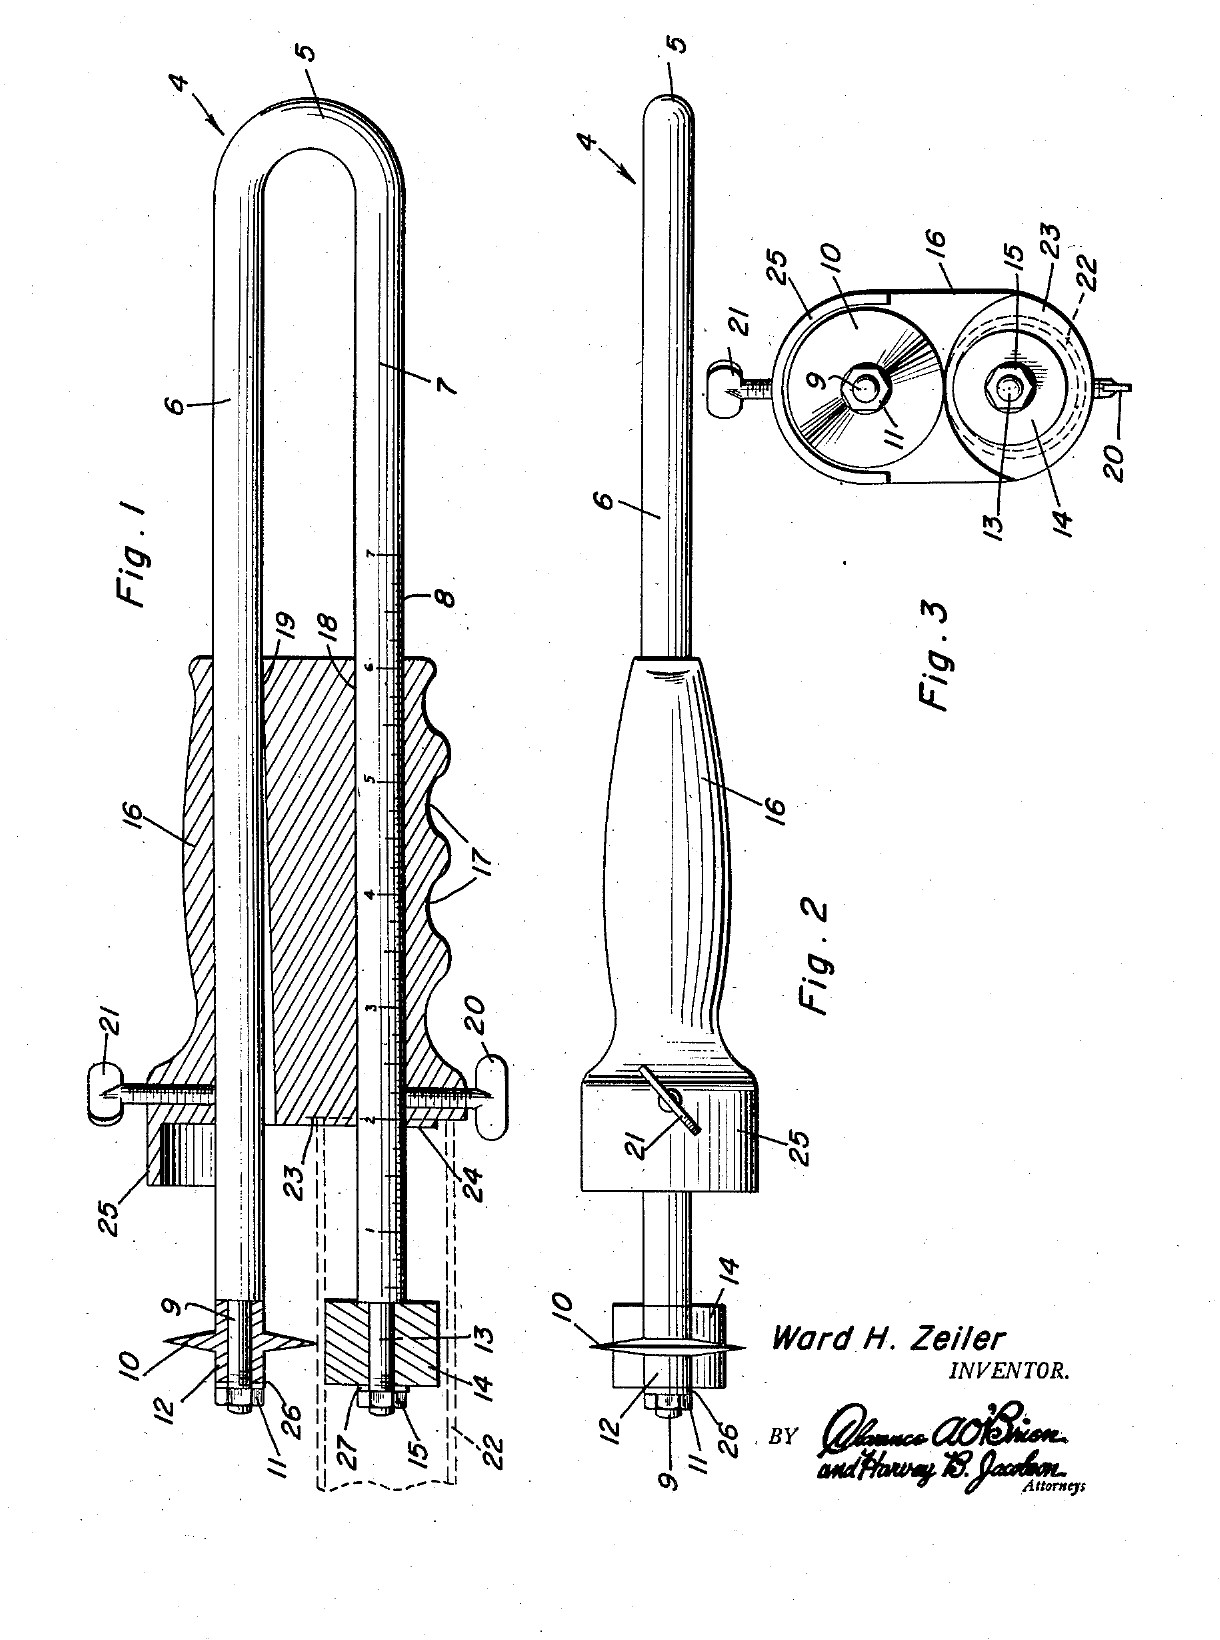
Ward H. Zeiler of Holyoke, Colorado, received US 2,821,781, dated 4 February 1958, for a plumber's tubing cutter that cuts a tube square, to length, near its end. The frame is one springy rod bent into a U. The lower leg goes into the tube and carries a roller. The upper leg carries a cutting disk outside the tube. A handle slides along both legs. Its front end stops against the tube end, so the cut length is read off a scale on the lower leg. A screw in the handle bends the upper leg in and presses the disk onto the tube, and turning the tool cuts it off. All sizes are ours.
Середній
About 2 days

Інструкції

1

Why the frame must spring

Завантаження блокнота Jupyter…
2

Read US 2,821,781

"The leg 7 is then inserted in the tube 22 and the roller 14 and the projection 24 are engaged in the upper portion of said tube. The screw 21 is then tightened for bending the leg 6 of the frame 4, thus engaging the knife 10 with the periphery of the tube 22."
3

Print the template

The bent frame, its ends, the disk, roller and handle at 1:1, with the oval bore, the screws and the scale. print at 100 % (check the 50 mm bar).
Файл дизайнуPDFCC0 - Free
4

Bend the frame

Cut 470 mm of 6 mm spring steel wire. Heat the middle 40 mm red with the torch and bend it round a 10 mm bar into a U with the legs 16 mm apart, and straighten the legs parallel. Heat the last 25 mm of each leg red and let it cool slowly in the dying forge, so the ends are soft enough to file and thread. Leave the rest of the legs as they are: they must spring.

Матеріали для цього кроку:

Пружинний сталевий дрітПружинний сталевий дріт1 штука

Необхідні інструменти ({count})

Пальник для паяння твердим припоємПальник для паяння твердим припоєм
ГорноГорно
Ковальські кліщіКовальські кліщі
Слюсарні лещатаСлюсарні лещата
Слюсарний молоток із кульковим бойкомСлюсарний молоток із кульковим бойком
Ножівка по металуНожівка по металу
Зварювальні рукавиціЗварювальні рукавиці
Захисні окуляриЗахисні окуляри
5

Thread the leg ends

Turn or file the last 24 mm of each leg to 5 mm, leaving a square shoulder, and cut an M5 thread on the last 8 mm with the die.

Необхідні інструменти ({count})

Токарний верстат по металуТокарний верстат по металу
Трикулачковий токарний патронТрикулачковий токарний патрон
Токарний різецьТокарний різець
Набір напилківНабір напилків
Набір мітчиків і плашокНабір мітчиків і плашок
Цифровий штангенциркуль 6 дюймівЦифровий штангенциркуль 6 дюймів
Мастильно-охолоджувальна оливаМастильно-охолоджувальна олива
6

Turn the disk and the roller

Disk: chuck a tool steel bar, turn 12 mm of it to 18 mm, drill it 5 mm, and turn the front 6 mm to a 50 degree edge, sharp in its middle. Turn the next 4 mm down to a 10 mm hub and part it off. Roller: turn 10 mm mild steel bar 16 mm long and drill it 5.2 mm, so it spins freely on the leg.

Матеріали для цього кроку:

Пруток інструментальної сталіПруток інструментальної сталі1 штука
Круглий пруток з маловуглецевої сталіКруглий пруток з маловуглецевої сталі1 штука

Необхідні інструменти ({count})

Токарний верстат по металуТокарний верстат по металу
Трикулачковий токарний патронТрикулачковий токарний патрон
Токарний різецьТокарний різець
Відрізний різецьВідрізний різець
Набір центрувальних сверделНабір центрувальних свердел
Набір сверделНабір свердел
Цифровий штангенциркуль 6 дюймівЦифровий штангенциркуль 6 дюймів
Захисні окуляриЗахисні окуляри
7

Harden and temper

Heat the disk to a cherry red, until a magnet no longer sticks, and quench it in water, moving it about. Rub it bright with a stone, warm it on a piece of steel plate over the fire, and quench again as soon as it turns a light straw colour.

Необхідні інструменти ({count})

ГорноГорно
Ковальські кліщіКовальські кліщі
Невеликий магнітНевеликий магніт
Гартівна діжкаГартівна діжка
ВодаВода
Точильний каміньТочильний камінь
Зварювальні рукавиціЗварювальні рукавиці
Захисні окуляриЗахисні окуляри
8

Make the handle

Saw 90 mm of 32 mm aluminium bar and face the ends. Drill two 6.2 mm holes through it lengthways, 16 mm apart, each 8 mm off the centre. With a round file, open the front 70 mm of the upper hole towards the lower one, 1.8 mm at the front face, tapering to nothing. Drill and tap M6 into the upper hole from the top, 12 mm from the front, and into the lower hole from below, 14 mm from the front. Saw and file away the lower half of the front 8 mm, leaving a 10 mm round boss round the lower hole. File three finger grooves underneath.

Матеріали для цього кроку:

Круглий алюмінієвий прутокКруглий алюмінієвий пруток1 штука

Необхідні інструменти ({count})

Ножівка по металуНожівка по металу
Токарний верстат по металуТокарний верстат по металу
Трикулачковий токарний патронТрикулачковий токарний патрон
Свердлильний верстатСвердлильний верстат
Машинні лещатаМашинні лещата
Набір сверделНабір свердел
Набір мітчиків і плашокНабір мітчиків і плашок
Набір напилківНабір напилків
Набір надфілівНабір надфілів
Цифровий штангенциркуль 6 дюймівЦифровий штангенциркуль 6 дюймів
9

Make the guard

Cut a strip of brass sheet 12 mm wide and 50 mm long, bend it into a half round hood that reaches 12 mm past the handle's front over the disk, and fix its back end on top of the handle with two small screws.

Матеріали для цього кроку:

Латунний листЛатунний лист1 штука
Гвинт із циліндричною головкою та внутрішнім шестигранникомГвинт із циліндричною головкою та внутрішнім шестигранником2 штук

Необхідні інструменти ({count})

Ножівка по металуНожівка по металу
Набір напилківНабір напилків
Свердлильний верстатСвердлильний верстат
Набір сверделНабір свердел
Набір мітчиків і плашокНабір мітчиків і плашок
Слюсарні лещатаСлюсарні лещата
10

Assemble

Slide the handle onto the legs from the open end, the upper leg in the oval bore. Put the disk on the upper leg's end, hub outwards, then a washer and an M5 nut, snug enough that the disk still turns. Fit the roller the same way on the lower leg. Screw in the M6 feed screw on top and the setscrew below.

Матеріали для цього кроку:

Плоска шайбаПлоска шайба2 штук
Шестигранна гайкаШестигранна гайка2 штук
Гвинт із циліндричною головкою та внутрішнім шестигранникомГвинт із циліндричною головкою та внутрішнім шестигранником1 штука

Установчий гвинт із чашоподібним кінцемУстановчий гвинт із чашоподібним кінцем1 штука

Необхідні інструменти ({count})

Розвідний ключРозвідний ключ
Набір шестигранних ключівНабір шестигранних ключів
11

Mark the scale

Slide the handle so its recess face is 20 mm from the disk's edge and lock it. File a nick across the lower leg at the handle's back face and mark it 20. File a nick every 10 mm towards the bend, deeper every 50 mm. The handle's back face now reads the cut length.

Необхідні інструменти ({count})

Набір надфілівНабір надфілів
Цифровий штангенциркуль 6 дюймівЦифровий штангенциркуль 6 дюймів
12

Cut a tube to length

Set the handle to the length you want and lock the setscrew. Push the lower leg into the tube until the end bears in the recess, with the roller and boss against the inside. Tighten the feed screw until the disk touches. Turn the tool round the tube, giving the screw a little more each turn, until the end drops off. Clean the cut with a deburring tool.

Матеріали для цього кроку:

Мідна трубаМідна труба1 штука

Необхідні інструменти ({count})

Слюсарні лещатаСлюсарні лещата

Знімач задирокЗнімач задирок
Набір шестигранних ключівНабір шестигранних ключів
Цифровий штангенциркуль 6 дюймівЦифровий штангенциркуль 6 дюймів
13

Troubleshooting

Sprung-leg tubing cutter troubleshooting.

Flow

Loading...
14

History and honest limits

**Ward H. Zeiler** of Holyoke, Colorado, US 2,821,781, dated 4 February 1958, filed 23 November 1956. He claimed "a substantially U-shaped resilient frame including legs extending slidably through the bores" and "a feed screw ... for bending said one leg within the confines of the handle for engaging the cutting disk with the tube". His frame was "suitable resilient metal"; ours is spring steel wire. His handle was a metal sleeve with a guard formed on it; ours is aluminium bar with a brass guard. The patent gives no sizes; all of ours are ours.

Матеріали

10

Необхідні інструменти

28

Файли дизайну

1

За цим кресленням виготовляють

CC0 Суспільне надбання

Це креслення випущено під ліцензією CC0. Ви можете вільно копіювати, змінювати, поширювати та використовувати цю роботу для будь-яких цілей без запиту дозволу.

Підтримайте мейкера, купуючи продукти через його креслення, де він отримує Комісію мейкера встановлену вендорами, або створіть нову ітерацію цього креслення та включіть його як зв'язок у власне креслення для розподілу доходу.

Обговорення

(0)

Увійти щоб приєднатися до обговорення

Завантаження коментарів...