ART
BEAUTY & WELLNESS
CRAFT
CULTURE & HISTORY
ENTERTAINMENT
ENVIRONMENT
FOOD & DRINKS
REVERSE ENGINEERING
SCIENCES
SPORTS
TECHNOLOGY
WEARABLES
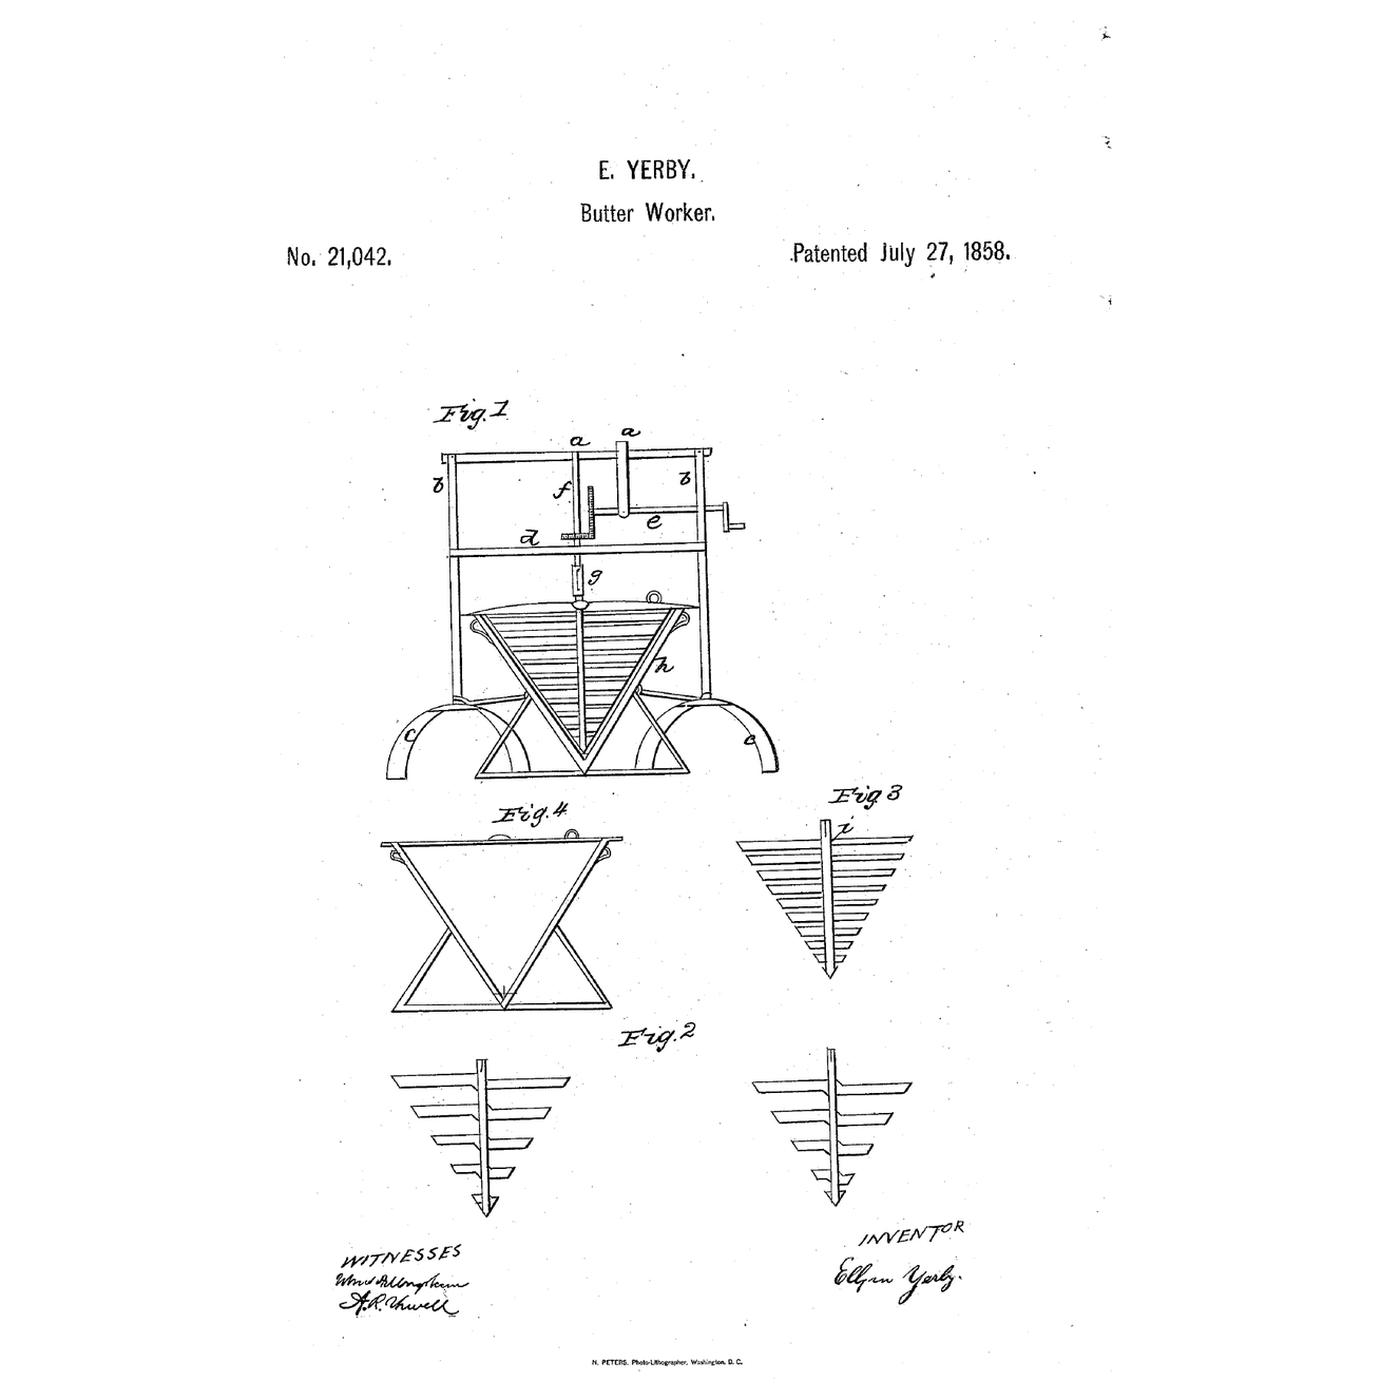


Conical-Pan Batter Machine: A Geared Beater Shaped to Its Cone Beats Batter, or Churns Butter
Ellyson Yerby of Washington, District of Columbia, received US 21,042, dated 27 July 1858, for a "batter machine": a crank and bevel gears in a standing frame turn a conical beater in a conical pan, which turns on a spindle in the pan's point. One beater, of stepped blades, makes cake batter; another, with flat sides, churns butter. The beater's part of the shaft unhooks so the pan comes away.
This rung builds the frame in pine and prints the pan, beaters and gearing at tabletop scale.
Advanced
About 5 hours, plus printing
Instructions
1
1
Gearing and the pan
Gearing and the pan
Loading Jupyter Notebook...
2
2
Geared beaters, before it
Geared beaters, before it
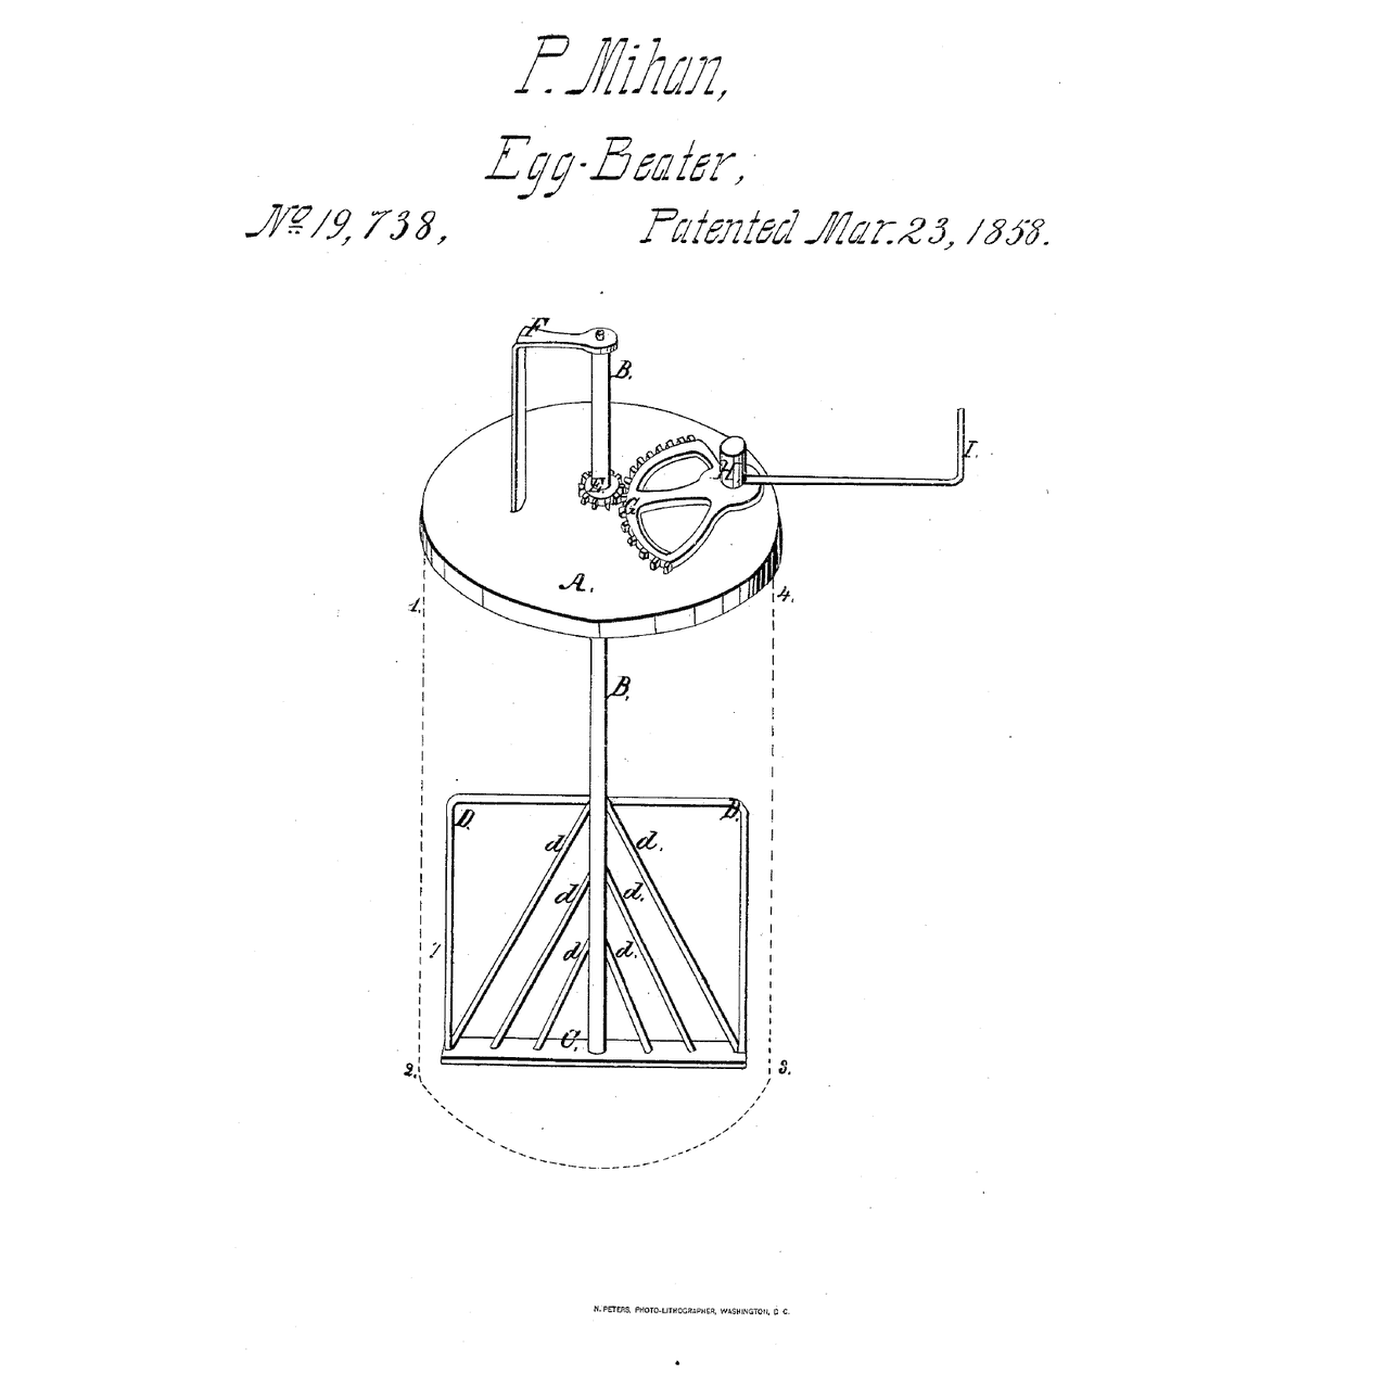
Mihan's beaters stood in an open vessel; Yerby shapes his beater to a conical pan that turns it on a spindle.
3
3
Read US 21,042
Read US 21,042
"The eggs and sugar are first put into the pan and beaten about five minutes, then add your butter, then beat about three minutes then add your flour as required which will insure in twenty minutes a good cake."
4
4
Print the parts
Print the parts
Print the pan (/uploads/blueprints/conical-pan-batter-machine-pan.stl) rim down, the batter beater (/uploads/blueprints/conical-pan-batter-machine-batter-beater.stl) with supports, the butter beater (/uploads/blueprints/conical-pan-batter-machine-butter-beater.stl), the tongue (/uploads/blueprints/conical-pan-batter-machine-tongue.stl), the slide (/uploads/blueprints/conical-pan-batter-machine-slide.stl), the pinion (/uploads/blueprints/conical-pan-batter-machine-pinion.stl), the wheel (/uploads/blueprints/conical-pan-batter-machine-wheel.stl) and the crank (/uploads/blueprints/conical-pan-batter-machine-crank.stl). Print in PETG at 0.2 mm layers, 30 % infill, 4 walls; wash before first use.
Materials for this step:
 PETG Filament1 piece
Tools needed:
 FDM 3D Printer
5
5
The frame
The frame
From 18 mm pine, cut two uprights 40 mm wide and 330 mm long, two feet 200 mm long and 40 mm deep with an arch sawn out underneath, a head 236 mm long and a brace 200 mm long, both 40 mm wide. Glue and screw each upright onto a foot, the head across their tops and the brace between them 210 mm up. Drill a 10.5 mm hole down through the middle of the head and the brace, and one across through the right upright 270 mm up, with a pine block 30 mm thick glued inside it as a longer bearing.
Materials for this step:
 Pine Board1 piece
 Wood Glue1 piece
 Wood Screws1 piece
Tools needed:
 Hand Saw
 Coping Saw
 Cordless Drill
 Sandpaper
 Screwdriver Set
6
6
Shafts, gears and pan
Shafts, gears and pan
Push a 10 mm dowel 216 mm long down through the head and the brace as the upright shaft, fixing the pinion on it just under the head with an M3 screw drilled through, and fix the tongue's sleeve on its lower end the same way. Push a 10 mm dowel 132 mm long through the right upright as the crank shaft, press the wheel on its inner end to mesh the pinion and fix the crank outside with an M3 screw. Screw an M4 screw up through the pan's point as the spindle, stand the pan between the uprights and hook it to them with two hooks and eyes through its loops.
Materials for this step:
 Hardwood Dowels1 piece
 Machine Screws1 piece
 Hook and Eye1 piece
Tools needed:
Hand SawCordless DrillScrewdriver Set7
7
The build in 3D
The build in 3D
FreeCAD model of this build: the pine frame on arched feet, the crank shaft and wheel, the pinion on the upright shaft, the joint with its tongue and slide, the stepped batter beater on the spindle, and the conical pan on three legs.
8
8
Churn butter
Churn butter
Set the butter beater on the spindle, slip the tongue into its slot, push an M3 screw through as the pin and drop the slide over the joint. Pour in 300 ml of heavy cream at about 15 °C, checked with the thermometer, and turn the crank steadily, timing it with the stopwatch. When the butter comes, lift the slide, take out the pin and unhook the pan. Pour off the buttermilk, wash the butter in cold water until it runs clear, salt and weigh it.
Materials for this step:
 Heavy Cream300 ml
 Coarse Sea Salt1 piece
 Water1 piece
Tools needed:
 Leave-In Probe Thermometer
 Stopwatch
 Digital Kitchen Scale
 Stainless Steel Mixing Bowl (Large)
9
9
Beat batter
Beat batter
Fit the batter beater the same way. In Yerby's order: beat 2 eggs with 100 g sugar about five minutes, add 100 g soft butter and beat about three minutes more, then add 100 g flour and beat until smooth. Scrape the batter out with the spatula. The amounts are ours, sized to the pan.
Materials for this step:
 Egg2 pieces
 Granulated Sugar100 g
 Butter100 g
 All-Purpose Flour100 g
Tools needed:
Digital Kitchen Scale Spatula
10
10
Troubleshooting
Troubleshooting
Batter machine troubleshooting.
Flow
Loading...
11
11
History and honest limits
History and honest limits
**Ellyson Yerby** of Washington, District of Columbia, US 21,042, 27 July 1858, for a machine for "All Kinds of Batter and for Churning Butter". He cast lead into the pan's point to steady the spindle; we do not, as lead has no place near food. His detached shaft was joined by a piece of sheet iron through an incision, held by a pin and a metal slide. He wrote that the machine makes the batter for a pound cake in twenty minutes and churns butter in ten. Our frame, sizes, pan legs and printed parts are ours, and our times are not tested against his. FDM prints hold food in their layer lines, so wash well and replace when worn.
Materials
14- 1 piecePlaceholder
- 1 piecePlaceholder
- 1 piecePlaceholder
- 1 piecePlaceholder
- 1 piecePlaceholder
- 1 piecePlaceholder
- 1 piecePlaceholder
- 300 mlPlaceholder
- 1 piecePlaceholder
- 1 piecePlaceholder
- 2 piecesPlaceholder
- 100 gPlaceholder
- 100 gPlaceholder
- 100 gPlaceholder
Tools Required
11- Placeholder
- Placeholder
- Placeholder
- 1 vendor sell this, none ship to you yetPlaceholder
- Placeholder
- Placeholder
- Placeholder
- Placeholder
- Placeholder
- Placeholder
- Placeholder
Design Files
1Related Blueprints
These blueprints share knowledge with this one — techniques, materials, or principles that connect them in the learning graph.



CC0 Public Domain
This blueprint is released under CC0. You are free to copy, modify, distribute, and use this work for any purpose, without asking permission.
Support the Maker by purchasing products through their Blueprint where they earn a Maker Commission set by Vendors, or create a new iteration of this Blueprint and include it as a connection in your own Blueprint to share revenue.