Collaboration
ART
BEAUTY & WELLNESS
CRAFT
CULTURE & HISTORY
ENTERTAINMENT
ENVIRONMENT
FOOD & DRINKS
REVERSE ENGINEERING
SCIENCES
SPORTS
TECHNOLOGY
WEARABLES
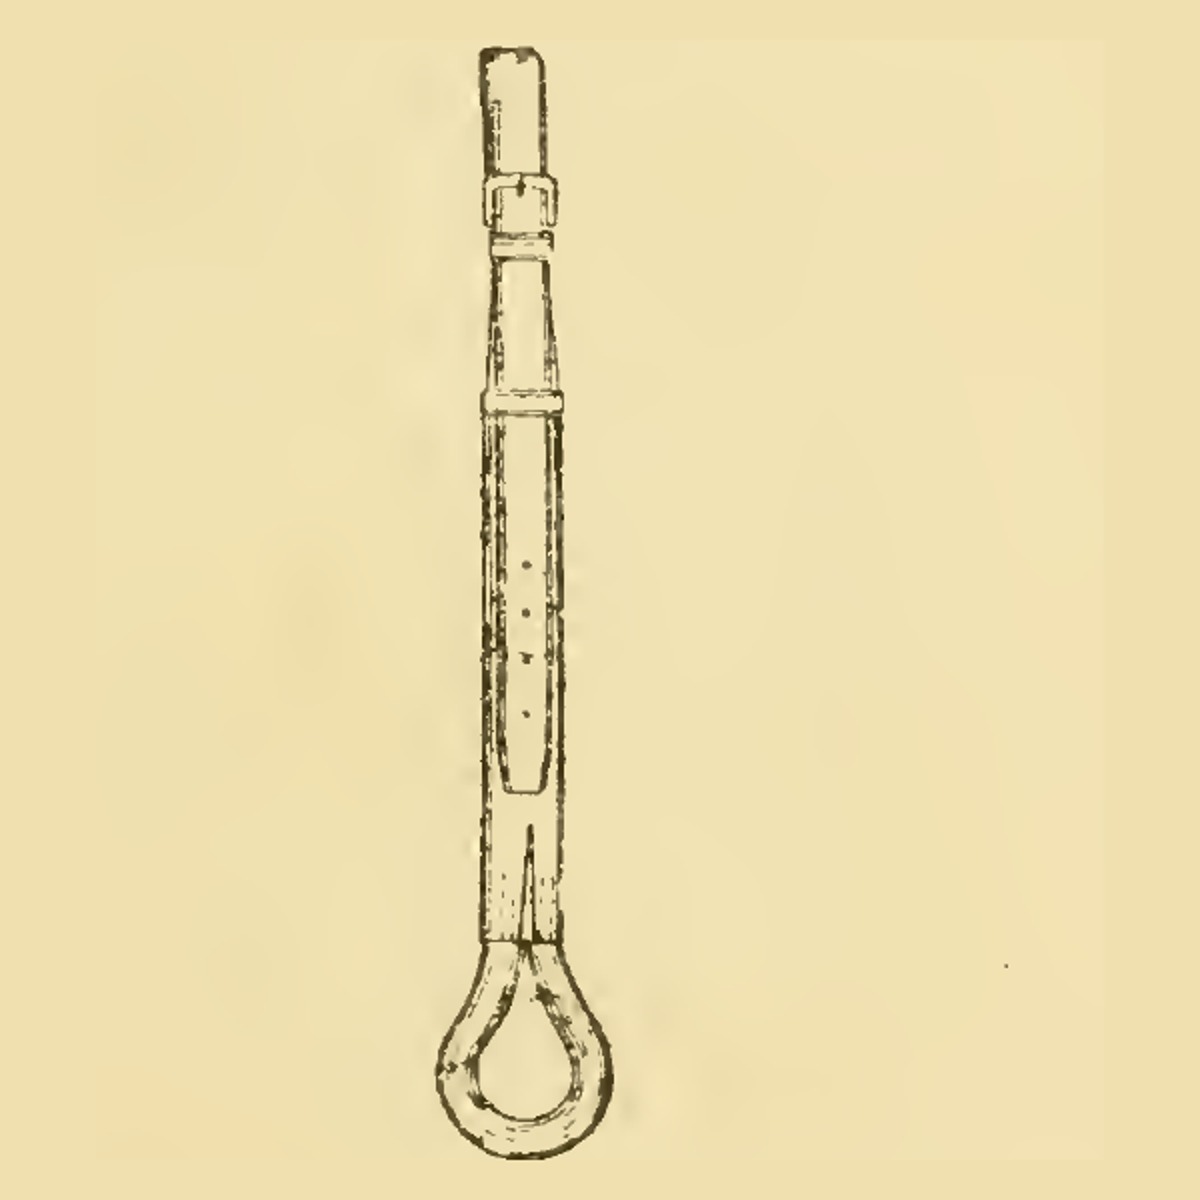


Saddle Crupper: Slit Body, Buckled Billet and Paper-Cored Dock (Hasluck, Saddlery, 1904)
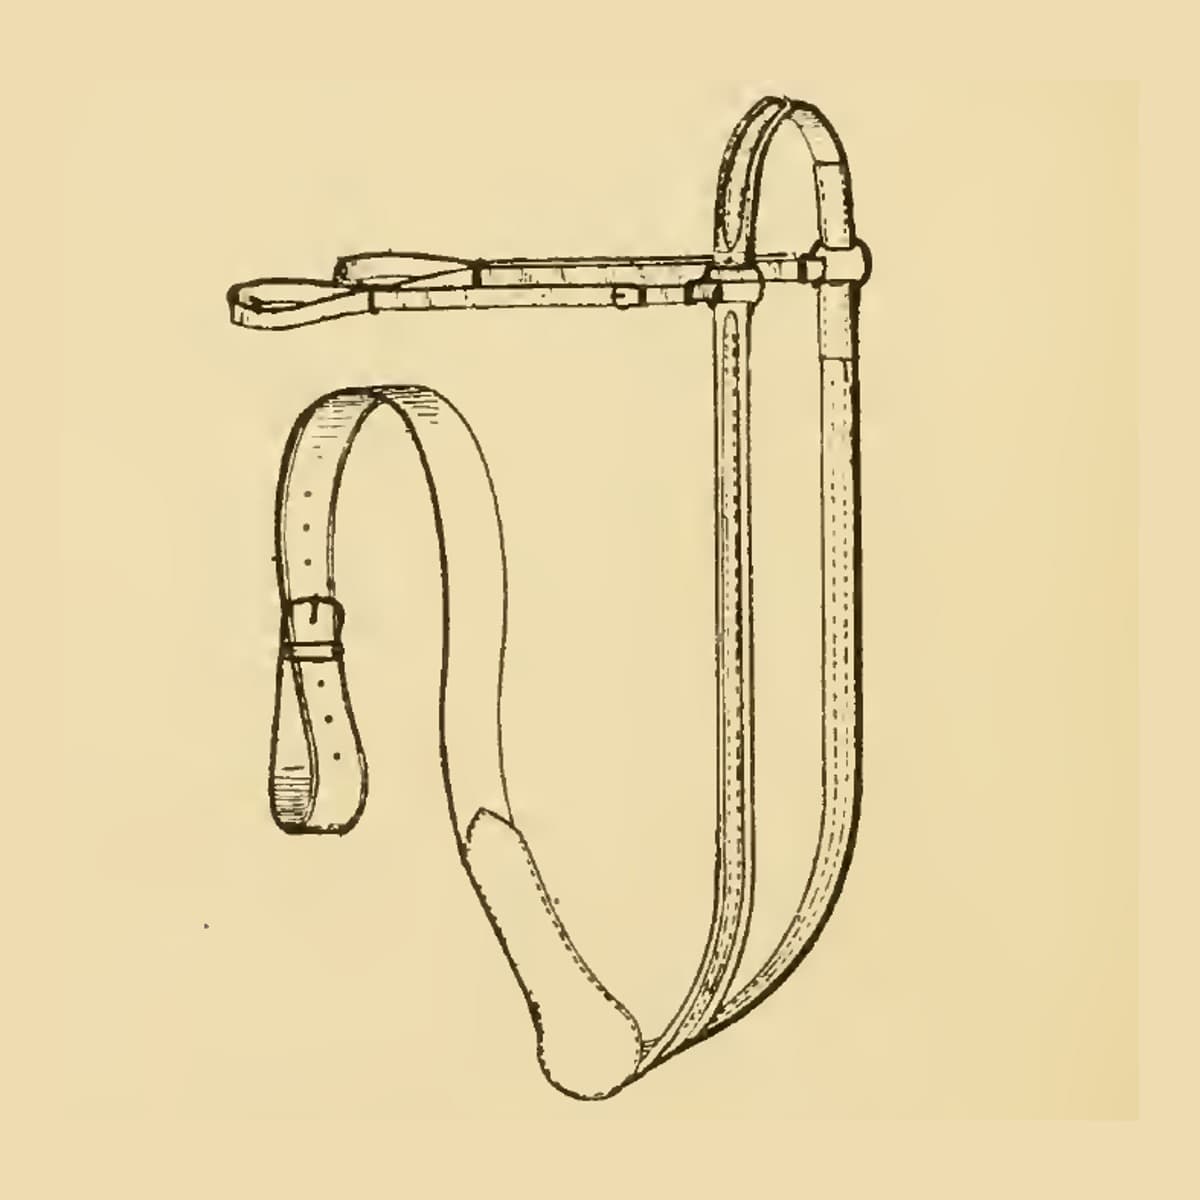
A saddle crupper runs from the back of a riding saddle to a padded loop (the dock) under the horse's tail, so the saddle cannot slide forward. This is the full-sized saddle crupper from Paul N. Hasluck's Saddlery (1904): a slit leather body, a buckled billet, and a dock shaped over string and wet brown paper. Every size is his.
Intermediate
About 1 day
Instructions
1
1
His sizes in centimetres
His sizes in centimetres
Loading Jupyter Notebook...
2
2
Read Saddlery, ch. V
Read Saddlery, ch. V
"Full-sized saddle cruppers (Fig. 9), which are used to prevent the saddle from advancing too much, are made about 1 in. wide, and sometimes a little more."
3
3
Cut the body
Cut the body
Cut the body about 1 in wide (or a little more) and about 1 ft 6 in long. Slit one end for about 5 in and turn the other end in for a 7/8 in buckle. Shave the points of the slits and the end of the chape.
Materials for this step:
 Harness Leather1 piece
Tools needed:
 Leather Knife
 Tape Measure
4
4
Make the billet and set the buckle
Make the billet and set the buckle
Cut a billet as wide as the buckle and 2 ft 4 in long; trim one end for the buckle and shave the other. Edge both pieces, polish the edges and crease them with a hot checker. Put on the buckle and stitch the billet: the first stitch by the buckle goes over the edge and through chape and billet together, the next through the loop. Run four or five stitches towards the point on each side, and come back to the buckle on the other side, making the last stitch over the side the same as the opposite side.
Materials for this step:
Harness Leather1 piece Iron Buckle with Tongue1 piece
 Linen Thread1 piece
 Beeswax1 piece
Tools needed:
Leather Knife Edge Beveller
 Edge Slicker
 Creasing Tool
 Propane Torch
 Awl
 Two Harness Needles
 Stitching Pony
5
5
Put on the loop
Put on the loop
Put a loop on the flat lower down the body, about 6 in from the buckle, stitching it across at each end.
Materials for this step:
Harness Leather1 pieceLinen Thread1 pieceBeeswax1 pieceTools needed:
Leather Knife Loop StickAwlTwo Harness Needles
6
6
Shape the dock core
Shape the dock core
The dock is much smaller round than a gig crupper dock. Take a piece of string about 1 ft long and roll wet brown paper round it until it is the thickness you need in the middle; thin the ends by cutting the paper before damping it.
Materials for this step:
 String1 piece
 Brown Paper1 piece
Tools needed:
 Scissors
 SpongeTape Measure
7
7
Cover the dock
Cover the dock
Cut the dock leather about 1 ft 1 in long; it must be soft and pliable, so damp it before stitching. Stitch it over the core as it is, without cutting a groove, drawing it very tightly over the paper. Dry the dock and finish it in shape.
Materials for this step:
Harness Leather1 pieceLinen Thread1 pieceBeeswax1 pieceTools needed:
Leather KnifeSpongeAwlTwo Harness NeedlesStitching Pony8
8
Join the dock and punch the billet
Join the dock and punch the billet
Stitch the dock to the slits with a splice of about 1-1/4 in. Put about a dozen holes in the billet, and vary the lengths to suit the size of horse.
Materials for this step:
Linen Thread1 pieceBeeswax1 pieceTools needed:
Leather KnifeAwlTwo Harness Needles Leather Hole Punch
9
9
Troubleshooting
Troubleshooting
Saddle crupper troubleshooting.
Flow
Loading...
10
10
History and honest limits
History and honest limits
From **Saddlery**, edited by Paul N. Hasluck, David McKay, 1904 (archive.org saddlery00hasl), chapter V, "Saddle Cruppers, Breastplates, and Other Accessories", saddle cruppers, pp. 40-41, Fig. 9; every fraction was read on the scan. He does not say how the billet fastens to the saddle; check against Fig. 9 and your saddle. The thread, tools and metric figures are ours.
Materials
6- 4 piecesPlaceholder
- 1 piecePlaceholder
- 4 piecesPlaceholder
- 4 piecesPlaceholder
- 1 piecePlaceholder
- 1 piecePlaceholder
Tools Required
13- Placeholder
- 1 vendor sell this, none ship to you yetPlaceholder
- Placeholder
- Placeholder
- Placeholder
- Placeholder
- Placeholder
- Placeholder
- Placeholder
- Placeholder
- Placeholder
- Placeholder
- Placeholder
This blueprint makes
Related Blueprints
These blueprints share knowledge with this one — techniques, materials, or principles that connect them in the learning graph.
CC0 Public Domain
This blueprint is released under CC0. You are free to copy, modify, distribute, and use this work for any purpose, without asking permission.
Support the Maker by purchasing products through their Blueprint where they earn a Maker Commission set by Vendors, or create a new iteration of this Blueprint and include it as a connection in your own Blueprint to share revenue.