
Collaboration
ART
BEAUTY & WELLNESS
CRAFT
CULTURE & HISTORY
ENTERTAINMENT
ENVIRONMENT
FOOD & DRINKS
REVERSE ENGINEERING
SCIENCES
SPORTS
TECHNOLOGY
WEARABLES
V-Slide Tubing Cutter: Two Slide Halves Held on the Ways by One Spring Clip, a Reamer on the Frame (Thewes, 1938)
Forge

Created by

Forge

13. November 2026NO
0
0
0
0
0

V-Slide Tubing Cutter: Two Slide Halves Held on the Ways by One Spring Clip, a Reamer on the Frame (Thewes, 1938)

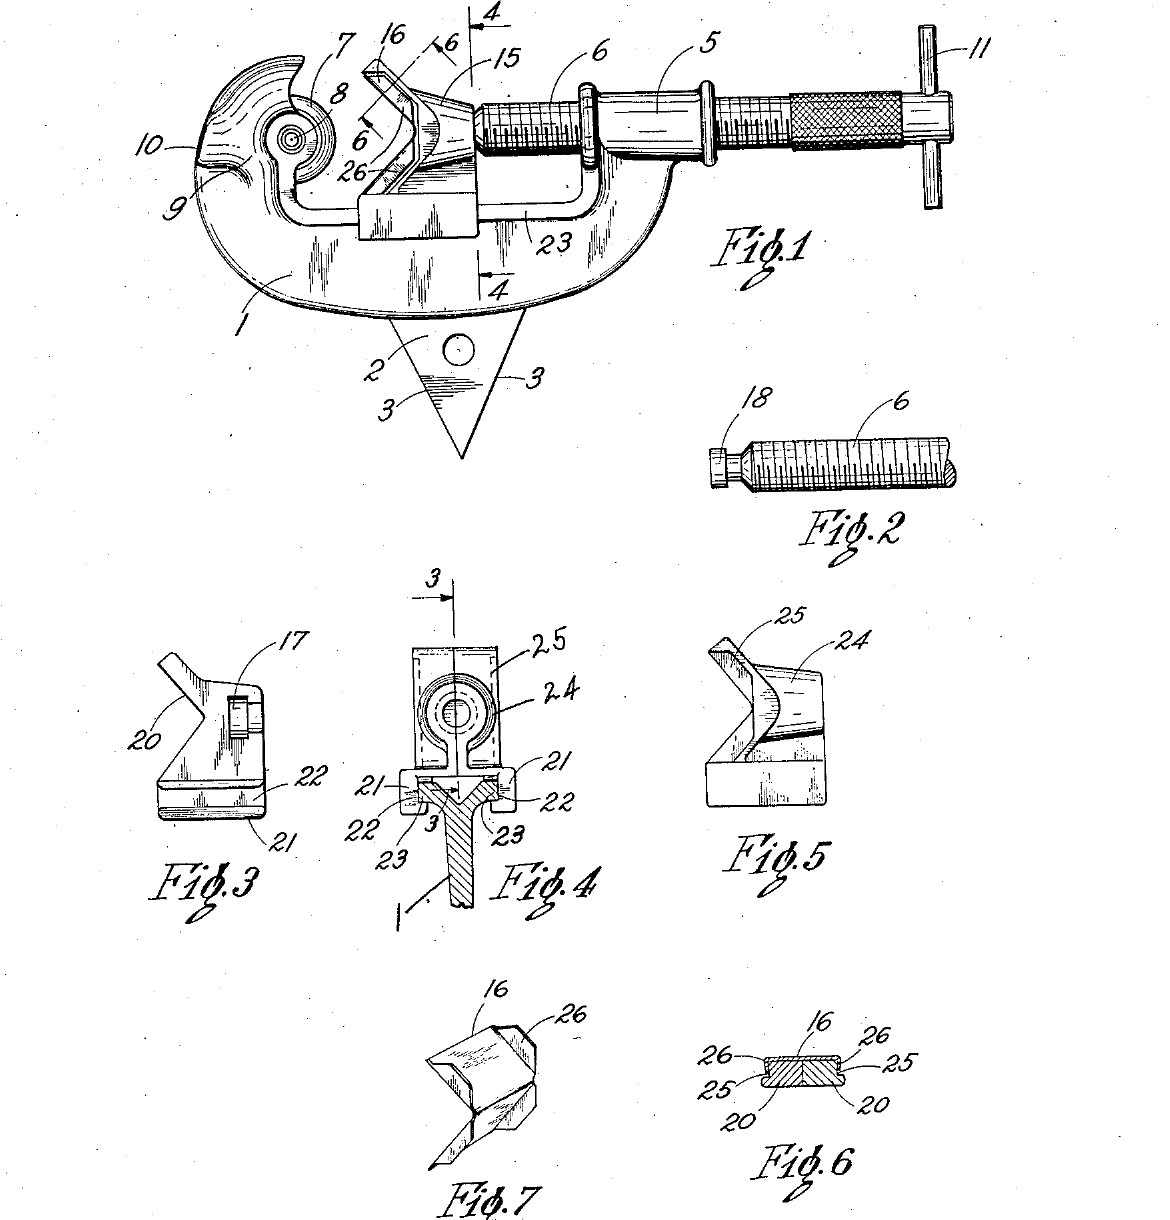
William O. Thewes of North Ridgeville, Ohio, received US 2,130,934, dated 20 September 1938 and assigned to The Ridge Tool Company, for a cutter for thin copper and brass tubing. A C-frame carries a cutting wheel at one end and a feed screw at the other. The screw pushes a V-slide that holds the tube against the wheel. The slide is two halves on ways along the frame, held together by one V-shaped spring clip, which is also the face the tube bears on. A triangular reamer on the side of the frame cleans the cut end, and the frame is its handle. We saw the frame from steel plate and pin the reamer in. His parts were die cast. All sizes are ours.
Intermediate
About 3 days

Instructions

1

Where the tube sits

Loading Jupyter Notebook...
2

Read US 2,130,934

"With my improved cutter the ways or guides are integral with the frame and are uninterrupted throughout the length of the frame, and the slide is held in close sliding engagement on the ways without the use of bolts or rivets."
3

Print the template

Frame, slide half, end section, reamer and clip blank at 1:1 on A4, with the 8 and 28 mm tubes drawn in. print at 100 % (check the 50 mm bar).
Design FilePDFCC0 - Free
4

Saw out the frame

Glue the frame outline on 16 mm plate. Drill a row of holes inside the C, saw to them, and file to the line. Saw the 7 mm wheel slot down through the wheel post with two cuts, break out the middle and file it flat. Drill the 5 mm wheel pin and 4 mm tie pin holes across the slot. Drill 8.5 mm along the screw axis through the other post and tap it M10.

Materials for this step:

Mild Steel PlateMild Steel Plate1 piece

Tools needed:

HacksawHacksaw
File SetFile Set
Drill PressDrill Press
Machine ViceMachine Vice
Drill Bit SetDrill Bit Set
Tap and Die SetTap and Die Set
Center PunchCenter Punch
ScriberScriber
Bench ViseBench Vise
Cutting OilCutting Oil
5

File the ways

Along the bottom bar, between the posts, file a groove 2 mm deep and 4 mm high in both faces, 3 mm below the top edge. This leaves a T-shaped rib along the top: the ways. Keep it straight and the same all along, so the slide runs smoothly from end to end.

Tools needed:

File SetFile Set
Needle File SetNeedle File Set
Bench ViseBench Vise
Digital Caliper 6-InchDigital Caliper 6-Inch
6

Turn the cutting wheel

Chuck a tool steel bar and face it. Turn the end to 20 mm across for 10 mm, centre drill and drill a 5 mm hole 10 mm deep, and turn the edge to a 50 degree vee, 25 degrees each side, sharp in the middle of the 6 mm width. Part it off 6 mm long and take the burr off the hole.

Materials for this step:

Tool Steel BarTool Steel Bar1 piece

Tools needed:

Metal LatheMetal Lathe
Lathe Chuck 3-JawLathe Chuck 3-Jaw
Lathe Cutting ToolLathe Cutting Tool
Parting ToolParting Tool
Center Drill SetCenter Drill Set
Drill Bit SetDrill Bit Set
Digital Caliper 6-InchDigital Caliper 6-Inch
Safety GlassesSafety Glasses
7

Make the reamer

Saw a triangle with 22 mm sides from 3 mm flat tool steel and drill its 4 mm hole. Grind each edge to a 60 degree bevel from both sides, so all three edges cut. Saw a 3 mm wide slot, 22 mm long and 8 mm deep, in the middle of the frame's bottom edge, 50 mm from the wheel end, and drill the 4 mm pin hole across it.

Materials for this step:

Flat Tool Steel BarFlat Tool Steel Bar1 piece

Tools needed:

HacksawHacksaw
Bench GrinderBench Grinder
Drill PressDrill Press
Drill Bit SetDrill Bit Set
File SetFile Set
Safety GlassesSafety Glasses
8

Harden and temper

Heat the wheel and the reamer to a cherry red, until a magnet no longer sticks, and quench it in water, moving it about. Rub it bright with a stone, warm it on a piece of steel plate over the fire, and quench again as soon as it turns a light straw colour.

Tools needed:

ForgeForge
Forge TongsForge Tongs
Small MagnetSmall Magnet
Quench BucketQuench Bucket
WaterWater
Sharpening StoneSharpening Stone
Welding GlovesWelding Gloves
Safety GlassesSafety Glasses
9

Make the slide halves

Saw two pieces of 10 mm plate to the slide outline, one the mirror of the other, and file the V. On the inner face of each, saw and file a pocket for half the screw head and a slot for its neck. Saw and file a step along the bottom edge of each half so its lip fits the groove under the ways (end section on the template). File a shallow notch in the outer face of each half, beside the V, for the clip's tongues.

Materials for this step:

Mild Steel PlateMild Steel Plate1 piece

Tools needed:

HacksawHacksaw
File SetFile Set
Needle File SetNeedle File Set
Bench ViseBench Vise
Digital Caliper 6-InchDigital Caliper 6-Inch
ScriberScriber
10

Bend the V clip

Cut the clip blank from 0.5 mm spring steel strip. Bend the four tongues up at right angles, then fold the blank to 90 degrees on the dashed line, over the slide's V.

Materials for this step:

Spring Steel StripSpring Steel Strip1 piece

Tools needed:

HacksawHacksaw
File SetFile Set
Bench ViseBench Vise
Ball Peen HammerBall Peen Hammer
11

Make the feed screw

Cut 120 mm of M10 threaded rod. Chuck it and turn the end to a 9 mm head 4 mm long on a 6 mm neck 3 mm long. Drill a 6 mm hole across the other end and push a 70 mm piece of 6 mm rod through it for the T-handle. Peen it both sides so it stays put.

Materials for this step:

Threaded RodThreaded Rod1 piece
Mild Steel RodMild Steel Rod1 piece

Tools needed:

Metal LatheMetal Lathe
Lathe Chuck 3-JawLathe Chuck 3-Jaw
Lathe Cutting ToolLathe Cutting Tool
Parting ToolParting Tool
Drill PressDrill Press
Drill Bit SetDrill Bit Set
Ball Peen HammerBall Peen Hammer
HacksawHacksaw
12

Assemble

Fit the wheel in its slot with the 5 mm pin, and the 4 mm tie pin above it, peened. Tap the reamer into its slot and pin it. Screw the feed screw through the boss. Put the halves on the ways from the sides, closing them round the screw head, and spring the clip over their V so its tongues snap into the notches. Oil the ways and the screw.

Materials for this step:

Steel Dowel PinSteel Dowel Pin3 pieces

Tools needed:

Ball Peen HammerBall Peen Hammer
Center PunchCenter Punch
Bench ViseBench Vise
Cutting OilCutting Oil
13

Cut a copper tube

Mark a copper tube and hold it in a vice with soft jaws, or by hand for small tubes. Open the screw, drop the cutter over the tube, and screw the slide in until the wheel just touches. Turn the cutter once round, give the screw about a quarter turn, and go on until the tube parts. The wheel should run in its own groove; the end should be square and not squeezed oval. Clean the inside of the end with a deburring tool.

Materials for this step:

Copper TubeCopper Tube1 piece

Tools needed:

Bench ViseBench Vise

Deburring ToolDeburring Tool
Digital Caliper 6-InchDigital Caliper 6-Inch
14

Ream the end

Hold the frame like a T-handle, put the reamer's point in the cut end, and turn it a few times to take off the fin the wheel has turned in.

Tools needed:

Bench ViseBench Vise
15

Troubleshooting

Tubing cutter troubleshooting.

Flow

Loading...
16

History and honest limits

**William O. Thewes** of North Ridgeville, Ohio, US 2,130,934, dated 20 September 1938, filed 4 November 1935, assigned to The Ridge Tool Company. Earlier slides needed notched ways, which weaken the frame, or bolts that come loose; he claimed "a V block reciprocable on the guideway and comprising two sections, and a face plate clamping said sections together". A later certificate corrects "same" to "frame" and "base" to "boss". His frame and slide were die cast and the reamer cast into the frame; ours are sawn from plate and the reamer is pinned. The patent gives no sizes; all of ours are ours.

Materials

8

Tools Required

28

Design Files

1

CC0 Public Domain

This blueprint is released under CC0. You are free to copy, modify, distribute, and use this work for any purpose, without asking permission.

Support the Maker by purchasing products through their Blueprint where they earn a Maker Commission set by Vendors, or create a new iteration of this Blueprint and include it as a connection in your own Blueprint to share revenue.

Discussion

(0)

Log in to join the discussion

Loading comments...