NGHỆ THUẬT
LÀM ĐẸP VÀ SỨC KHỎE
THỦ CÔNG
VĂN HÓA VÀ LỊCH SỬ
GIẢI TRÍ
MÔI TRƯỜNG
THỰC PHẨM VÀ ĐỒ UỐNG
KỸ THUẬT NGƯỢC
KHOA HỌC
THỂ THAO
CÔNG NGHỆ
THIẾT BỊ ĐEO
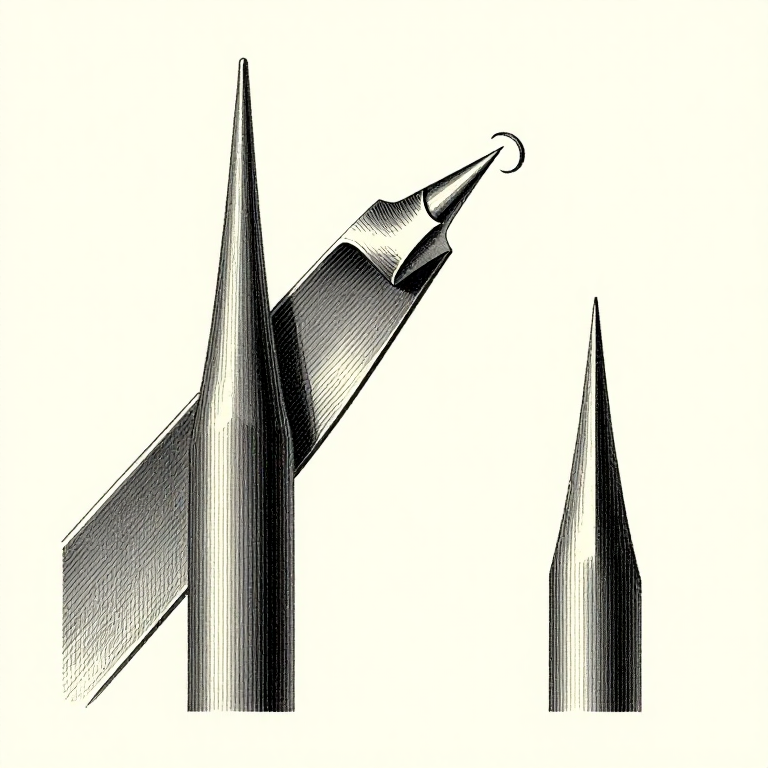


The Wire Edge: The Only Proof You Have Reached the Apex
The hardest question in sharpening is knowing when to stop. Grind too little and the two surfaces have not met yet; the edge is still rounded and no amount of polishing will fix it. Grind too long and you are wasting steel and time.
There is an unambiguous answer, and it is physical rather than visual: a WIRE EDGE — a thin ribbon of metal pushed over to the far side, running the whole length of the edge. It can only form once the bevel has reached the very apex, because there is nothing left to support the metal there.
So the rule is simple: raise a wire edge along the whole edge, then remove it. Everything before that is preparation, and everything after it is polish.
Trung cấp
2 hours
Hướng dẫn
1
1
Feel for it with a thumb, moving off the edge
Feel for it with a thumb, moving off the edge
Draw a thumb gently ACROSS the flat side, away from the edge — never along it. A wire edge catches as a faint roughness or a tiny lip you can feel but often cannot see.
Always move off the edge, never along it. A sharpened edge will open a thumb without any pressure at all, and drawing along it is exactly how that happens. This is the one genuinely sharp-object habit in the whole batch.
Check along the WHOLE length. A wire edge over two thirds of the blade means the other third has not reached the apex yet and is still blunt, which is why a freshly sharpened tool sometimes cuts beautifully at one corner and not at the other.
Công cụ cần thiết:
 Bộ đục - lưỡi vát cạnh
 Kính lúp thợ kim hoàn
2
2
Raise it on purpose, then keep going until it runs the full length
Raise it on purpose, then keep going until it runs the full length
Work the bevel on the coarse stone until you can feel the wire along the entire edge, corner to corner. Do not move to a finer grit before then.
This is the discipline the whole process rests on. Moving up a grit early means the finer stone spends its time polishing a rounded edge, which is slow, satisfying and completely useless. Most disappointing sharpening is this mistake.
If one region refuses to raise a wire, that region is not being touched. Colour it with marker and look at where the stone actually lands — usually the blade is being held at a slightly different angle at that corner, or the stone is dished.
Công cụ cần thiết:
 Đá mài dao
 Bút dạ không xoáBộ đục - lưỡi vát cạnh
3
3
Remove it, do not tear it off
Remove it, do not tear it off
Take a few light strokes on the flat back, then a few more on the bevel, alternating and getting lighter, until the wire is gone. Finish on the strop.
Do not pull the wire off with your fingers or drag it through wood. It is attached to the apex, and tearing it away takes part of the edge with it, leaving a ragged line that looks sharp and fails in the first minute of work. That is why a tool can be 'sharp' on the bench and blunt after two cuts.
Each pass should be lighter than the last. The wire gets thinner, flips to the other side, gets thinner again, and eventually falls away on its own as the two polished surfaces finally meet.
Công cụ cần thiết:
Đá mài dao Dây da liếc daoBộ đục - lưỡi vát cạnh
 Kem đánh bóng
4
4
Three tests, in increasing order of honesty
Three tests, in increasing order of honesty
First the light test: edge-up under a lamp, no bright line anywhere along it. That rules out obvious bluntness in two seconds.
Then paper: a sharp edge slices clean through a hanging sheet without tearing or snagging. Then end grain — pare a thin curl across the end of a softwood offcut. End grain is the real test because the fibres are unsupported, and only a genuine apex severs them instead of crushing them.
A blade that passes paper and fails end grain has a wire edge still attached, or one corner that never came to the apex. That is a useful diagnosis rather than a disappointment, and it tells you exactly which step to return to.
Vật liệu cho bước này:
 Tấm gỗ mềm đã khô1 cái
Công cụ cần thiết:
Bộ đục - lưỡi vát cạnhKính lúp thợ kim hoànVật liệu
1- 1 cáiTạm thời
Công cụ yêu cầu
6- Tạm thời
- Tạm thời
- Tạm thời
- Tạm thời
- Tạm thời
- Tạm thời
Blueprint liên quan
Các blueprint này chia sẻ kiến thức — kỹ thuật, vật liệu hoặc nguyên tắc
CC0 Phạm vi công cộng
Bản thiết kế này được phát hành theo CC0. Bạn tự do sao chép, sửa đổi, phân phối và sử dụng cho bất kỳ mục đích nào mà không cần xin phép.
Hỗ trợ nhà sáng tạo bằng cách mua sản phẩm qua bản thiết kế, nơi họ nhận Hoa hồng nhà sáng tạo do nhà bán hàng đặt, hoặc tạo phiên bản mới và kết nối trong bản thiết kế riêng để chia sẻ doanh thu.