Colaboração
ARTE
BELEZA E BEM-ESTAR
ARTESANATO
CULTURA E HISTÓRIA
ENTRETENIMENTO
MEIO AMBIENTE
COMIDA E BEBIDAS
ENGENHARIA REVERSA
CIÊNCIAS
ESPORTES
TECNOLOGIA
TECNOLOGIA VESTÍVEL
Hinged-Leaf Wing Dasher Churn: Turn One Way to Churn, Reverse and a Leaf Opens to Gather the Butter
Buttercup

Criado por

Buttercup

11. novembro 2026IE
6
0
0
0
0

Hinged-Leaf Wing Dasher Churn: Turn One Way to Churn, Reverse and a Leaf Opens to Gather the Butter

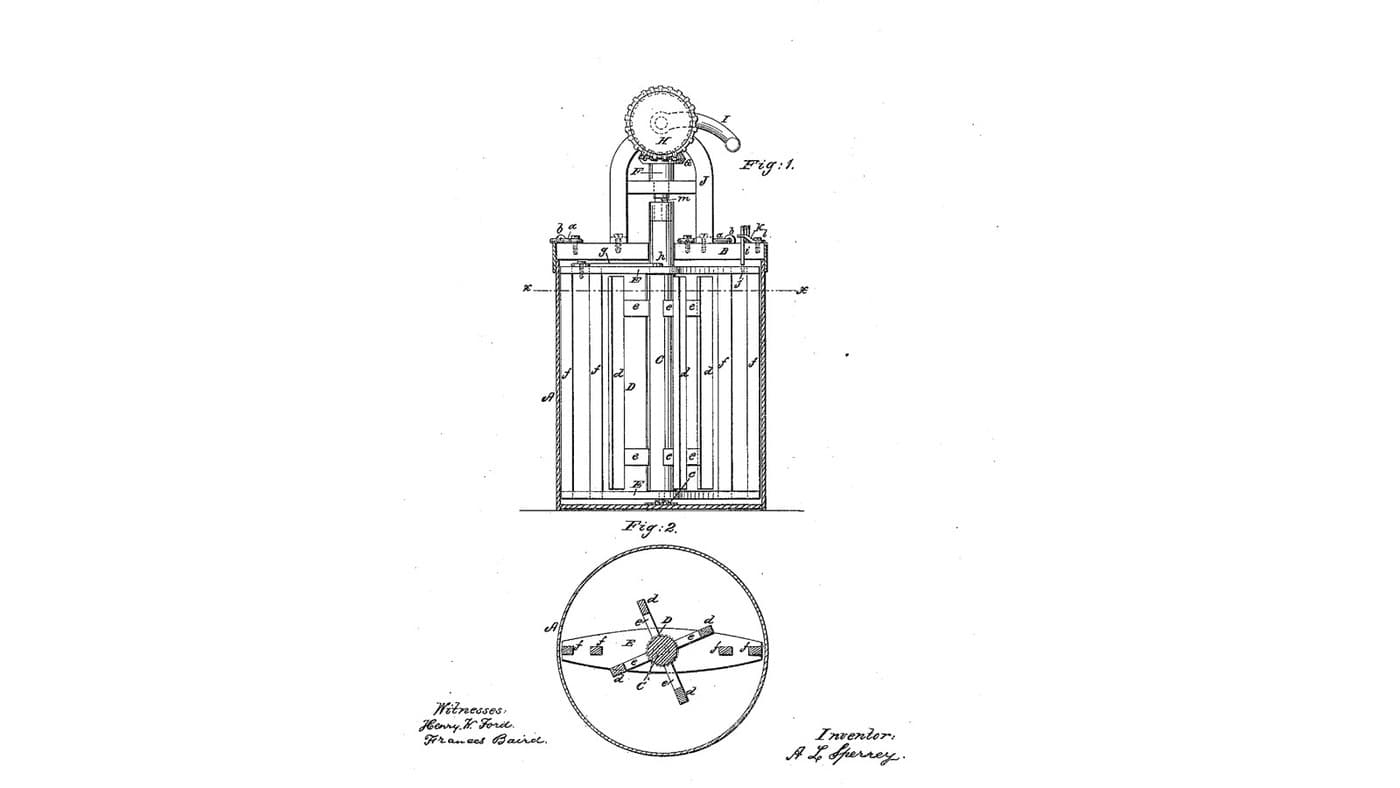
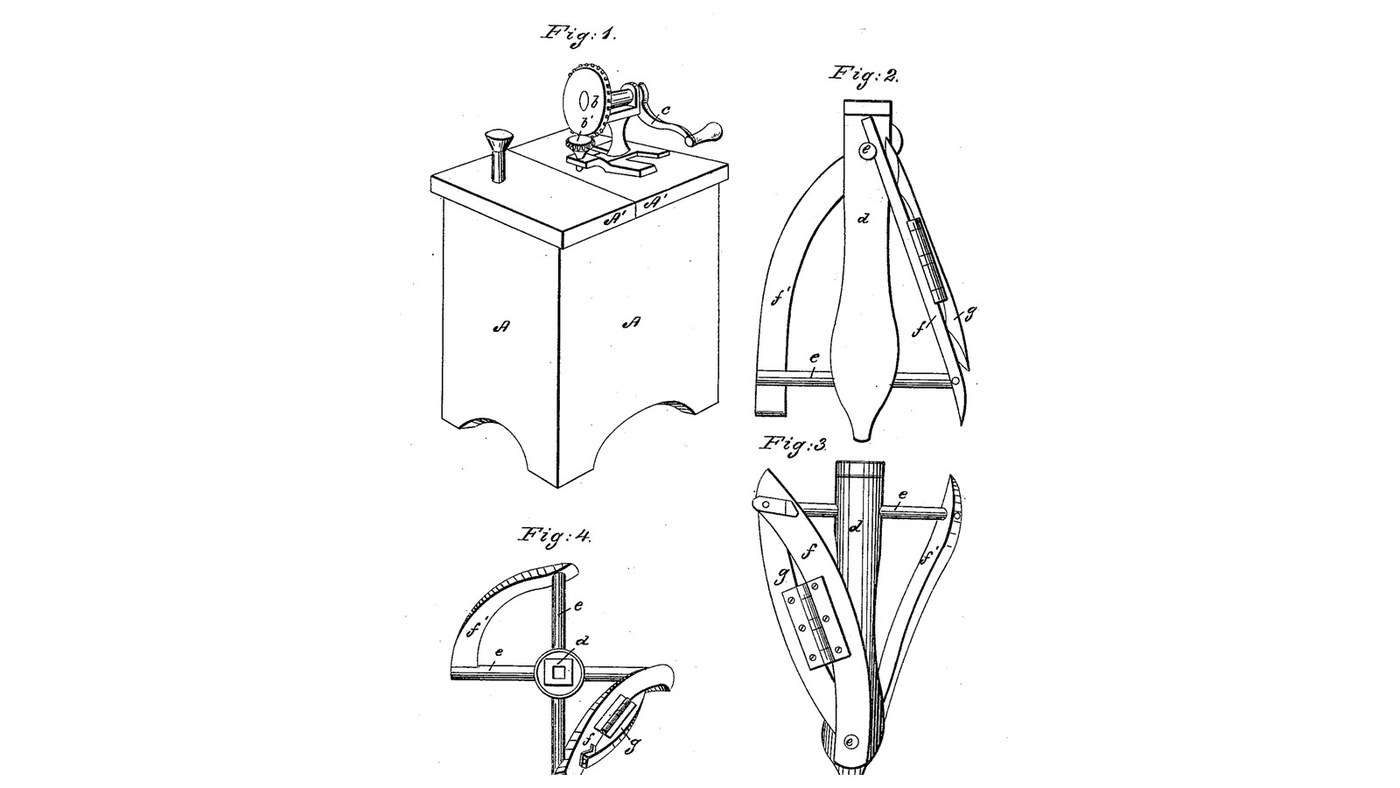
Malachi B. Hassler of Columbia City, Indiana, received US 25,410, dated 13 September 1859, for a churn dasher. A crank and a pair of wheels on the lid turn an upright dasher shaft. Two arms through the shaft carry two curved wings: one bowed outward near the shell, one bowed inward near the shaft. A curved leaf hinged to the inner wing lies folded while churning; turning the dasher the other way opens it, and it gathers the butter near the shell. The patent gives no sizes; every size here is ours.
Intermediário
About 2 days, plus printing

Instruções

1

Crank, wheels and wings

A carregar o notebook Jupyter…
2

Reverse the dash to gather the butter, the same day

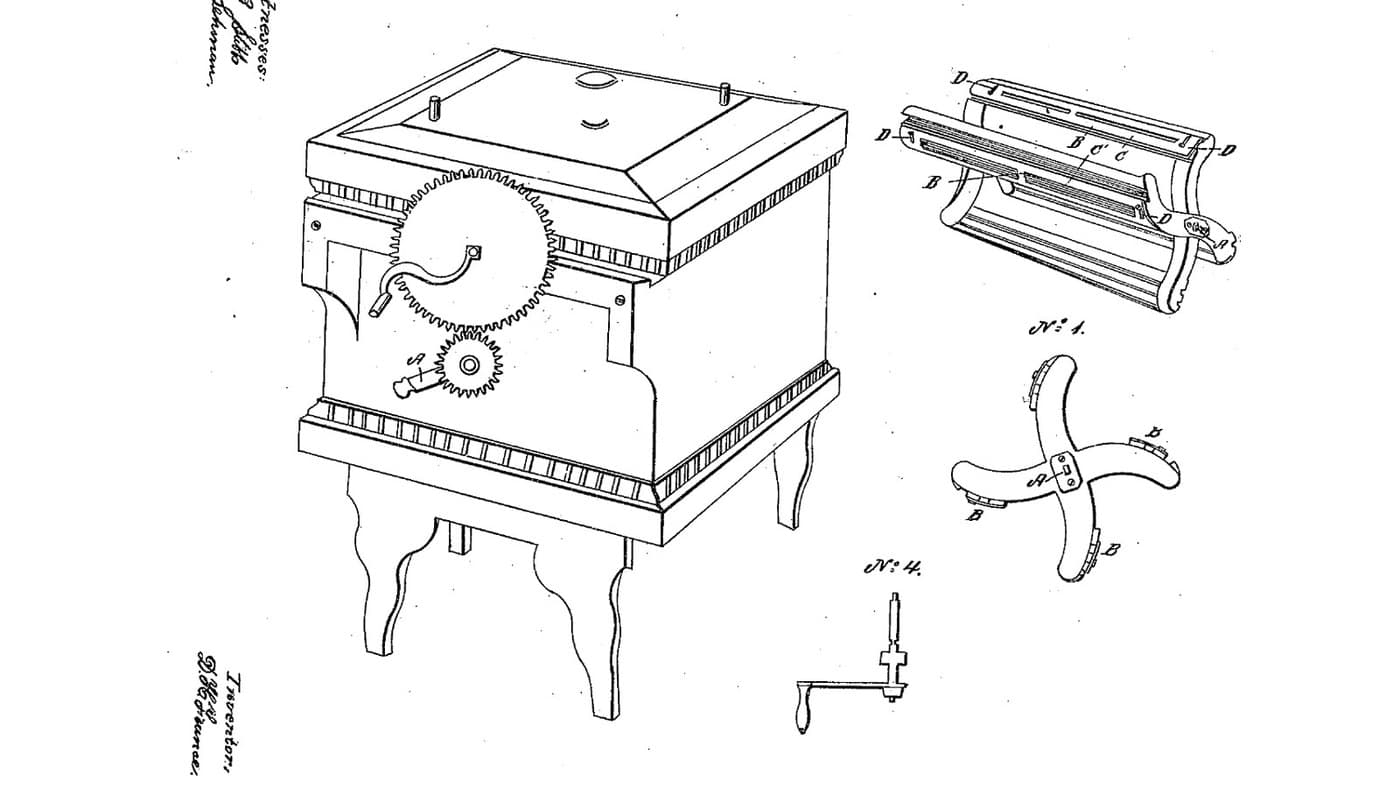
France's strips slide over the gaps when the dash is reversed. Hassler's leaf swings open.
3

Read US 25,410

"hinged to the wing (f) is a folding curved leaf (g), so arranged that it may be folded back upon the wing (f), during the process of churning, and when it may be desired to gather the butter; by reversing the motion of the dasher, the said leaf (g) may be opened as shown clearly in Fig. 3, and serve to gather the butter near the shell of the churn, while the wing (f) serves to secure it next to the shaft (d)"
4

Print the crown wheel b

Crown wheel, 36 teeth on its face, module 2, with a hub bored 12.4 mm and a cross hole for a pin. PETG, 0.2 mm layers, 40 % infill, 4 walls.
Arquivo de designSTLCC0 - Free
5

Print the pinion b'

Spur pinion, 12 teeth, module 2, with a hub bored 12.4 mm and a cross hole for a pin. PETG, 0.2 mm layers, 40 % infill, 4 walls.
Arquivo de designSTLCC0 - Free
6

Print the outer wing f'

The outer wing: a ribbon 36 x 12 mm turning a quarter round at 112 mm from the shaft as it falls 200 mm, convex outward. Print with tree supports. PETG, 0.2 mm layers, 40 % infill, 4 walls.
Arquivo de designSTLCC0 - Free
7

Print the inner wing f

The inner wing: a ribbon 30 x 12 mm bowed in towards the shaft as it falls 200 mm. Print with tree supports. PETG, 0.2 mm layers, 40 % infill, 4 walls.
Arquivo de designSTLCC0 - Free
8

Print the leaf g

The leaf: a curved ribbon 26 x 8 mm that lies on the inner wing's middle. Print with tree supports. PETG, 0.2 mm layers, 40 % infill, 4 walls.
Arquivo de designSTLCC0 - Free
9

Shell A and lid A'

From 20 mm hardwood make a box 300 x 300 mm and 450 mm deep inside, its four sides carried 100 mm below the bottom and cut with an arch 180 mm wide, so they stand as legs. Glue a hardwood step 60 x 60 x 20 mm in the middle of the floor with a 20 mm hole 15 mm deep. Make the lid 380 x 380 mm in two halves, split 30 mm off centre, bore the larger half 13 mm in the middle, and give the smaller half a knob. Fill the box with water overnight so it swells tight, then empty it.

Materiais para este passo:

Tábua de madeira de leiTábua de madeira de lei3 peças
Cola de madeiraCola de madeira1 peça
Parafusos para madeiraParafusos para madeira30 peças
Cavilhas de madeira duraCavilhas de madeira dura1 peça

Ferramentas necessárias:
Serra de mesaSerra de mesa
Serra tico-ticoSerra tico-tico
Berbequim sem fiosBerbequim sem fios
Jogo de brocasJogo de brocas
Sargento de barraSargento de barra
Esquadro fixoEsquadro fixo
Fita métricaFita métrica
ÁguaÁgua
10

Gearing on the lid

Screw a hardwood bridge 80 x 56 x 25 mm over the lid's hole and two chairs 44 x 30 mm, 106 mm tall, in a line towards the front. Pass a 12 mm stainless shaft down through the bridge and lid, with the pinion pinned on top and a 16 mm square hardwood pin glued on below the lid. Pass a 12 mm stainless crank shaft through the chairs with the crown wheel pinned on, meshing with the pinion, and a hardwood crank c with a handle on its end.

Materiais para este passo:

Varão de aço inoxidávelVarão de aço inoxidável1 peça
Tábua de madeira de leiTábua de madeira de lei1 peça
Cavilhas de madeira duraCavilhas de madeira dura1 peça
Cola de madeiraCola de madeira1 peça
Parafusos para madeiraParafusos para madeira8 peças
Filamento PETGFilamento PETG1 peça

Ferramentas necessárias:

Impressora 3D de filamento (FDM)Impressora 3D de filamento (FDM)
Serra de arco para metaisSerra de arco para metais
Limas (lima de mão)Limas (lima de mão)
Berbequim sem fiosBerbequim sem fios
Jogo de brocasJogo de brocas
Conjunto de chaves de fendasConjunto de chaves de fendas
11

Dasher shaft d and arms e e

Turn a hardwood shaft 40 mm square and 435 mm long down to 18 mm across for its last 55 mm, tapering into the square over the 60 mm above. Cut a square socket 16.6 mm across and 35 mm deep in its top. Chisel a 20 mm mortise through it across where it will stand 260 mm above the box's floor, and another at right angles at 60 mm, and glue in two hardwood arms 20 mm square, 224 mm long.

Materiais para este passo:

Tábua de madeira de leiTábua de madeira de lei1 peça
Cola de madeiraCola de madeira1 peça

Ferramentas necessárias:

Torno de madeiraTorno de madeira
Formão de samblagemFormão de samblagem
Maço de madeiraMaço de madeira
SerroteSerrote
LixaLixa
Fita métricaFita métrica
12

Wings f f' and leaf g

Screw the outer wing from the upper arm's back tip down to the lower arm's left tip, bowed out, and the inner wing from the upper arm's front tip down to the lower arm's right tip, bowed in. Hinge the leaf to the inner wing's edge towards the box's corner with the small butt hinge, so it lies on the wing one way and swings out the other. Stand the dasher's foot in the step, put the lid on so the square pin drops into the socket.

Materiais para este passo:

Dobradiça de livro para móvelDobradiça de livro para móvel1 peça
Parafusos para madeiraParafusos para madeira8 peças

Ferramentas necessárias:

Berbequim sem fiosBerbequim sem fios
Jogo de brocasJogo de brocas
Conjunto de chaves de fendasConjunto de chaves de fendas
13

The build in 3D

FreeCAD model of this build, one side and half of another cut away: the shell, the lid with the crown wheel, pinion and crank, and the dasher with its two arms, the two wings and the leaf (shown open). The dasher was turned through 16 angles with the leaf closed and open.
Arquivo de designBLENDCC0 - Free
14

Churn, then gather

Pour about 12 litres of heavy cream at about 15 °C into the box, checked with the thermometer, and put the lid on. Turn the crank the way that keeps the leaf folded on its wing, timing it. When the butter comes, turn the crank the other way so the leaf opens and gathers the butter. Lift the lid off, lift out the butter, drain the buttermilk, wash the butter in cold water until it runs clear, work in a pinch of salt and weigh it.

Materiais para este passo:

Natas para baterNatas para bater12 l
Sal marinho grossoSal marinho grosso1 peça
ÁguaÁgua1 peça

Ferramentas necessárias:

Termómetro de sonda permanenteTermómetro de sonda permanente
CronómetroCronómetro
Balança digital de cozinhaBalança digital de cozinha
Taça grande de aço inoxidávelTaça grande de aço inoxidável
15

Troubleshooting

Hinged-leaf churn troubleshooting.

Flow

Loading...
16

History and honest limits

**Malachi B. Hassler** of Columbia City, Indiana, US 25,410, 13 September 1859, "Churn". He claimed "the arrangement of the hinged curved leaf (g) in combination with the wings (f, f',)". The patent gives no sizes; every size here is ours. The wings' exact curves are read from his drawings; ours are printed.

Materiais

10

Ferramentas necessárias

21

Ficheiros de design

6

CC0 Domínio Público

Este blueprint é liberado sob CC0. Você é livre para copiar, modificar, distribuir e usar este trabalho para qualquer finalidade, sem pedir permissão.

Apoie o Maker comprando produtos através do Blueprint, onde ele ganha uma Comissão Maker definida pelos vendedores, ou crie uma nova versão deste Blueprint e inclua-o como conexão no seu próprio Blueprint para compartilhar receita.

Discussão

(0)

Entrar para participar da discussão

Carregando comentários...