Colaboração
ARTE
BELEZA E BEM-ESTAR
ARTESANATO
CULTURA E HISTÓRIA
ENTRETENIMENTO
MEIO AMBIENTE
COMIDA E BEBIDAS
ENGENHARIA REVERSA
CIÊNCIAS
ESPORTES
TECNOLOGIA
TECNOLOGIA VESTÍVEL
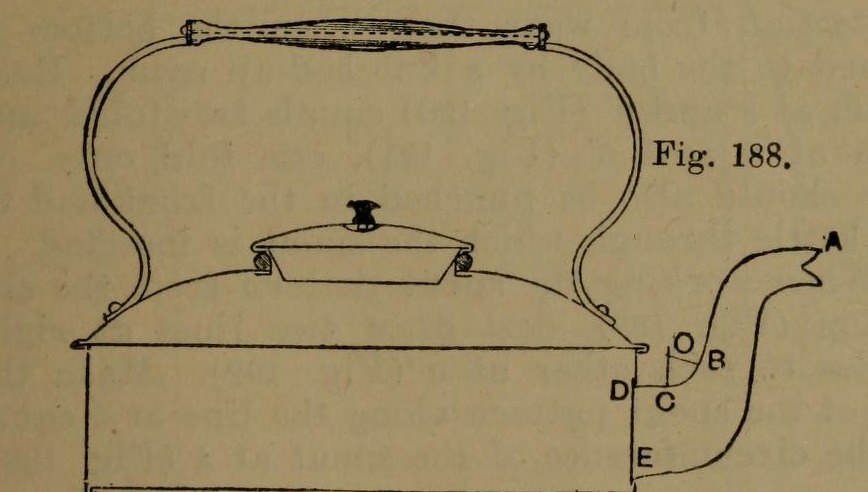


Stovetop Kettle: a Square Copper Kettle (Hasluck, 1907)
A tinsmith's square kettle in sheet copper, 9 x 9 in and 3 5/8 in deep: a box body with folded corner seams, a hollowed top pened on, a brazed and bent spout, a small cover, and a wooden handle on brass uprights.
Hasluck prefers copper; tinplate also works and is a separate route.
Source: Paul N. Hasluck, Tinplate Work (1907), pp. 91-98. Unknown: copper gauge, solder. Picture: Figs. 188-189 of the book.
Avançado
Unknown
Instruções
1
1
Cut the patterns
Cut the patterns
For a body 9 x 9 x 3 5/8 in, cut two ends 9 1/2 x 4 in and two sides 9 1/4 x 4 in, notched for box seams at the corners (Figs. 190-191), with allowances to fold at top and bottom. Punch the spout hole in the front. Cut the bottom 9 1/2 in square, notched for a 1/4 in edge. Set out the top as a 10 1/2 in square with curved allowances for hollowing and a 4 in circle for the cover hole (Fig. 193); set out the spout from the elevation (Fig. 192), the cover and its cone-shaped rim (Figs. 194-195).
Materiais para este passo:
 Chapa de cobre1 body, bottom, top, spout, cover
Ferramentas necessárias:
 Compasso de pontas
 Ponta de traçar
 Tesoura de chapa
2
2
Braze and shape the spout
Braze and shape the spout
Thin the long edges by hammering. Set in the throat with a stretching hammer on a beak iron, bend the spout round until the edges overlap, bind it with wire, lay spelter and borax along the inside of the seam and braze it; then close and braze the under seam. Fill it with lead and bend the neck with a round-faced hammer on the hollowing block; file off spare spelter and smooth it. Run out the lead, throw off a seating round the large end, trim the top with snips and tin the inside.
Materiais para este passo:
 Metal desconhecido1 spelter
 Estanho1 tinning
Ferramentas necessárias:
 Martelo de aplanar
 Estaca
 Arame de ferro
 Bórax em pó
 Maçarico de brasagem
 Chumbo
 Escumadeira perfurada
 Bloco de madeira dura
 Lima para metalTesoura de chapa
3
3
Fold and seam the body
Fold and seam the body
Fold the top edges square, the front and back outwards and the sides likewise; fold the bottom edges right over inwards to take the bottom (Fig. 188). Hook each side's end over the front's and work the corner seam on a straight-edged tool (Figs. 198-199). Turn up the bottom's 1/4 in edge, push it edge-down into the bottom folds, and solder the bottom and seams.
Materiais para este passo:
 Solda de estanho-chumbo1 peça
Ferramentas necessárias:
 Maço de madeiraEstaca
 Ferro de solda elétrico
 Fluxo
4
4
Hollow the top and make the cover
Hollow the top and make the cover
Hollow the top on the block: sink the four sides a little, hollow the corners with a bullet-faced hammer, flatten each side along the block edge, even the shoulder and smooth it all over. Pare the edges, mark the flange with an edging machine, set it down square with a hatchet stake and mallet, and take up an edge to fit over the body. Cut the cover hole with circular snips and fit a narrow wired rim, worked over inside. Make the cover: solder its cone rim to fit the wired rim, throw off a flange, hollow the cover disc and seam it on, and fix the knob.
Materiais para este passo:
Arame de ferro1 rimSolda de estanho-chumbo1 peçaMetal desconhecido1 cover knobFerramentas necessárias:
Martelo de aplanarBloco de madeira duraEstacaMaço de madeiraTesoura de chapaFerro de solda elétricoFluxo5
5
Handle, top and spout
Handle, top and spout
Cut two handle uprights from stout brass or copper band (Fig. 196), drill them for rivets and for the spindle that carries the wooden handle, and bend them to shape. Rivet them to the top and solder over the rivet heads inside. Pene the top down onto the body and solder along each edge. Push the spout through its hole from inside until its large end butts against the front, and solder it strongly from inside.
Materiais para este passo:
 Chapa de latão1 handle uprights
 Varão de latão1 spindle
 Cabo1 wood
 Rebites de cobre1 number not givenSolda de estanho-chumbo1 peça
Ferramentas necessárias:
 Berbequim de mão
 Martelo de rebitarMaço de madeiraFerro de solda elétricoFluxo
Materiais
9- 1 body, bottom, top, spout, coverReferência
- 1 cover knobReferência
- 1 tinningReferência
- 3 peçasReferência
- 1 rimReferência
- 1 handle uprightsReferência
- 1 spindleReferência
- 1 woodReferência
- 1 number not givenReferência
Ferramentas necessárias
17- Referência
- Referência
- Referência
- Referência
- Referência
- Referência
- Referência
- Referência
- Referência
- Referência
- Referência
- Referência
- Referência
- Referência
- Referência
- Referência
- Referência
Materiais de Blueprints conectados


Este projeto faz

CC0 Domínio Público
Este blueprint é liberado sob CC0. Você é livre para copiar, modificar, distribuir e usar este trabalho para qualquer finalidade, sem pedir permissão.
Apoie o Maker comprando produtos através do Blueprint, onde ele ganha uma Comissão Maker definida pelos vendedores, ou crie uma nova versão deste Blueprint e inclua-o como conexão no seu próprio Blueprint para compartilhar receita.