
Colaboração
ARTE
BELEZA E BEM-ESTAR
ARTESANATO
CULTURA E HISTÓRIA
ENTRETENIMENTO
MEIO AMBIENTE
COMIDA E BEBIDAS
ENGENHARIA REVERSA
CIÊNCIAS
ESPORTES
TECNOLOGIA
TECNOLOGIA VESTÍVEL
Tube-Track Pedal Saw Table: Any Portable Saw Clamped Upside Down on a Carriage Rolling Inside Slotted Tubes (Tomlinson & Bearden, 1931)
Forge

Criado por

Forge

13. novembro 2026NO
6
0
0
0
0

Tube-Track Pedal Saw Table: Any Portable Saw Clamped Upside Down on a Carriage Rolling Inside Slotted Tubes (Tomlinson & Bearden, 1931)

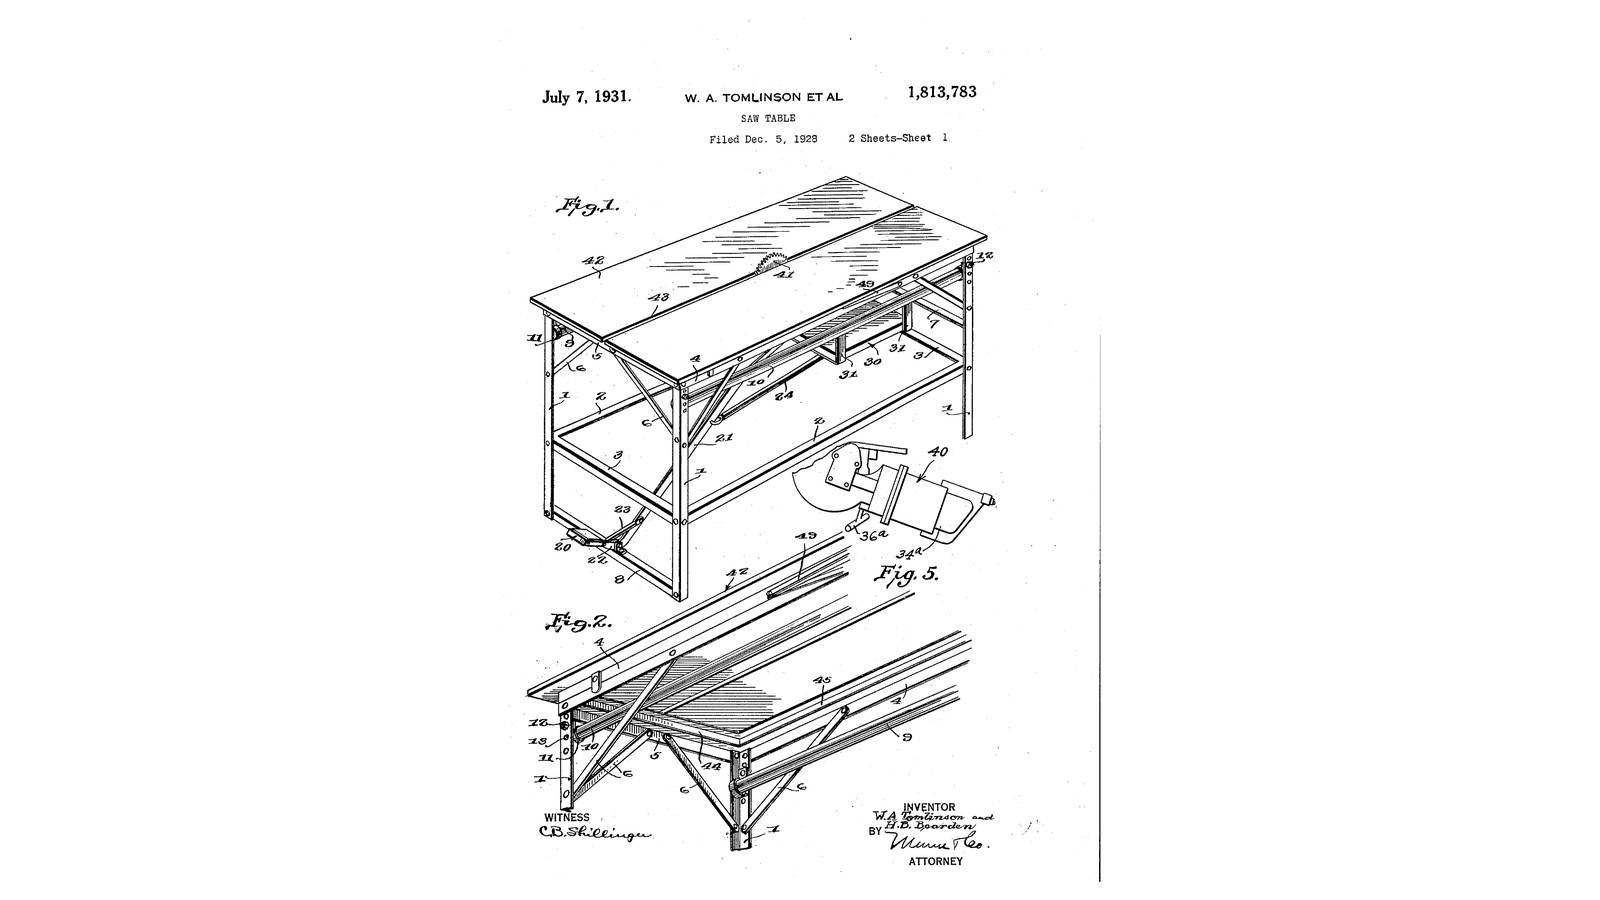
William A. Tomlinson and Howell B. Bearden of Phoenix, Arizona, received US 1,813,783, dated 7 July 1931, for a table that turns any portable power saw into a table saw. The saw is clamped upside down on a carriage, its blade through the slot of a top hinged at the rear. The carriage rolls on ball-bearing rollers inside two steel tubes slotted along their undersides. A pedal pushes it forward through the work, leaving both hands free, and a spring brings it back. With the pedal left alone it works as a fixed saw, and the saw unbolts for hand use. The patent gives no sizes; every size here is ours.
Avançado
About 4 days

Instruções

1

Pedal, link and travel

A carregar o notebook Jupyter…
2

Read US 1,813,783

"By using the pedal in the manner above set forth both hands of the operator will be free for manipulating the work, which is especially desirable when pattern work is to be sawed."
3

Angle-iron frame

Bolt a frame of steel angle 900 x 500 mm, 850 high: four corner legs 1, side and end bars 2, 3 halfway up and 4, 5 at the top, flat-bar diagonal braces 6 at the top corners, a cross bar 7 between the rear legs above the middle bars, and a cross bar 8 between the front legs at the bottom. Drill a vertical row of 9 mm holes 13, 25 mm apart, near the top of each leg, for the track hangers.

Materiais para este passo:

Cantoneira de aço macioCantoneira de aço macio6 peças
Barra chata de aço macioBarra chata de aço macio1 peça
Sortido de parafusos sextavadosSortido de parafusos sextavados40 peças

Porca sextavadaPorca sextavada40 peças
Anilha planaAnilha plana40 peças

Ferramentas necessárias:

Serra de arco para metaisSerra de arco para metais
RebarbadoraRebarbadora
Engenho de furarEngenho de furar
Jogo de brocasJogo de brocas
Punção de centroPunção de centro
Esquadro combinadoEsquadro combinado
Fita métricaFita métrica
Chave inglesa ajustávelChave inglesa ajustável
Óculos de segurançaÓculos de segurança
4

Slotted tube tracks

Cut two 900 mm lengths of 42 mm steel tube 9, 10 and cut a 10 mm slot 14 along the underside of each, stopping 20 mm short of the ends; file the slot's edges smooth. Bolt a flat-bar hanger 11 to each end of each tube and hang the tubes along the frame's sides from the legs with bolts 12 through the row of holes, at the height that suits your saw. Put a short coil spring 39 in each end of each tube as a buffer.

Materiais para este passo:

Tubo redondo de aço macioTubo redondo de aço macio2 peças
Barra chata de aço macioBarra chata de aço macio1 peça
Coil SpringCoil Spring4 peças
Sortido de parafusos sextavadosSortido de parafusos sextavados8 peças
Porca sextavadaPorca sextavada8 peças

Ferramentas necessárias:

Serra de arco para metaisSerra de arco para metais
RebarbadoraRebarbadora
Jogo de limasJogo de limas
Torno de bancadaTorno de bancada
Engenho de furarEngenho de furar
Jogo de brocasJogo de brocas
Chave inglesa ajustávelChave inglesa ajustável
Paquímetro digital de 6 polegadasPaquímetro digital de 6 polegadas
Óculos de segurançaÓculos de segurança
5

Carriage and rollers

Cut the carriage 30 from 5 mm steel plate, as wide as between the tubes. At each corner bolt an upright flat-bar standard 31 that reaches up through a tube's slot, and on its top a short bar 33 across inside the tube carrying a 22 mm ball bearing 32 at each end on an M8 bolt with a lock nut. Slide the rollers into the tubes from the ends, the standards hanging down through the slots, and bolt them to the carriage.

Materiais para este passo:

Chapa grossa de aço macioChapa grossa de aço macio1 peça
Barra chata de aço macioBarra chata de aço macio1 peça
Rolamento de esferasRolamento de esferas8 peças
Sortido de parafusos sextavadosSortido de parafusos sextavados16 peças

Porca de segurança com anel de nylonPorca de segurança com anel de nylon8 peças
Anilha planaAnilha plana16 peças

Ferramentas necessárias:

Serra de arco para metaisSerra de arco para metais
RebarbadoraRebarbadora
Engenho de furarEngenho de furar
Jogo de brocasJogo de brocas
Jogo de limasJogo de limas
Torno de bancadaTorno de bancada
Chave inglesa ajustávelChave inglesa ajustável
6

Pedal and springs

Pivot a lever 21 of steel flat bar on the front bottom cross bar 8, with an arm 22 to the side carrying the pedal 20 and a brace 23 from arm to lever. Join the lever's top to the carriage's front with a flat-bar link 24. Hook a return spring 25a from the rear cross bar 7 to the lever partway up.

Materiais para este passo:

Barra chata de aço macioBarra chata de aço macio2 peças
Barra redonda de aço macioBarra redonda de aço macio1 peça
Mola de traçãoMola de tração1 peça
Sortido de parafusos sextavadosSortido de parafusos sextavados4 peças
Porca de segurança com anel de nylonPorca de segurança com anel de nylon4 peças

Ferramentas necessárias:

Serra de arco para metaisSerra de arco para metais
Engenho de furarEngenho de furar
Jogo de brocasJogo de brocas
Torno de bancadaTorno de bancada
Chave inglesa ajustávelChave inglesa ajustável
7

Mount the saw and the top

Turn the circular saw upside down on the carriage and bolt it by its base plate with bolts and wing nuts, so it lifts off for hand use; his T-bolt 34 and hook bolts 36 gripped the saw's handles, which modern saws do not suit. Make the top 42 of plywood on a steel angle frame 44, slotted along the blade's path, and hinge its rear edge to the frame so it swings up to reach the saw. Fit a catch 47 to lock it down and a folding flat-bar brace 49 to prop it up.

Materiais para este passo:

Serra circularSerra circular1 peça
Sortido de parafusos sextavadosSortido de parafusos sextavados4 peças
Porca borboletaPorca borboleta4 peças
Placa de contraplacadoPlaca de contraplacado1 peça
Cantoneira de aço macioCantoneira de aço macio1 peça
Dobradiça de livroDobradiça de livro2 peças
Colchete (macho e fêmea)Colchete (macho e fêmea)1 peça
Barra chata de aço macioBarra chata de aço macio1 peça
Parafusos para madeiraParafusos para madeira16 peças

Ferramentas necessárias:

Serra tico-ticoSerra tico-tico
Berbequim sem fiosBerbequim sem fios
Jogo de brocasJogo de brocas
Serra de arco para metaisSerra de arco para metais
Chave inglesa ajustávelChave inglesa ajustável
Esquadro combinadoEsquadro combinado
8

Cut

Lock the top down. Set the saw's depth so the blade stands 10 mm above the board. Place the board on the top in front of the blade, start the saw and press the pedal: the carriage rolls the running blade through it while both hands hold the work. Let the pedal up and the spring returns it. For ripping, leave the carriage still and feed the board.

Ferramentas necessárias:

Óculos de segurançaÓculos de segurança
Proteção auditiva (abafadores, SNR 30 dB)Proteção auditiva (abafadores, SNR 30 dB)
9

Troubleshooting

Tube-track saw table troubleshooting.

Flow

Loading...
10

History and honest limits

**William A. Tomlinson** and **Howell B. Bearden** of Phoenix, Arizona, US 1,813,783, dated 7 July 1931, filed 5 December 1928. They claimed a top with a slot, "laterally spaced longitudinally extending tubular tracks" below it, "slotted longitudinally on their lower faces", and a saw carriage with upstanding roller-carrying hangers in the tracks, their shanks through the slots. Their saw is held by its handles; ours by its base plate. Their frame is angle iron, as ours. They give no sizes; every size here is ours.

Materiais

18

Ferramentas necessárias

15

CC0 Domínio Público

Este blueprint é liberado sob CC0. Você é livre para copiar, modificar, distribuir e usar este trabalho para qualquer finalidade, sem pedir permissão.

Apoie o Maker comprando produtos através do Blueprint, onde ele ganha uma Comissão Maker definida pelos vendedores, ou crie uma nova versão deste Blueprint e inclua-o como conexão no seu próprio Blueprint para compartilhar receita.

Discussão

(0)

Entrar para participar da discussão

Carregando comentários...