Współpraca
SZTUKA
Piękno i dobre samopoczucie
RZEMIOSŁO
KULTURA I HISTORIA
ROZRYWKA
ŚRODOWISKO
JEDZENIE I NAPOJE
INŻYNIERIA ODWROTNA
NAUKI
LEKKOATLETYKA
TECHNOLOGIA
URZĄDZENIA DO NOSZENIA
Hinged-Arm Frame Churn: An Arm That Swings Back Holds the Dasher's Top, Its Forked Brace Holds the Cover Down
Buttercup

Autor

Buttercup

11. listopad 2026IE
10
0
0
0
0

Hinged-Arm Frame Churn: An Arm That Swings Back Holds the Dasher's Top, Its Forked Brace Holds the Cover Down

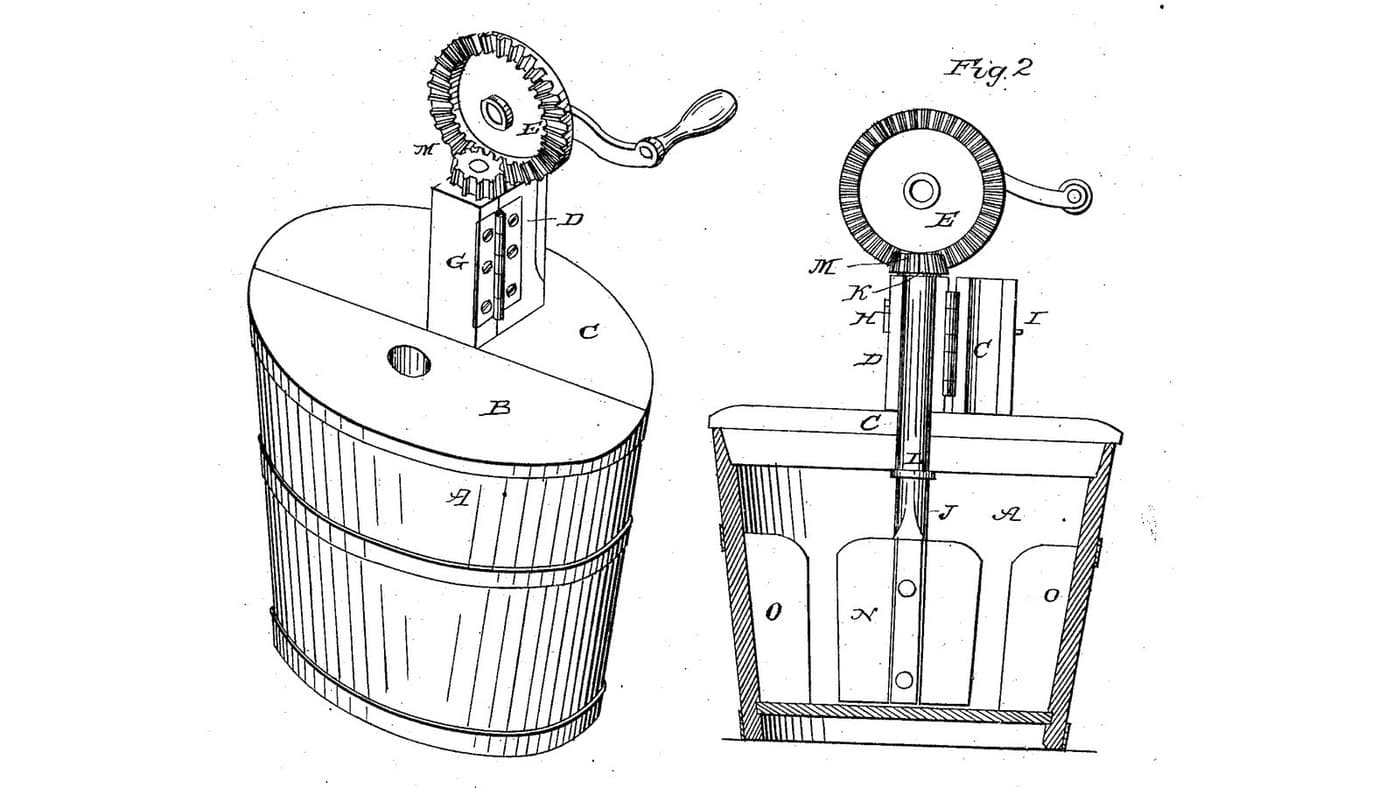
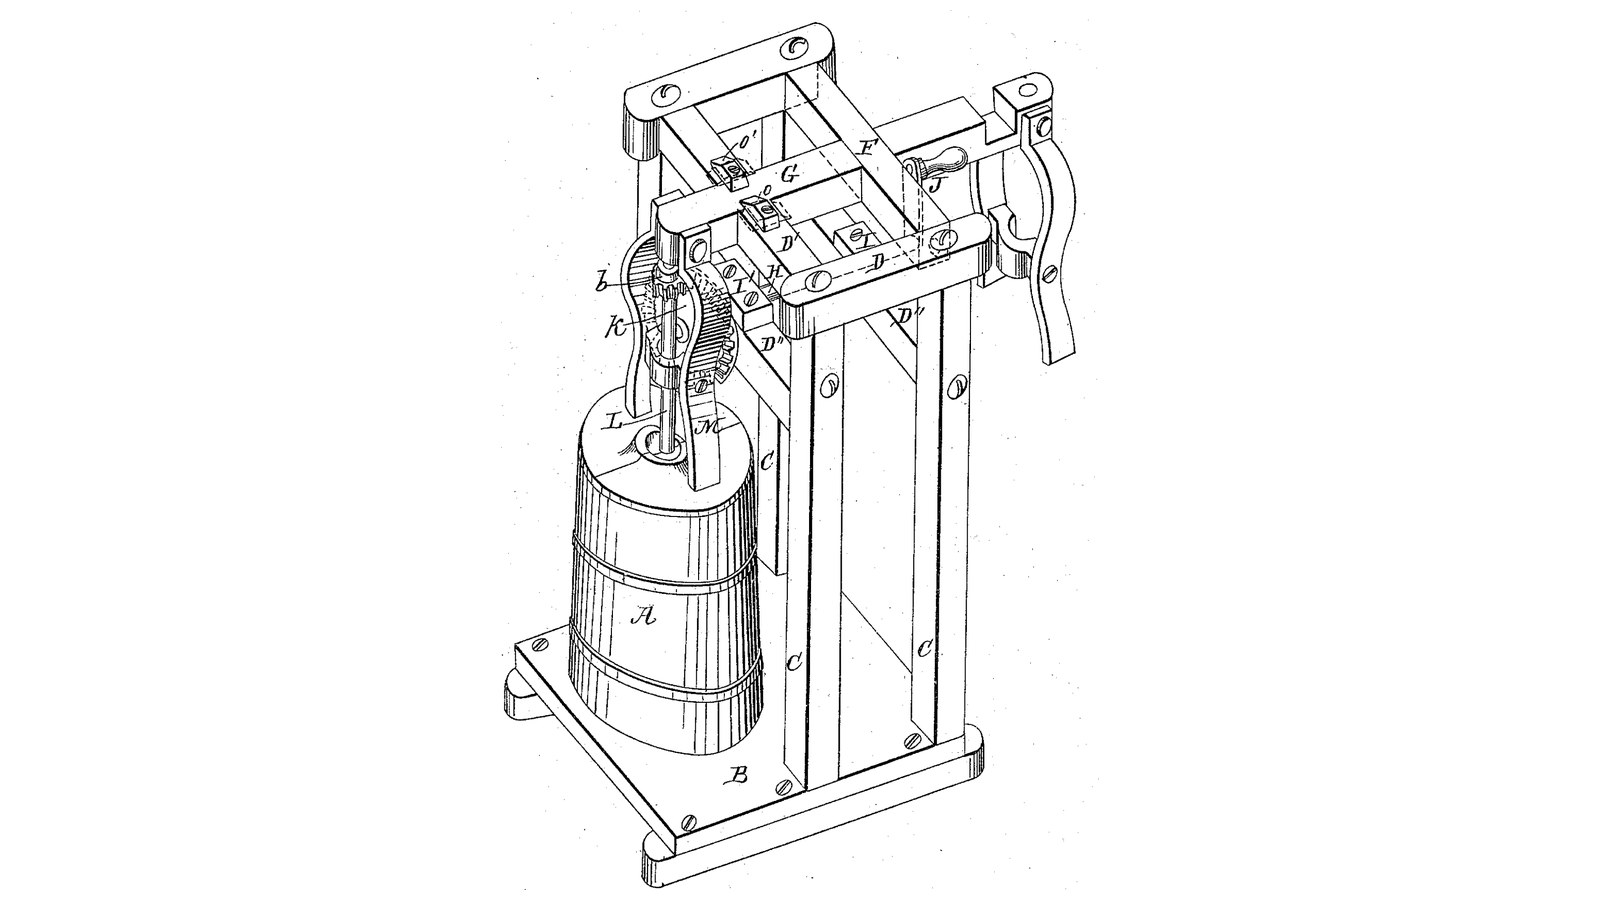
John Stilwell of Griffin, Georgia, received US 32,388, dated 21 May 1861, for a stand that turns the dasher of an upright churn. The churn stands on a base in front of a frame; an arm fixed to a cross bar turning in the frame's top reaches over it and holds the dasher's top, while a crank shaft on the frame turns the dasher through bevel gearing. A forked brace hinged to the arm presses the two half covers and the churn down. Turn the brace up to look in, or loosen two buttons and swing the arm back to take the churn out. The patent gives no sizes; every size here is ours.
Średniozaawansowany
About 3 days

Instrukcje

1

Swinging the arm clear

Wczytywanie notatnika Jupyter…
2

A hinged bearing over the churn, a year before

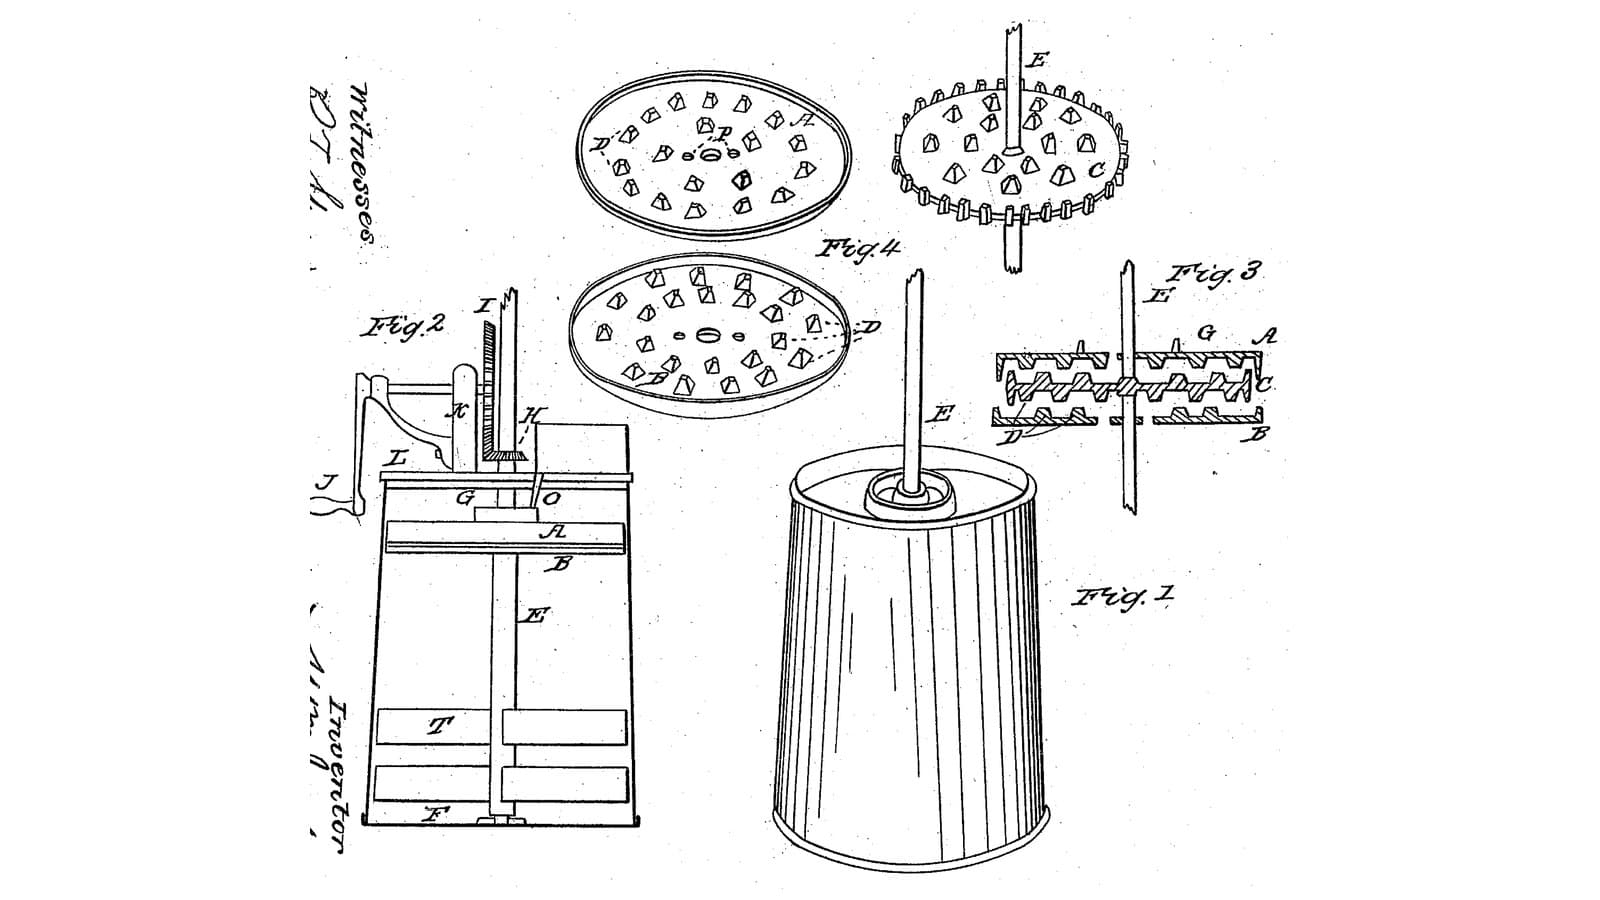
Mitchell hangs the dasher from a hinged journal box. Stilwell steps it in the churn and holds its top in an arm that swings back.
3

Read US 32,388

"By means of the forked brace bar the churn is held in position in the frame without other fastening and the cover firmly fastened thereon, thus preventing the cream from being thrown out by the action of the beaters. The brace bar also serves to steady the end of the arm in which the beater shaft is stepped."
4

Base B, uprights C and cross ties D, D', D''

Glue up a hardwood base B 400 x 600 x 30 mm. Mortise four hardwood uprights C 40 x 40 mm, 603 long, into it at the back, 220 mm apart side to side, in pairs 100 mm apart front to back, 230 mm behind where the churn's centre will be. Join each side pair at the top with a cross tie D 40 x 30, 160 long, bored 20.6 mm across 40 mm from its front end for the cross bar's journals; join the front pair with a cross tie D' 260 long, 30 below the top; and join each pair 430 mm up with a cross tie D'' 260 x 40 x 20 for the crank shaft's boxes.

Materiały do tego kroku:

Deska z drewna liściastegoDeska z drewna liściastego4 sztuk
Klej do drewnaKlej do drewna1 sztuka
Wkręty do drewnaWkręty do drewna24 sztuk

Potrzebne narzędzia:

Pilarka stołowaPilarka stołowa
Komplet dłut do drewnaKomplet dłut do drewna
Frezarka górnowrzecionowaFrezarka górnowrzecionowa
Wiertarko-wkrętarka akumulatorowaWiertarko-wkrętarka akumulatorowa
Zestaw wiertełZestaw wierteł
Zestaw wierteł łopatkowychZestaw wierteł łopatkowych
Ścisk stolarski listwowyŚcisk stolarski listwowy
Miara zwijanaMiara zwijana
5

Cross bar F, arm G, buttons O, O' and brace bar M

Run a 20 mm stainless rod 270 mm long as the cross bar F through both cross ties D. Cut a hardwood arm G 40 x 30 mm, 310 long, bore it across 20.4 mm 20 mm from its back end, and pin it on F so it reaches forward over the churn's centre resting on the tie D'. Glue a hardwood block 40 x 40 x 40 under its front end, bored 16.6 mm 30 deep from below for the staff's top. Screw two hardwood buttons O, O' on the tie D' either side of the arm, to turn over it. For the brace bar M, cut two hardwood legs 20 x 20 mm, 250 long, and a foot bar 110 x 20 x 12 notched for the staff, and hang the legs either side of the arm on a 12 mm stainless pin through it above the staff, so the foot presses the cover.

Materiały do tego kroku:

Pręt ze stali nierdzewnejPręt ze stali nierdzewnej2 sztuk
Deska z drewna liściastegoDeska z drewna liściastego1 sztuka
Klej do drewnaKlej do drewna1 sztuka
Wkręty do drewnaWkręty do drewna6 sztuk
ZawleczkaZawleczka4 sztuk

Potrzebne narzędzia:

Pilarka stołowaPilarka stołowa
Wiertarko-wkrętarka akumulatorowaWiertarko-wkrętarka akumulatorowa
Zestaw wiertełZestaw wierteł
Zestaw wierteł łopatkowychZestaw wierteł łopatkowych
Piła do metaluPiła do metalu
Pilniki (pilnik ręczny)Pilniki (pilnik ręczny)
Zestaw wkrętakówZestaw wkrętaków
6

Print the step

The step in the churn's bottom: 40 mm across, 12 high, with a 16.8 mm hole 8 deep. PETG, 0.2 mm layers, 30 % infill, 4 walls.
Plik projektowySTLCC0 - Free
7

Print the pinion b

The pinion on the staff: 14 teeth, module 2.5, 16.2 mm bore. PETG, 0.2 mm layers, 30 % infill, 4 walls.
Plik projektowySTLCC0 - Free
8

Print the bevel wheel K

The driving wheel K: a crown wheel of 42 teeth, module 2.5, 16.2 mm bore. PETG, 0.2 mm layers, 30 % infill, 4 walls.
Plik projektowySTLCC0 - Free
9

Churn A, covers, staff L, shaft H, wheel K and crank J

Use a 20-litre food-grade bucket as the churn A on the base in front of the frame, with the step in its bottom. Cut a 12 mm HDPE cover to it and saw it in two halves through a 17 mm centre hole. Cut a 16 mm stainless staff L 586 mm long, screw two crossed hardwood slats 240 x 30 x 8 mm on hubs 70 and 170 mm above its foot as the dasher, and pin the pinion b on it 420 mm above the churn's floor. Screw two hardwood boxes I, I' 50 x 24 x 47 mm on the D'' ties, bored 16.6 mm across 23 mm above them. Run a 16 mm stainless shaft H 410 mm long through them with the wheel K pinned on its front end meshing b, a shaft collar behind the front box, and a crank J of mild steel flat bar, 100 mm throw, with a hardwood handle at the back.

Materiały do tego kroku:

Wiadro 20-litroweWiadro 20-litrowe1 sztuka
Płyta HDPEPłyta HDPE1 sztuka
Pręt ze stali nierdzewnejPręt ze stali nierdzewnej2 sztuk
Deska z drewna liściastegoDeska z drewna liściastego1 sztuka
Kołki z twardego drewnaKołki z twardego drewna1 sztuka
Wkręty do drewnaWkręty do drewna8 sztuk
Shaft CollarShaft Collar1 sztuka
ZawleczkaZawleczka3 sztuk
Płaskownik ze stali miękkiejPłaskownik ze stali miękkiej1 sztuka
Filament PETGFilament PETG1 sztuka

Potrzebne narzędzia:

Drukarka 3D z filamentem (FDM)Drukarka 3D z filamentem (FDM)
KompasKompas
WyrzynarkaWyrzynarka
Zestaw wierteł łopatkowychZestaw wierteł łopatkowych
Wiertarko-wkrętarka akumulatorowaWiertarko-wkrętarka akumulatorowa
Zestaw wiertełZestaw wierteł
Piła do metaluPiła do metalu
Pilniki (pilnik ręczny)Pilniki (pilnik ręczny)
Imadło warsztatoweImadło warsztatowe
Zestaw wkrętakówZestaw wkrętaków
10

The build in 3D

FreeCAD model of this build, the churn cut open: the base and frame, the cross bar with the arm and its bearing block, the buttons, the forked brace bar on the covers, the staff with its slats and pinion, and the crank shaft with the bevel wheel running back through the frame to the crank.
Plik projektowyBLENDCC0 - Free
11

Churn

With the arm turned back, stand the churn on the base with the staff in its step, pour in about 10 litres of heavy cream at about 15 °C, checked with the thermometer, and lay on the half covers. Swing the arm down over the staff's top, turn the buttons over it and let the brace bar rest on the covers. Turn the crank steadily, timing it. To look in, turn the brace up and lift a half cover. When the butter comes, turn the buttons, swing the arm back, lift out the staff, take out the butter, pour the buttermilk into a bowl, wash the butter in cold water until it runs clear, salt and weigh it.

Materiały do tego kroku:

Śmietanka kremówkaŚmietanka kremówka10 l
Sól morska gruboziarnistaSól morska gruboziarnista1 sztuka
WodaWoda1 sztuka

Potrzebne narzędzia:

Termometr z sondą pozostawianą w potrawieTermometr z sondą pozostawianą w potrawie

StoperStoper
Cyfrowa waga kuchennaCyfrowa waga kuchenna
Duża misa ze stali nierdzewnejDuża misa ze stali nierdzewnej
12

Troubleshooting

Hinged-arm churn troubleshooting.

Flow

Loading...
13

History and honest limits

**John Stilwell** of Griffin, Spalding County, Georgia, US 32,388, 21 May 1861, "Churn". He claimed "the combination of the brace bar M, hinged arm G, buttons O, O', with a vertical barrel churn and rotary dasher shaft L". He neither drew nor described the dasher on the shaft; ours is two crossed slats. His churn was a hooped barrel and his gears bevel wheels; ours are a bucket and a printed crown wheel and pinion. The patent gives no sizes; every size here is ours.

Materiały

14

Wymagane narzędzia

19

Pliki projektowe

4

CC0 Domena publiczna

Ten plan jest udostępniany na licencji CC0. Możesz go swobodnie kopiować, modyfikować, rozpowszechniać i wykorzystywać do dowolnych celów, bez konieczności uzyskiwania zgody.

Wesprzyj Makera kupując produkty przez jego plan, za co zarabia Prowizja Makera ustalony przez sprzedawców, lub stwórz nową iterację tego planu i dołącz go jako połączenie w swoim własnym planie, aby dzielić się przychodami.

Dyskusja

(0)

Zaloguj się aby dołączyć do dyskusji

Ładowanie komentarzy...