Współpraca
SZTUKA
Piękno i dobre samopoczucie
RZEMIOSŁO
KULTURA I HISTORIA
ROZRYWKA
ŚRODOWISKO
JEDZENIE I NAPOJE
INŻYNIERIA ODWROTNA
NAUKI
LEKKOATLETYKA
TECHNOLOGIA
URZĄDZENIA DO NOSZENIA
Leaning-Scoop Churn: Three Scoops Tilted 10, 5 and 0 Degrees Throw the Cream at Sharp-Topped Ribs and a Slit Cover
Buttercup

Autor

Buttercup

11. listopad 2026IE
8
0
0
0
0

Leaning-Scoop Churn: Three Scoops Tilted 10, 5 and 0 Degrees Throw the Cream at Sharp-Topped Ribs and a Slit Cover

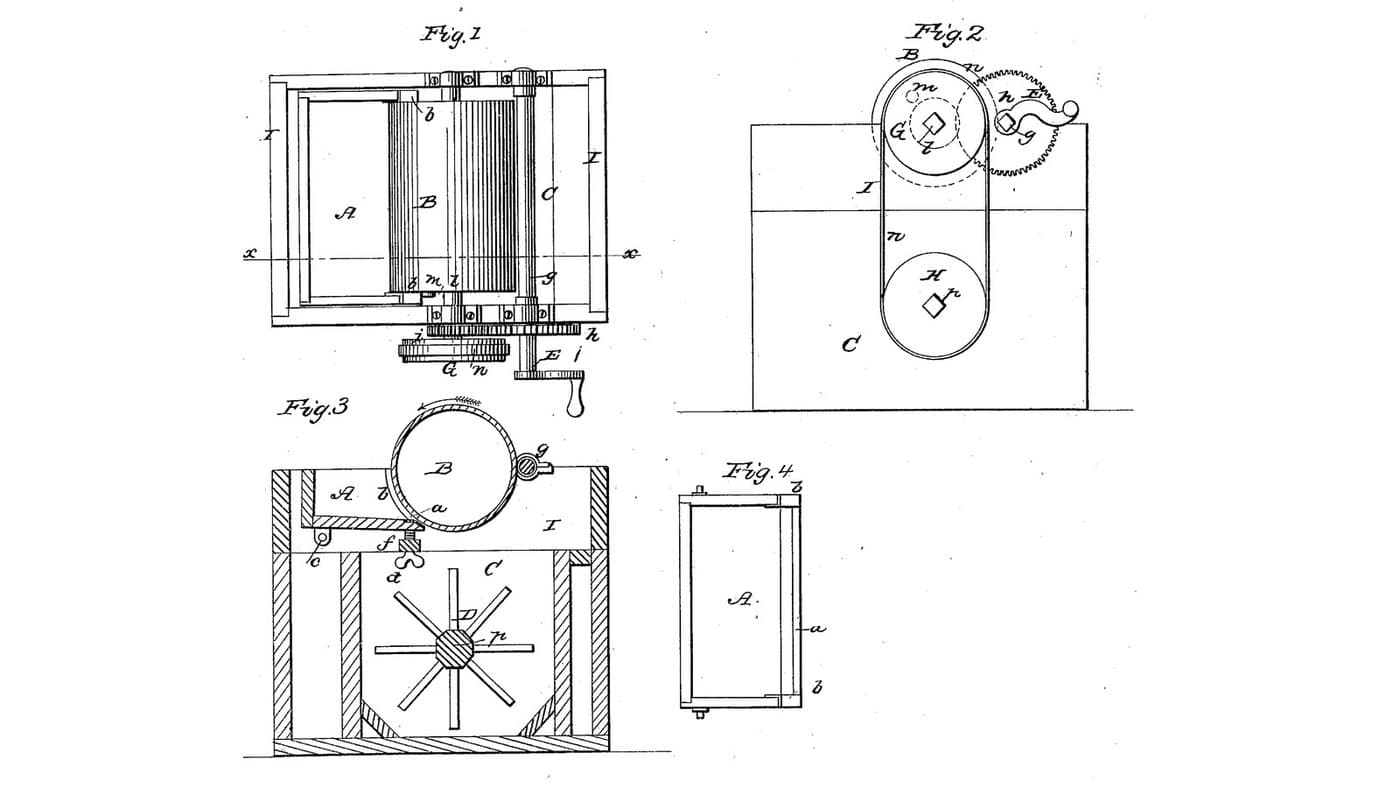
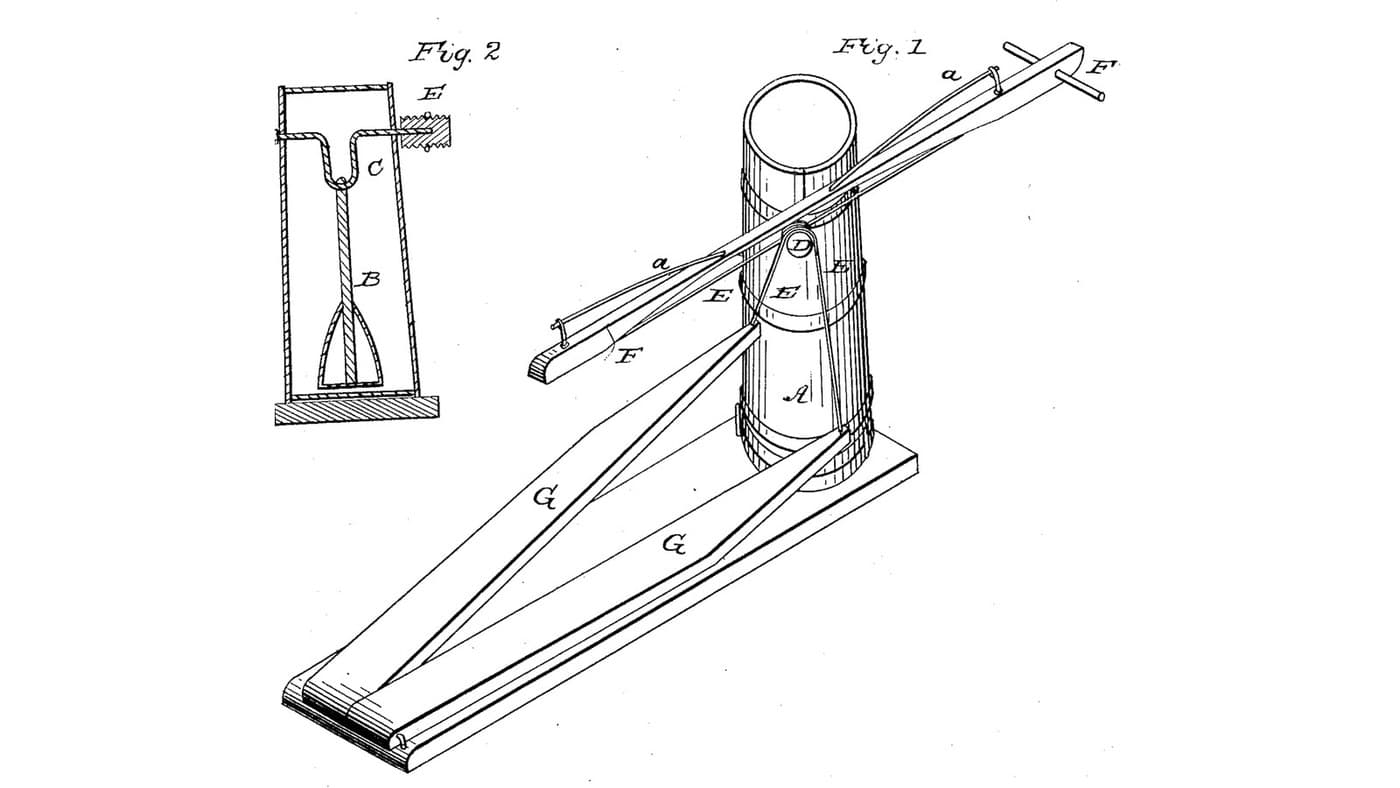
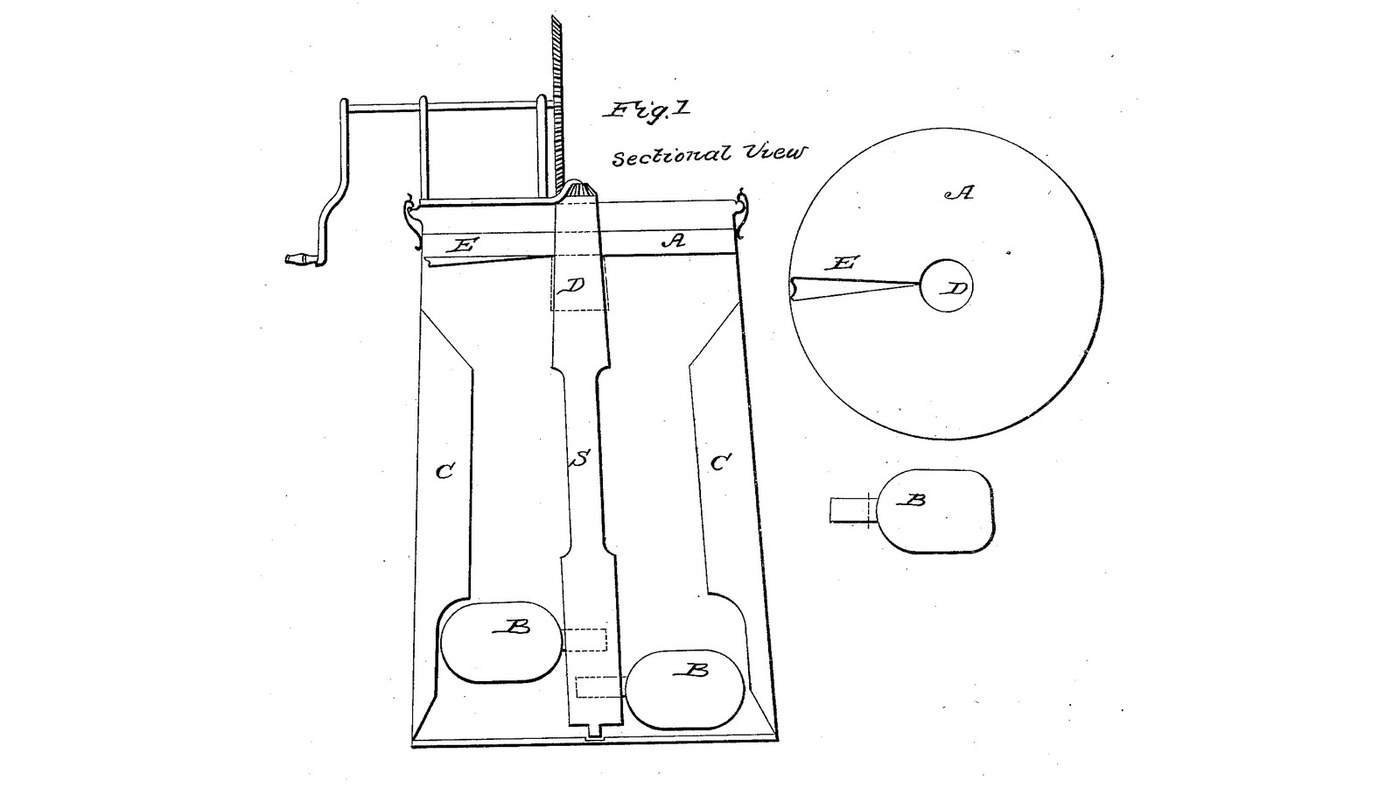
Daniel H. Wiswell of Buffalo, New York, received US 27,504, dated 13 March 1860, for a churn. Three concave scoops on a crank-turned upright shaft lean back by different amounts, 10, 5 and 0 degrees, and throw the cream against ribs on the wall, whose tops slant down to a sharp edge, and up against an inner cover slit on one side with one lip raised over the other. The patent gives no sizes; every size here is ours, and so is our reading of where the scoops sit.
Średniozaawansowany
About 2 days, plus printing

Instrukcje

1

Three scoops, three leans

Wczytywanie notatnika Jupyter…
2

An upright churn worked from the top, one month before

Willson strokes his dasher up and down. Wiswell turns his scoops round an upright shaft.
3

Read US 27,504

"The nature of my invention and improvement consists in the application of the scoops or arms marked B inserted in a shaft marked S, one at the base, the upper edge of which scoop or arm leans backward ten degrees; the second, one third distant to the left, the upper edge of which leans backward five degrees; the third, one third distant from the second and above the other at right angles."
4

Print the scoop leaning 10 degrees

Concave scoop 90 mm long and 64 across, its stem 12 mm, the scoop turned 10 degrees on the stem. PETG, 0.2 mm layers, 40 % infill, 4 walls.
Plik projektowySTLCC0 - Free
5

Print the scoop leaning 5 degrees

The same scoop turned 5 degrees on its stem. PETG, 0.2 mm layers, 40 % infill, 4 walls.
Plik projektowySTLCC0 - Free
6

Print the upright scoop

The same scoop, upright on its stem. PETG, 0.2 mm layers, 40 % infill, 4 walls.
Plik projektowySTLCC0 - Free
7

Print the crown wheel

Crown wheel, 36 teeth on its face, module 2, with a hub; bored 12.4 mm. PETG, 0.2 mm layers, 40 % infill, 4 walls.
Plik projektowySTLCC0 - Free
8

Print the pinion

Spur pinion, 12 teeth, module 2, with a hub; bored 12.4 mm. PETG, 0.2 mm layers, 40 % infill, 4 walls.
Plik projektowySTLCC0 - Free
9

Shaft S, spindle box F and scoops B

Cut a 35 mm hardwood dowel 348 mm long for the shaft and drill 12 mm stainless spindles 30 mm into each end, the lower one standing out 15 mm, the upper one 70 mm. Screw a hardwood block 60 x 60 x 20 mm to the bucket's floor centre as the spindle box F and bore it 12.6 mm, 15 deep. Bore three 12 mm holes into the shaft for the scoops' stems, a third of a turn apart, 56, 86 and 116 mm above the floor, and glue the scoops in, the 10-degree one lowest, the upright one highest, each leaning back against the way the shaft turns.

Materiały do tego kroku:

Wiadro 20-litroweWiadro 20-litrowe1 sztuka
Kołki z twardego drewnaKołki z twardego drewna1 sztuka
Pręt ze stali nierdzewnejPręt ze stali nierdzewnej1 sztuka
Klocek z drewna twardegoKlocek z drewna twardego1 sztuka
Klej do drewnaKlej do drewna1 sztuka
Wkręty do drewnaWkręty do drewna2 sztuk
Uszczelniacz silikonowyUszczelniacz silikonowy1 sztuka
Filament PETGFilament PETG1 sztuka

Potrzebne narzędzia:

Drukarka 3D z filamentem (FDM)Drukarka 3D z filamentem (FDM)
Piła do metaluPiła do metalu
Wiertarko-wkrętarka akumulatorowaWiertarko-wkrętarka akumulatorowa
Zestaw wiertełZestaw wierteł
Pilniki (pilnik ręczny)Pilniki (pilnik ręczny)
Imadło warsztatoweImadło warsztatowe
KątomierzKątomierz
Zestaw wkrętakówZestaw wkrętaków
10

Ribs C

Cut four hardwood ribs 20 mm thick and 25 deep, 100 mm long on the inner edge and with their tops slanting down from the wall to the inner edge over 40 mm; plane both faces of the slant to a sharp edge. Screw them inside the bucket a quarter turn apart, 160 mm up from the floor, and seal each screw hole outside with silicone.

Materiały do tego kroku:

Deska z drewna liściastegoDeska z drewna liściastego1 sztuka
Wkręty do drewnaWkręty do drewna8 sztuk
Uszczelniacz silikonowyUszczelniacz silikonowy1 sztuka

Potrzebne narzędzia:
Pilarka stołowaPilarka stołowa
Papier ściernyPapier ścierny
Wiertarko-wkrętarka akumulatorowaWiertarko-wkrętarka akumulatorowa
Zestaw wiertełZestaw wierteł
Zestaw wkrętakówZestaw wkrętaków
11

Inner cover A, tube D and slit E

Cut a disc of 3 mm HDPE sheet to fit inside the bucket 300 mm up, with a 40 mm hole in the centre, and fit a printed or hardwood tube D 48 mm across and 60 long in the hole round the shaft. Saw a slit E from the tube to the rim; warm the sheet beside it with the heat gun and lift one side 15 mm so it projects over the other. Screw three small hardwood cleats inside the bucket for the cover to rest on.

Materiały do tego kroku:

Płyta HDPEPłyta HDPE1 sztuka
Deska z drewna liściastegoDeska z drewna liściastego1 sztuka
Wkręty do drewnaWkręty do drewna6 sztuk
Uszczelniacz silikonowyUszczelniacz silikonowy1 sztuka

Potrzebne narzędzia:

WyrzynarkaWyrzynarka
OpalarkaOpalarka
Wiertarko-wkrętarka akumulatorowaWiertarko-wkrętarka akumulatorowa
Zestaw wiertełZestaw wierteł
Pilniki (pilnik ręczny)Pilniki (pilnik ręczny)
Zestaw wkrętakówZestaw wkrętaków
12

Bridge and crank

Cut a hardwood bridge 350 x 205 x 25 mm to sit on the bucket's rim and bore it 13 mm over the centre for the shaft's upper spindle; fit the pinion on the spindle above it. Screw two hardwood chairs on the bridge carrying a 12 mm stainless crank shaft with the crown wheel meshing the pinion, and fit a hardwood crank with a dowel handle on its outer end; hold it with collars.

Materiały do tego kroku:

Deska z drewna liściastegoDeska z drewna liściastego2 sztuk
Pręt ze stali nierdzewnejPręt ze stali nierdzewnej1 sztuka
Kołki z twardego drewnaKołki z twardego drewna1 sztuka
Klej do drewnaKlej do drewna1 sztuka
Wkręty do drewnaWkręty do drewna8 sztuk
Shaft CollarShaft Collar2 sztuk
ZawleczkaZawleczka1 sztuka

Potrzebne narzędzia:

Pilarka stołowaPilarka stołowa
Wiertarko-wkrętarka akumulatorowaWiertarko-wkrętarka akumulatorowa
Zestaw wiertełZestaw wierteł
Zestaw wierteł łopatkowychZestaw wierteł łopatkowych
Piła do metaluPiła do metalu
Ścisk stolarski listwowyŚcisk stolarski listwowy
Zestaw wkrętakówZestaw wkrętaków
Miara zwijanaMiara zwijana
13

The build in 3D

FreeCAD model of this build, the bucket cut through the middle: the shaft S on its spindle box, the three leaning scoops, the ribs, the slit inner cover with its tube, and the bridge with the crank, crown wheel and pinion.
Plik projektowyBLENDCC0 - Free
14

Churn

Pour about 6 litres of heavy cream at about 15 °C, checked with the thermometer, into the bucket, set the shaft in its box, lay the cover over the shaft on its cleats, and set the bridge and gearing on the rim. Turn the crank steadily, timing it, so the scoops travel with their hollows forward. When the butter comes, lift off the bridge, cover and shaft, take out the butter, pour the buttermilk into a bowl, wash the butter in cold water until it runs clear, salt and weigh it.

Materiały do tego kroku:

Śmietanka kremówkaŚmietanka kremówka6 l
Sól morska gruboziarnistaSól morska gruboziarnista1 sztuka
WodaWoda1 sztuka

Potrzebne narzędzia:

Termometr z sondą pozostawianą w potrawieTermometr z sondą pozostawianą w potrawie

StoperStoper
Cyfrowa waga kuchennaCyfrowa waga kuchenna
Duża misa ze stali nierdzewnejDuża misa ze stali nierdzewnej
15

Troubleshooting

Leaning-scoop churn troubleshooting.

Flow

Loading...
16

History and honest limits

**Daniel H. Wiswell** of Buffalo, New York, US 27,504, 13 March 1860, "Churn", assigned to Chas. W. Adams and Debby Pinner. He claimed the inner cover A, the scoops B, and the sharp edge and slant of the ribs' tops, combined. His text does not make plain where each scoop sits; ours are a third of a turn apart, each higher than the last, the third upright. His spindle box is lignum vitae or hemlock knot; ours is hardwood. Every size here is ours.

Materiały

15

Wymagane narzędzia

19

Pliki projektowe

6

CC0 Domena publiczna

Ten plan jest udostępniany na licencji CC0. Możesz go swobodnie kopiować, modyfikować, rozpowszechniać i wykorzystywać do dowolnych celów, bez konieczności uzyskiwania zgody.

Wesprzyj Makera kupując produkty przez jego plan, za co zarabia Prowizja Makera ustalony przez sprzedawców, lub stwórz nową iterację tego planu i dołącz go jako połączenie w swoim własnym planie, aby dzielić się przychodami.

Dyskusja

(0)

Zaloguj się aby dołączyć do dyskusji

Ładowanie komentarzy...