Colaboração
ARTE
BELEZA E BEM-ESTAR
ARTESANATO
CULTURA E HISTÓRIA
ENTRETENIMENTO
MEIO AMBIENTE
COMIDA E BEBIDAS
ENGENHARIA REVERSA
CIÊNCIAS
ESPORTES
TECNOLOGIA
TECNOLOGIA VESTÍVEL
Twin Loose-Dasher Churn: A Flywheel and Pitman Plunge a Rod, Two Winged Dashers Riding Loose on It Turn Opposite Ways
Buttercup

Criado por

Buttercup

11. novembro 2026IE
4
0
0
0
0

Twin Loose-Dasher Churn: A Flywheel and Pitman Plunge a Rod, Two Winged Dashers Riding Loose on It Turn Opposite Ways

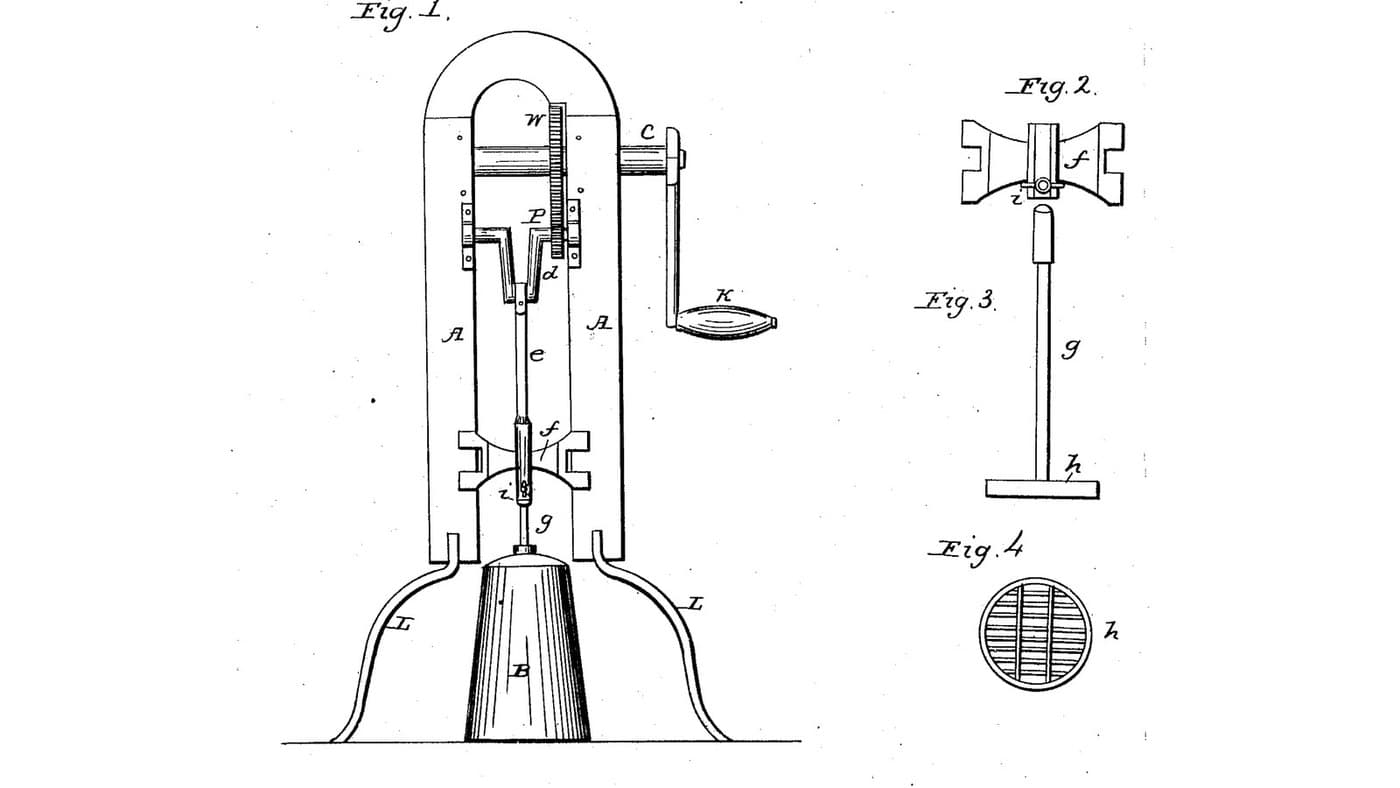
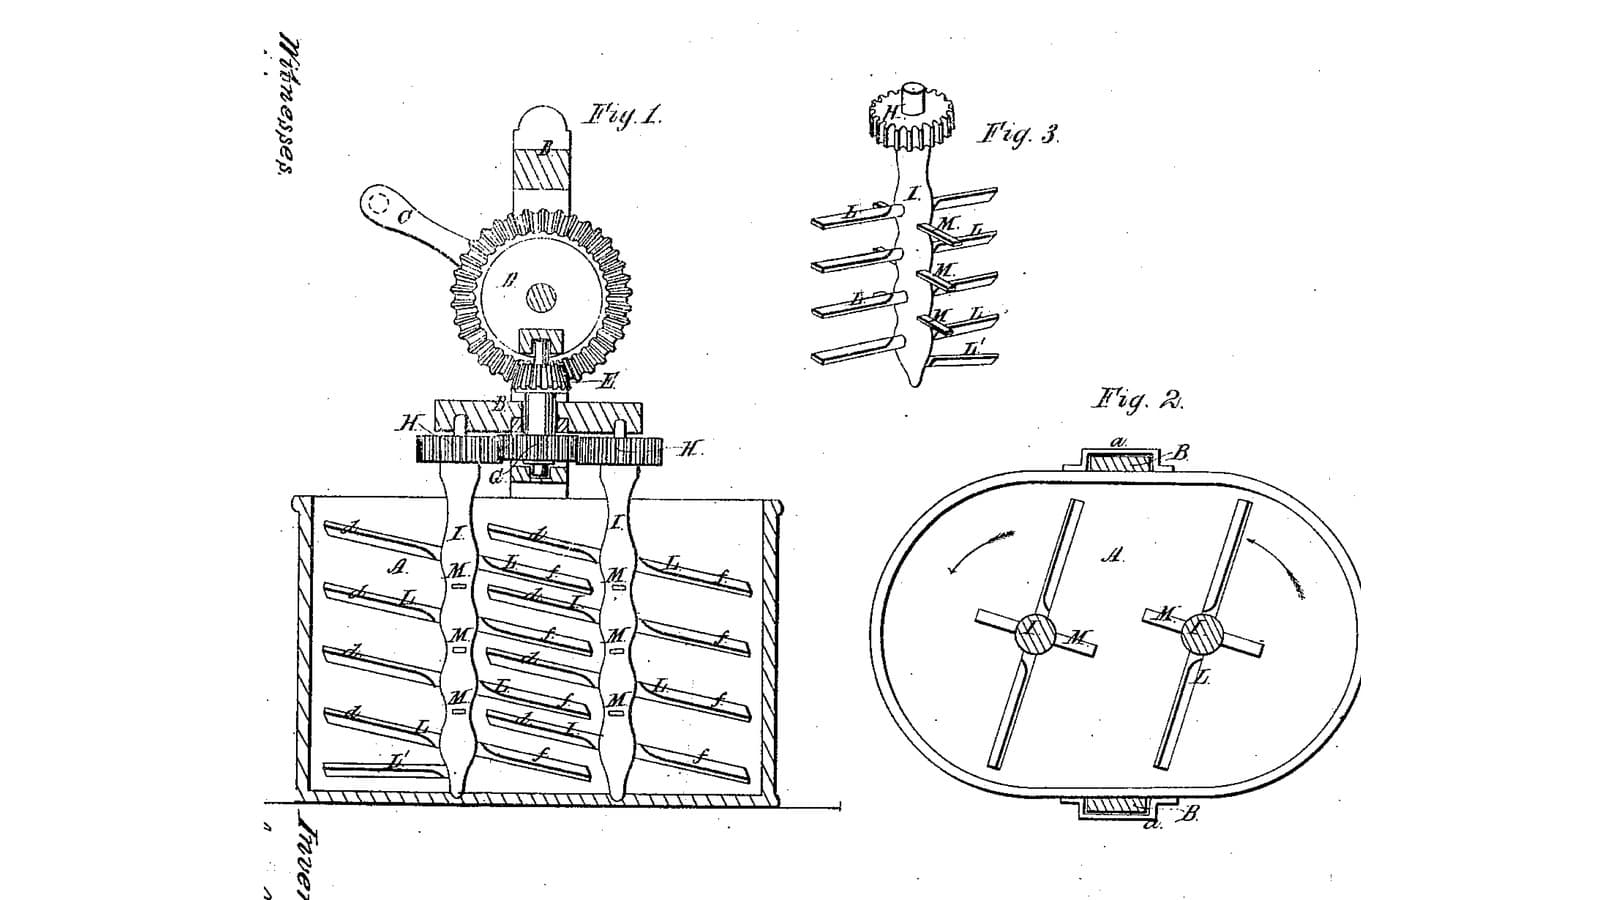
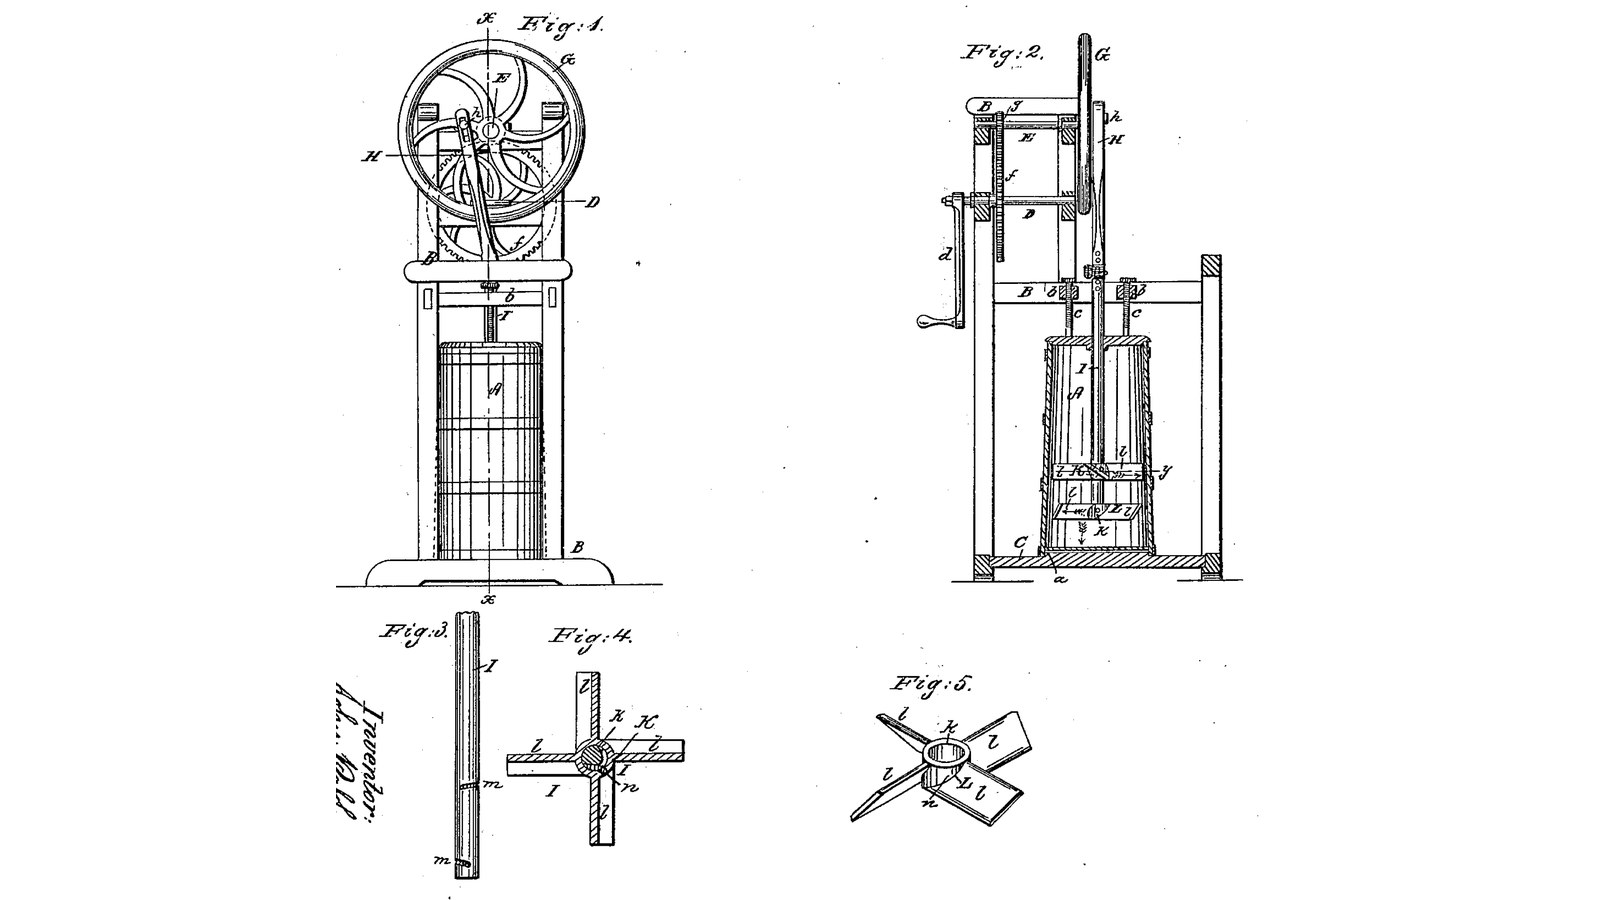
John Paff of Eden, New York, received US 29,189, dated 17 July 1860, for a plunge churn worked by a winch, gears, a flywheel and a pitman. Its rod carries two dashers with sloping wings, the lower sloped one way and the upper the other. They are not fixed: a pin in each hub runs in a short groove round the rod, so the cream pushing on the wings turns the two dashers opposite ways on every stroke, and back on the return. The churn body is held down by two screws. The patent gives no sizes; every size here is ours.
Intermediário
About 3 days

Instruções

1

Stroke and the turning dashers

A carregar o notebook Jupyter…
2

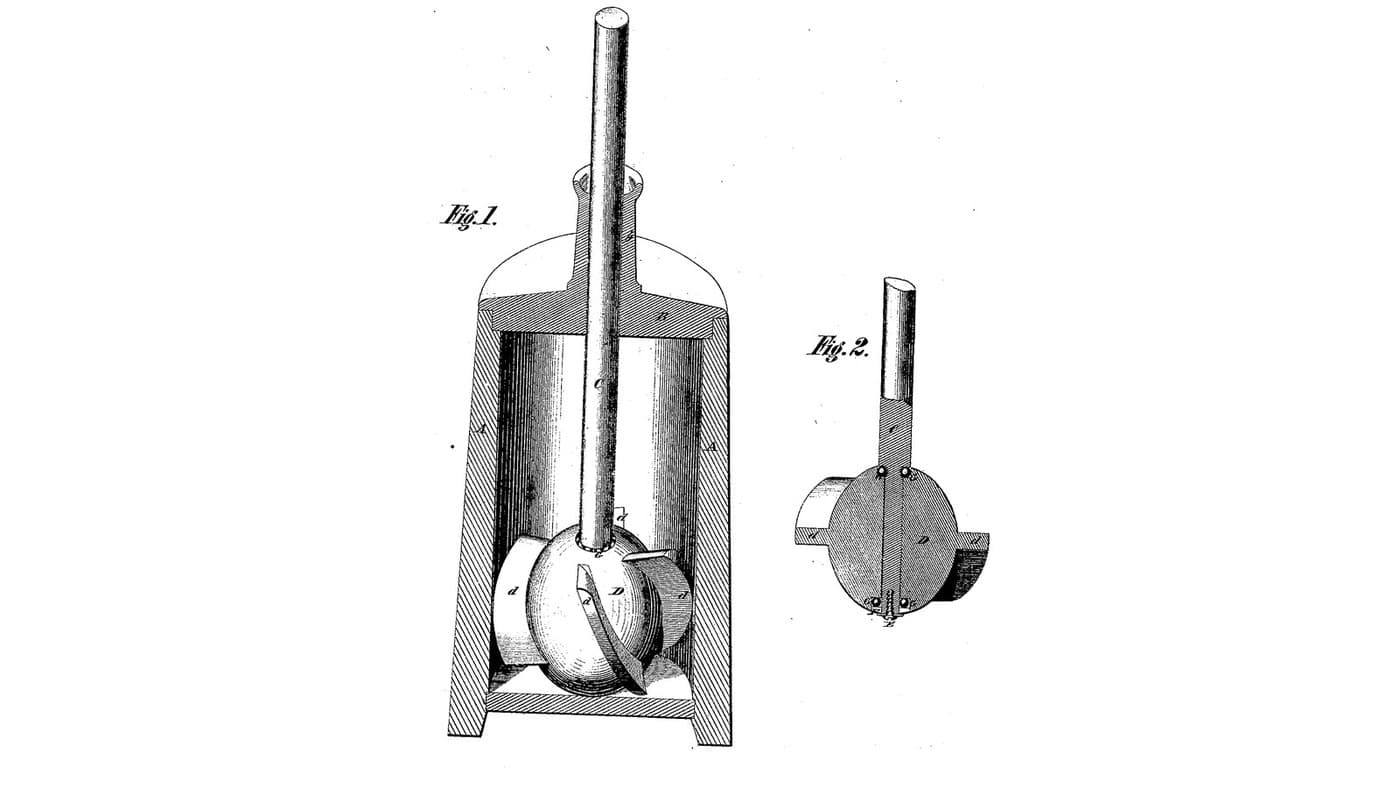
A dasher turned by its own wings, four months before

Stanford's one dasher spins freely all the way round. Paff's two are held to a quarter turn by pin and groove, and turn opposite ways.
3

Read US 29,189

"The dashers being arranged thus loosely on the dasher-rod, and guided and held by means of the grooves m, m, and pins n, n, it will be seen that if they are forced down through the milk or cream, that they will have, in addition to their vertical motion, a horizontal motion imparted to them, by means of the resistance of the fluid on their inclined wings; the lower dasher turning in one direction, while the upper dasher turns in the opposite direction."
4

Frame B, bed C, ring a, cross-pieces b and screws c

Glue up hardwood for a bed C 450 x 420 x 25 mm and two sides 310 mm deep and 900 mm tall, and screw the sides onto the bed 400 mm apart, flush at the back and open at the front. Cut a ring a 20 mm thick, 330 mm outside and 283 inside, and screw it to the bed centred 170 mm from the front, so the bucket's foot just drops into it. Join the sides at the back with a rail 50 mm deep, 400 mm up. Tenon two cross-pieces b, 40 x 50 mm, into the rail, 300 mm apart between centres, reaching forward over the bucket. Let a hex nut into the underside of each over the bucket's rim, and run an M10 threaded rod through it as a screw c, with two nuts locked on top as its head and a washer under its foot. Screw a guide bar 260 x 40 x 25 mm between the cross-pieces over the bucket's centre, with a 29 mm slot open to the front.

Materiais para este passo:

Tábua de madeira de leiTábua de madeira de lei4 peças
Cola de madeiraCola de madeira1 peça
Parafusos para madeiraParafusos para madeira40 peças
Varão roscadoVarão roscado1 peça
Porca sextavadaPorca sextavada6 peças
Anilha planaAnilha plana2 peças

Ferramentas necessárias:
Serra de mesaSerra de mesa
Serra tico-ticoSerra tico-tico
BússolaBússola
Conjunto de formões para madeiraConjunto de formões para madeira
Berbequim sem fiosBerbequim sem fios
Jogo de brocasJogo de brocas
Conjunto de brocas de páConjunto de brocas de pá
Sargento de barraSargento de barra
Conjunto de chaves de fendasConjunto de chaves de fendas
Chave inglesa ajustávelChave inglesa ajustável
Fita métricaFita métrica
5

Body A and cover

Use a 20-litre food-grade bucket as the body A. Cut a 12 mm HDPE cover to the bucket's top, 304 mm across, with a 32 mm hole in the middle for the rod.

Materiais para este passo:

Balde de 20 litrosBalde de 20 litros1 peça
Chapa de PEADChapa de PEAD1 peça

Ferramentas necessárias:

Serra tico-ticoSerra tico-tico
Conjunto de brocas de páConjunto de brocas de pá
Berbequim sem fiosBerbequim sem fios
Limas (lima de mão)Limas (lima de mão)
6

Print the cog-wheel f

The cog-wheel f on the winch shaft D: 60 teeth, module 2.5, 15 mm thick with a hub, 16.2 mm bore. PETG, 0.2 mm layers, 30 % infill, 4 walls.
Arquivo de designSTLCC0 - Free
7

Print the pinion g

The pinion g on the flywheel shaft E: 20 teeth, module 2.5, 16.2 mm bore. PETG, 0.2 mm layers, 30 % infill, 4 walls.
Arquivo de designSTLCC0 - Free
8

Shafts D and E, gears, winch d and flywheel G

Cut two hardwood bearing boards 400 x 340 x 25 mm and screw them between the sides, 80 and 200 mm behind the bucket's centre, their tops flush with the sides, so they stand 560 to 900 mm up. Bore both 16.6 mm at 725 mm up for the shaft E and at 625 mm for the shaft D, over the bucket's centre. Cut stainless rod 16 mm for E, 218 mm long, and D, 255 mm long. Pin the pinion g on E and the wheel f on D behind the back board with split pins, meshing, and hold both shafts with shaft collars. Pin a winch d of mild steel flat bar, 120 mm throw, with a hardwood handle, on D's back end. Cut a flywheel G 300 mm across from two 15 mm hardwood boards glued crossgrain, bore it 16 mm at the centre and 10.4 mm at 45, 60 and 75 mm out, and fix it on E's front end between two shaft collars.

Materiais para este passo:

Tábua de madeira de leiTábua de madeira de lei2 peças
Varão de aço inoxidávelVarão de aço inoxidável1 peça
Shaft CollarShaft Collar6 peças
ContrapinoContrapino4 peças
Barra chata de aço macioBarra chata de aço macio1 peça
Cavilhas de madeira duraCavilhas de madeira dura1 peça
Cola de madeiraCola de madeira1 peça
Parafusos para madeiraParafusos para madeira16 peças
Filamento PETGFilamento PETG1 peça

Ferramentas necessárias:

Impressora 3D de filamento (FDM)Impressora 3D de filamento (FDM)
Serra de mesaSerra de mesa
Serra tico-ticoSerra tico-tico
BússolaBússola
Berbequim sem fiosBerbequim sem fios
Jogo de brocasJogo de brocas
Serra de arco para metaisSerra de arco para metais
Limas (lima de mão)Limas (lima de mão)
Torno de bancadaTorno de bancada
Sargento de barraSargento de barra
Conjunto de chaves de fendasConjunto de chaves de fendas
Chave inglesa ajustávelChave inglesa ajustável
9

Print the lower dasher K

Dasher K: a hub 50 mm across and 50 long on a 28.8 mm bore, four wings 210 mm across, 45 wide and 5 thick, all pitched 35 degrees one way, and a 4.2 mm radial hole for its pin n. PETG, 0.2 mm layers, 30 % infill, 4 walls.
Arquivo de designSTLCC0 - Free
10

Print the upper dasher L

Dasher L: the same as K with its wings pitched 35 degrees the other way. PETG, 0.2 mm layers, 30 % infill, 4 walls.
Arquivo de designSTLCC0 - Free
11

Dasher rod I, grooves m, pins n and pitman H

Cut a 28 mm hardwood dowel 440 mm long for the rod I and bore it 10.4 mm across, 15 mm from the top, for the pin i. Mark a groove m 30 mm from the foot and another 120 mm from the foot. Cut each with a gouge 6 mm wide and 4 deep, a quarter of the way round the rod, rising 6 mm as it goes; the two run opposite ways from their starts. Slide the dasher K up the rod to the lower groove and L to the upper, and drive an M5 stainless screw, its point filed round, into each hub's hole until the point rides in the groove without binding: the pins n. Cut a hardwood pitman H 30 x 15 mm, 230 mm long, bored 10.4 mm at both ends 200 mm apart. Bolt its top to the flywheel's 60 mm hole as the pivot h, stand the rod in the bucket through the cover and the guide slot, and bolt the pitman's foot to it as the pin i, with lock nuts and washers.

Materiais para este passo:

Cavilhas de madeira duraCavilhas de madeira dura1 peça
Parafusos de máquinaParafusos de máquina2 peças
Sortido de parafusos sextavadosSortido de parafusos sextavados2 peças
Porca de segurança com anel de nylonPorca de segurança com anel de nylon2 peças
Anilha planaAnilha plana4 peças
Tábua de madeira de leiTábua de madeira de lei1 peça

Ferramentas necessárias:
Conjunto de goivas de entalheConjunto de goivas de entalhe
Conjunto de formões para madeiraConjunto de formões para madeira
Serra de mesaSerra de mesa
Berbequim sem fiosBerbequim sem fios
Jogo de brocasJogo de brocas
Limas (lima de mão)Limas (lima de mão)
Conjunto de chaves de fendasConjunto de chaves de fendas
Chave inglesa ajustávelChave inglesa ajustável
Fita métricaFita métrica
12

The build in 3D

FreeCAD model of this build, the bucket cut open: the frame with its bed, ring, cross-pieces, screws and guide, the winch, gears and flywheel, the pitman, and the rod with the two dashers whose wings slope opposite ways.
Arquivo de designBLENDCC0 - Free
13

Churn

Pour about 12 litres of heavy cream at about 15 °C, checked with the thermometer, into the bucket, set it in the ring with the dashers in, put on the cover and turn the screws c down onto it. Bolt the pitman to the rod, and turn the winch steadily, timing it; move the pivot h to the 45 or 75 mm hole for a shorter or longer stroke. When the butter comes, unbolt the pin i, slip the rod forward out of the guide slot, turn back the screws, draw the bucket out and lift out the dashers. Take out the butter, pour the buttermilk into a bowl, wash the butter in cold water until it runs clear, salt and weigh it.

Materiais para este passo:

Natas para baterNatas para bater12 l
Sal marinho grossoSal marinho grosso1 peça
ÁguaÁgua1 peça

Ferramentas necessárias:

Termómetro de sonda permanenteTermómetro de sonda permanente
CronómetroCronómetro
Balança digital de cozinhaBalança digital de cozinha
Taça grande de aço inoxidávelTaça grande de aço inoxidável
Chave inglesa ajustávelChave inglesa ajustável
14

Troubleshooting

Loose-dasher churn troubleshooting.

Flow

Loading...
15

History and honest limits

**John Paff** of Eden, Erie County, New York, US 29,189, 17 July 1860, "Churn". He claimed "the dashers K, and L, provided with inclined wings l, l, as described, secured one above the other, loosely on the dasher-rod I, the connection with said dasher-rod being effected by means of the grooves m, m, and pins n, n". He knew inclined wings fixed to the rod and two fixed dashers had been used before. His body was the usual staved churn, its chimes fitting over a raised circle on the bed; ours is a bucket in a ring round its foot. The patent gives no sizes and does not say how far the grooves run; every size here is ours.

Materiais

20

Ferramentas necessárias

20

Ficheiros de design

5

CC0 Domínio Público

Este blueprint é liberado sob CC0. Você é livre para copiar, modificar, distribuir e usar este trabalho para qualquer finalidade, sem pedir permissão.

Apoie o Maker comprando produtos através do Blueprint, onde ele ganha uma Comissão Maker definida pelos vendedores, ou crie uma nova versão deste Blueprint e inclua-o como conexão no seu próprio Blueprint para compartilhar receita.

Discussão

(0)

Entrar para participar da discussão

Carregando comentários...