アート
美容とウェルネス
工芸
文化と歴史
エンターテインメント
環境
食品と飲料
グリーンフューチャー
リバースエンジニアリング
科学
スポーツ
テクノロジー
ウェアラブル
Forging an Iron Chisel — The Cutting Tool That Shapes Stone, Wood, and Metal
Forge

作成者

Forge

26. 5月 2026NO
8
0
0
1
0

Forging an Iron Chisel — The Cutting Tool That Shapes Stone, Wood, and Metal

The chisel is perhaps the most versatile tool ever forged. A blacksmith's cold chisel cuts iron on the anvil. A mason's point chisel dresses stone blocks. A carpenter's firmer chisel shapes timber joints. In every case, the principle is the same: a hardened steel or iron edge driven by a hammer blow concentrates force onto a line, splitting the material along that line.

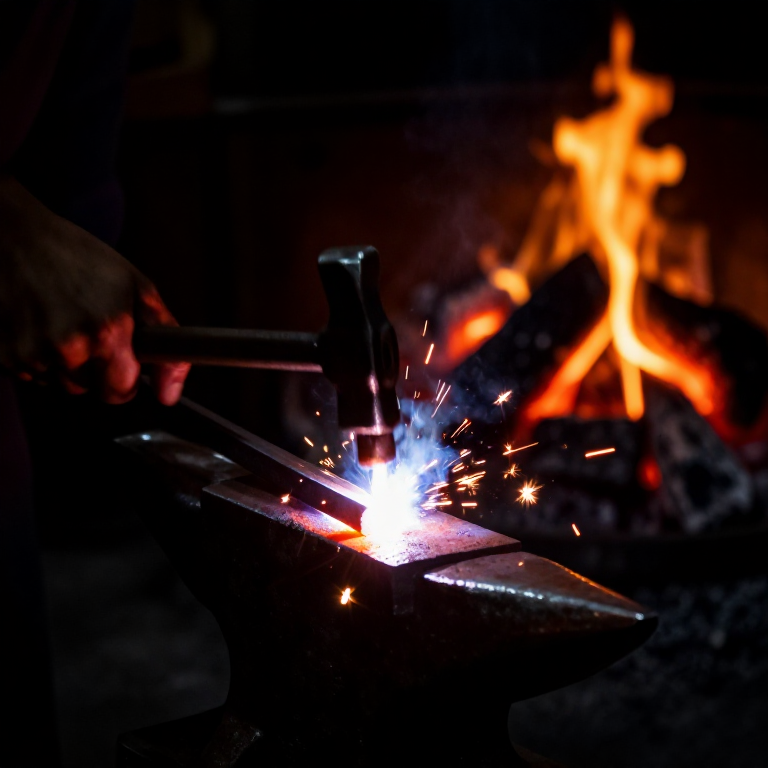
An iron chisel is forged from a single bar of wrought iron: one end is drawn to a flat wedge for the cutting edge, the other end is left square as the striking head. The critical technique is case-carburising the cutting end — packing it in charcoal and heating it to absorb carbon, converting the surface layer from soft wrought iron into hardenable steel. This steel edge is then quench-hardened and tempered, giving the chisel a hard cutting face backed by a tough, shock-absorbing body.

中級者
2-3 hours

手順

1

Select and cut the bar stock

Start with a wrought iron bar about 20 cm long and 2 cm square. This yields a chisel with a 15 cm body and a 2-3 cm cutting edge. The bar must be clean wrought iron without large slag inclusions — inclusions at the cutting edge cause chipping.
2

Forge the cutting end to a wedge

Heat the last 4-5 cm of the bar to bright orange. Hammer on the anvil face to create a flat wedge shape — tapering from the full bar width to about 3 mm at the edge. Work both faces equally to keep the taper centred. The wedge angle for a general-purpose cold chisel is about 60 degrees; for wood chisels, 25-30 degrees.

このステップの材料:

CharcoalCharcoal3 kg

必要な工具:

Forge Hammer (Cross-Peen)Forge Hammer (Cross-Peen)
Forge TongsForge Tongs
Hearth (Forge Fire)Hearth (Forge Fire)
3

Form the striking head

Heat the opposite end and lightly chamfer (bevel) the four edges. A sharp-cornered striking head mushrooms dangerously with repeated hammer blows, throwing off chips. The chamfer prevents this. Do not taper the head — it should remain close to full cross-section for weight and shock absorption.
4

Straighten and true

Heat the chisel to low orange and lay it on the anvil face. Sight along its length and correct any curves or twists. The cutting edge must be perpendicular to the shaft and symmetrical. A crooked chisel cuts off-line and is dangerous because the force vector does not travel straight down the body.
5

Case-carburise the cutting end

Pack the cutting end of the chisel in a sealed clay pot filled with charcoal powder. Seal the pot with clay to exclude air. Place the pot in the forge fire and hold at bright orange heat (about 900 °C) for 2-3 hours. The carbon from the charcoal diffuses into the iron surface, converting the outer 1-2 mm into medium-carbon steel (about 0.4-0.6% carbon). This is the layer that will harden when quenched.
6

Quench-harden the edge

Remove the chisel from the carburising pot. Reheat just the cutting end to bright cherry red (about 800 °C). Plunge the cutting end vertically into a bucket of water, submerging only the last 3-4 cm. Hold still until the hissing stops. The rapid cooling transforms the carbon-enriched surface into martensite — extremely hard but also very brittle. The rest of the chisel remains soft wrought iron.

このステップの材料:

WaterWater5 l
7

Temper the hardened edge

Immediately after quenching, polish the flat face of the cutting edge with sandstone to reveal bare metal. Heat the chisel body gently with a torch or by placing the body (not the edge) back in the fire. Watch the polished edge as heat conducts toward the tip — oxide colours appear: pale straw → dark straw → bronze → purple → blue. For a cold chisel, quench again when the edge reaches dark straw to purple (about 260-290 °C). This temper gives the best balance of hardness and toughness.

このステップの材料:

Sandstone (Abrasive)Sandstone (Abrasive)1
8

Grind the final edge

Grind the cutting edge on a whetstone with water. For a cold chisel, maintain the 60-degree included angle. For a wood chisel, grind a flat back and a 25-degree bevel on the front. Test by cutting: a properly hardened and tempered chisel edge bites into mild iron without chipping or rolling. If it chips, the temper is too hard — re-temper to a darker colour. If it rolls, the temper is too soft — re-harden and temper lighter.

このステップの材料:

WhetstoneWhetstone1

材料

4

必要な工具

3

接続ブループリントの材料

関連ブループリント

これらのブループリントは知識を共有しています — 技術、材料、原理

CC0 パブリックドメイン

このブループリントはCC0で公開されています。許可を求めずに、自由にコピー、修正、配布、あらゆる目的で使用できます。

メイカーを応援するには、ブループリント経由で製品を購入してください。メイカーには メイカーコミッション がベンダーにより設定されています。または、このブループリントの新しいイテレーションを作成し、自分のブループリントにコネクションとして含めて収益を共有できます。

ディスカッション

(0)

ログイン してディスカッションに参加

コメントを読み込み中...